Skip to content


No matter how dedicated your support team is, there will be times when things don’t go as planned. Maybe a customer didn’t get their order on time. Maybe your product didn’t quite meet their expectations. Or maybe, despite your best efforts, they still feel unheard.
When that happens, customers often want their issue taken to someone with more authority or expertise. That’s where you need a solid escalation management process. It gives you and your team a clear path to follow, so tough cases don’t spiral into bigger problems, and customers know their concerns are being taken seriously.
In this blog, we’ll discuss escalation management, the different types you’ll encounter, and 8 practical tips to help you handle escalations smoothly.
Table of Contents
- What is Escalation Management?
- What are the Benefits of Escalation Management?
- The Escalation Management Process: Step-by-Step Guide
- 8 Best Practices for Escalation Management
- 1. Define Clear and Measurable SLAs
- 2. Set Up Automated Escalation Paths for SLA Breaches
- 3. Conduct a Thorough RCA (Root Cause Analysis)
- 4. Train Agents to Respond with Empathy and Emotional Intelligence
- 5. Keep Your Customers in the Loop
- 6. Empower Your Agents with the Right Tools
- 7. Provide more autonomy to your support staff
- 8. Document Escalation Cases
- Escalation Management Metrics: What to Measure and Why
- Common Challenges of Escalation Management
- Create Positive Customer Experiences Even When Things Go Wrong
- Frequently Asked Questions (FAQs)
What is Escalation Management?
Escalation management is the process of identifying, categorizing, and resolving customer issues that frontline agents can’t handle. These issues are typically too complex, critical, or have gone unanswered for too long. So, they are “escalated” to specialized teams with higher authority and expertise to provide a solution quickly.
For example, if a customer can’t log in, the frontline support team will try the usual troubleshooting steps. If that doesn’t work, they’ll pass it to the technical team, who dig in, find a backend server error, and fix it. This way, a small hiccup doesn’t snowball into a big problem or an unhappy customer.
What are the different types of escalations?
There are typically three types of customer escalations:
– Functional escalations happen when the issue is outside the agent’s scope or access. The ticket moves to a specialist with the right tools or knowledge, so progress doesn’t stall. For example, a payment failure goes to the billing team that can see gateway logs and reverse charges.
– Hierarchical escalations are about authority, not expertise. A manager steps in when a policy exception, higher refund limit, security risk, or VIP concern is involved. They can approve exceptions, add goodwill credits, or make risk calls that frontline agents can’t.
– Automatic (SLA-based) escalations are triggered by timers, not judgment. When response or resolution SLAs are at risk or breached, the system alerts the on-call owner, raises priority, and can auto-reassign the ticket. For instance, a P1 approaching its 15-minute response window pings the team lead and routes to the escalation queue.

What are the Benefits of Escalation Management?
Here are the key benefits of handling customer escalations effectively:
- Boosted Team Morale: Empowered agents who know exactly when and how to escalate feel more confident, leading to higher productivity.
- Improved Customer Satisfaction: Promptly resolving high-level issues increases loyalty and positive reviews.
- Reduced Resolution Time: Automated routing and clear ownership cut handoff delays and get fixes in customers’ hands faster.
- Enhanced Operational Efficiency: Streamlined escalation paths and transparent communication eliminate wasted effort and confusion.
- Lower Costs: Catching and fixing problems early avoids expensive downtime, rework, and support cycles.
The Escalation Management Process: Step-by-Step Guide
Effective escalation management comes down to a few essentials: knowing exactly when to escalate, classifying issues correctly, routing them to the right people, keeping communication clear, resolving them fully, and reviewing the process so it keeps improving. Done well, it ensures that no issue falls through the cracks and customers stay informed. Let’s take a look at the key aspects in more detail below:

1. Recognizing When to Escalate
One of the most important skills in escalation management is spotting the exact moment an issue needs to be handed off. If you escalate too early, you risk overloading higher-level teams with problems your frontline could have solved. Waiting too long might lead to the customer’s frustration (and the problem itself) spiraling.
You might want to look out for these trigger conditions to know when it’s the right time to escalate:
- The problem requires specialized expertise beyond frontline support (technical bugs or account-specific errors).
- The issue breaches defined SLAs or response times.
- The customer expresses increasing dissatisfaction or threatens to leave.
- The problem affects multiple customers or critical business functions.
2. Classifying and Prioritizing Escalations
Once you’ve decided an issue needs to be escalated, the next step is figuring out where it sits on your priority list. Treating every escalation as urgent wastes resources—your team could be fixing a minor bug while a major outage waits. You can use the priority matrix below as a reference to decide how each escalation should be routed and addressed:
| Priority | Typical Scenario | Immediate Action |
| Critical | System-wide outage affecting all users | Bypass the frontline, alert senior engineers and IT leadership, and declare “all hands” until service is restored. |
| High | A security breach or data leak impacting a segment of customers | Escalate to the security team and senior management; launch mitigation while the root cause is investigated |
| Medium | Billing errors affect multiple customers, but the core service is still usable | Route to finance/billing; notify affected customers with resolution ETA. |
| Low | A single customer requests a minor feature tweak or reports a non-critical bug | Log for product backlog; address in next sprint or routine support cycle. |
3. Assigning Escalations: Who Does What?
Even the most accurate prioritization won’t help if escalations land on the wrong desk. Clear ownership is what keeps tickets moving instead of bouncing between teams. Here’s how to assign escalations effectively:
- Match Issues to Agent Skillsets and Expertise: Assign escalations to team members best equipped to handle them. Use skill-based routing to direct each escalation to the best-qualified rep automatically. For example, technical bugs should go to engineers or Tier 2 specialists, while billing issues should go to finance support.
- Consider Agent Availability and Workload: Avoid overloading your top performers by distributing escalations based on real-time capacity. A simple way is to configure round-robin assignment, which rotates tickets evenly among agents.
- Define Escalation Tiers Clearly
Use a tiered structure to clarify who handles what level of complexity. For example,- Tier 1: Frontline agents resolving basic issues.
- Tier 2: Specialists handling technical or complex problems.
- Tier 3: Managers or executives for critical or high-priority escalations.
This hierarchy prevents confusion and speeds up resolution.
- Implement Escalation Handoff Protocols: When you pass an escalation along, include all relevant notes, history, and customer communications. A “blind” handoff only frustrates the next person and the customer.
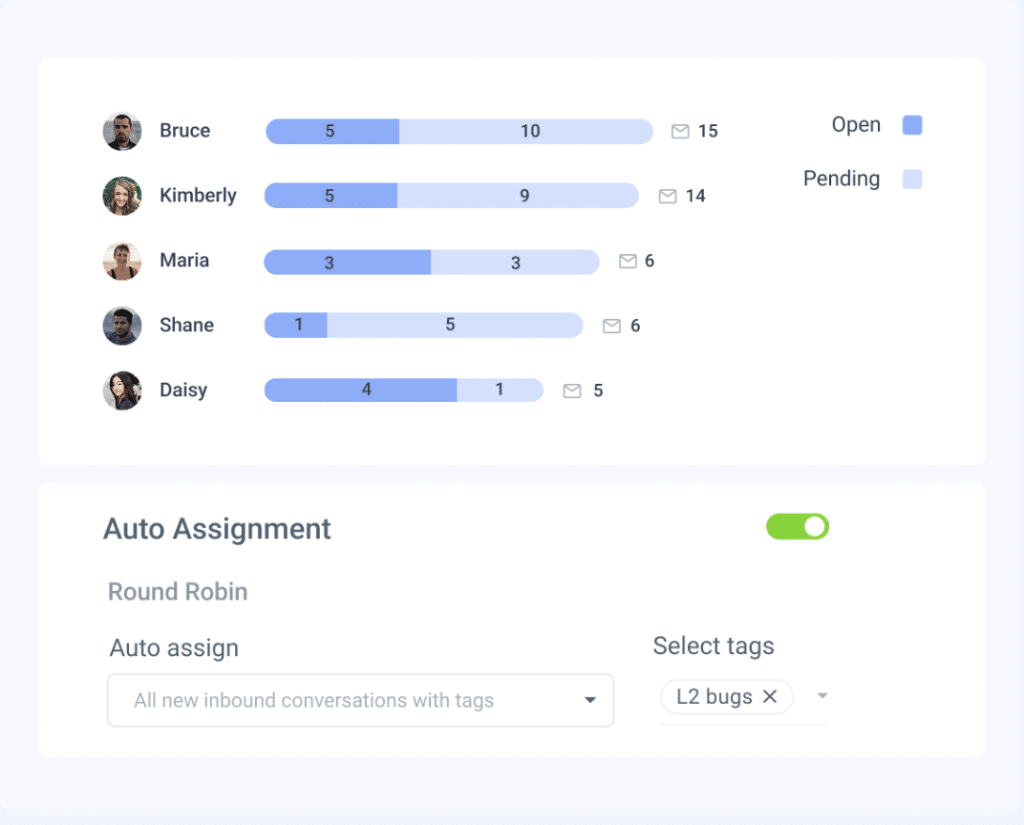
🧠 Did you know? Using the workload distribution report in Hiver, you get a real-time view of conversations and assignments. You can auto-distribute incoming escalations based on workload or availability, and instantly reassign when someone’s queue spikes. This keeps escalations moving without overloading your team.
4. Communicating During Escalation
Transparent and timely communication keeps customers informed and reduces frustration. Make sure to acknowledge the escalation quickly, share regular progress updates, set realistic timelines, and use empathetic, plain language.
💡Pro Tip: Maintain smooth internal communication between teams involved to coordinate efforts effectively. This can include using internal notes or @mentions to keep cross-functional teams aligned without exposing back-office chatter to the customers.
5. Resolving and Closing the Escalation
Resolution isn’t just about fixing the issue and ensuring customer satisfaction. To close escalations effectively, make sure you.
- Thoroughly resolve the root cause, not just the symptoms
- Confirm resolution with the customer and gather feedback
- Document the case details for future reference
- Close the ticket only after customer confirmation
6. Post-Escalation Review and Continuous Improvement
Escalation management doesn’t stop when the issue is fixed. A structured review process helps you learn from each case and strengthen your support operations. Here’s how to make it actionable:
- Hold weekly or monthly cross-functional meetings with support, product, and operations teams to analyze recent escalations. Review the volume, types, and outcomes to identify patterns and recurring issues.
- Beyond solving individual cases, dig deeper into why escalations happened. Were there knowledge gaps, process delays, or communication breakdowns? Use root cause analysis tools like the “5 Whys” to uncover underlying issues.
- Turn these insights into improvements: update training, adjust escalation criteria, and refine SLA targets.
- Use your help desk or customer service platform analytics to monitor key metrics like average resolution time, escalation rate, and SLA breaches.
Recommended Reading
8 Best Practices for Escalation Management
Escalations test the strength of your support engine. Follow these 11 tips to keep issues from stalling, teams from scrambling, and customers from churning.
1. Define Clear and Measurable SLAs
Defining internal SLAs is the first step in your escalation management process. These are the rules you will use to decide when an escalation takes place and which steps should be taken after an escalation gets triggered. Use simple, observable rules to kick off an escalation:
- A customer makes five attempts to contact customer support without being assisted.
- Your product or service is not delivered within 24 hours of purchase.
- The customer satisfaction survey score falls below a certain threshold.
2. Set Up Automated Escalation Paths for SLA Breaches
Each time an SLA breach occurs, your customer service software should automatically trigger an escalation path, depending on how you set it up. The following are examples of possible escalation paths:
- A senior manager reaches out to the customer within two hours of an escalation trigger.
- A senior manager assigns a junior manager to handle the customer request on priority.
- A team member reassigns the support ticket to another team member with greater authority.
It’s important to note that not all escalations are equal in terms of priority or urgency. You need to develop a system that prioritizes your incoming customer escalations. This could be based on how severe the situation is, how urgent it is for you to respond, and how much time you have before the situation turns dire. A good way to approach this is to create an escalation matrix. It is essentially a flowchart outlining the different steps of escalating and resolving customer requests.

For example, when a customer reports a delayed order, the frontline agent escalates it to a shipping specialist who identifies a customs delay and marks it as a high priority. The issue is assigned to a logistics manager for quick resolution, while the customer receives regular updates. After delivery, the team reviews the case to improve future processes.
3. Conduct a Thorough RCA (Root Cause Analysis)
When an issue escalates, rushing to fix it without understanding the root cause can lead to repeated problems. Taking time to investigate what went wrong helps prevent future escalations and improves overall customer satisfaction.
Key steps to perform an effective root cause analysis:
- Involve the original agent in gathering the full context of the issue
- Identify whether the cause is internal (process error, product defect) or external (website issue, third-party failure)
- Collect data and customer feedback related to the escalation
- Collaborate with relevant teams to pinpoint the underlying problem
- Document findings clearly and share them with the entire support team
Use a standardized root cause analysis (RCA) template that guides agents through key questions, such as what happened, why it happened, and what corrective actions are needed. For example, after every escalation, log the root cause, tag it by category (e.g., training, process, product), and assign follow-up actions to the right teams.
💡Pro Tip: You can also use the Fishbone Diagram (Ishikawa) to visually map out potential causes across categories like people, processes, technology, and environment. A fishbone diagram is a simple cause-and-effect map.

The “head” is the problem you’re seeing. The “spine” points to it. Each “bone” is a category of possible causes. Under each bone, you list specific contributing factors. The goal is to move from vague symptoms to concrete, testable root causes you can fix.
For example, if a customer escalates due to repeated billing errors, a Fishbone Diagram helps break down complex issues like delayed deliveries by examining supplier delays, warehouse inefficiencies, or software problems.
4. Train Agents to Respond with Empathy and Emotional Intelligence
When customers feel truly heard and understood, they’re more likely to stay calm and cooperative even when things go wrong. In fact, 52% of support professionals say their customers prefer human-only interactions, highlighting the enduring value of empathy and personal connection in an increasingly digital world.
Here are some simple ways agents can show empathy:
- Acknowledge emotion before solutions: Use calming, validating phrases like, “I completely understand how frustrating this must be,” or “Thanks for your patience—I’m here to help get this sorted.”
- Promise updates in the customer’s local time: Don’t make them convert zones or guess around holidays: “Next update by Wed 15:30 CET.” If Monday is a public holiday for them, say so and give the next exact time you’ll follow up.
- Ban idioms; use plain, time-bound actions: Idioms can read flippant or get lost in translation during tense moments. Tie your wording to a concrete action and deadline. For example, in case of a shipment delay, dont’ say, “Hang tight.” Try saying, “I’m checking your shipment now and will update you by 15:30 CET.”
- Restate the issue in their words, then state your next step: For example, “You were charged twice for order #48219. I’m reversing the duplicate and will confirm by 16:00 CET.”
Recommended reading
5. Keep Your Customers in the Loop
When a customer submits a service request, you should always keep them updated about the status of their query. Tell them what your plan is to resolve the issue, and make sure to inform them as soon as it’s taken care of. Here are some best practices for keeping customers informed during escalations:
- Acknowledge receipt immediately (within 15–30 minutes) to let them know you’re on it
- For critical issues, provide updates every 1–2 hours until resolved
- For high-priority issues, send progress updates every 4 hours
Even after you’ve resolved their query, don’t assume everything is fine because your customer hasn’t reached out again. Follow up with your customers to check if everything is okay and if there are any other concerns they might have. This will instill a sense of trust in them and reassure them that they can reach out to you in case they face another problem later on.
6. Empower Your Agents with the Right Tools
One of the biggest challenges with managing escalations is keeping track of them, and it’s hard to do manually. That’s where tools like Hiver can help. Hiver is an AI-powered customer service platform that helps you manage customer queries across email, chat, phone, WhatsApp, and social media (Instagram and Facebook) from a single interface.
Hiver lets you create shared inboxes so teams can manage group addresses like info@, help@, finance@, and support@ in one place. It centralizes customer conversations across channels, giving everyone the same context and making it easy to assign, track, and reply as a team.

Using a shared inbox to manage escalations in Hiver
When it comes to escalations, you can automatically tag and assign queries to the right team member based on the sender or keywords in the subject line. This will make sure that no escalated query slips through the cracks. For example, if an email contains the phrase “billing issue,” you can automatically assign it to the billing team, apply a ‘high-priority’ tag, and notify the right agents.
Here are more ways Hiver can help you manage escalations:
- Set up SLAs (Service Level Agreements): Define response and resolution deadlines.
Define response and resolution deadlines. For instance, you can define SLAs to ensure that a critical issue from a VIP customer gets a response within 15 minutes and resolution within 2 hours. If the issue is at risk of breaching an SLA, your team will get an alert.

Setting up SLAs in Hiver
- Ensure faster responses using Hiver’s AI Copilot: If a customer escalates a complaint about a delayed shipment, you can ask AI Copilot, “What’s the status of this order?” The Copilot will scan third-party apps and knowledge bases to generate precise answers in seconds.
- Leverage analytics and reports in Hiver: Track key metrics like response times, resolution rates, and SLA adherence. This helps you identify patterns in escalations. Let’s say you notice that 30% of “Where is my order?” tickets exceed the promised response SLA of 2 hours, causing customer frustration and leading to more escalations. This insight can help you take proactive steps.

SLA violation report in Hive
7. Provide more autonomy to your support staff
Empower your frontline staff to resolve issues without immediate escalation or much back-and-forth. This can speed up resolution times and enhance customer satisfaction.
For example, a hotel chain could allow its receptionists to offer complimentary services or room upgrades to dissatisfied guests without managerial approval. Here, you can empower your agents effectively by setting up monetary or decision-making limits for frontline action (e.g., up to $100 refund without escalation).
8. Document Escalation Cases
Documentation ensures everyone involved in the escalation process is accountable for their actions. It provides a transparent record of what has been done, making it easier to track responsibilities and follow up on tasks.
Keep detailed records of all escalated cases, including the nature of the issue, steps taken, and final resolution. Use a customer relationship management (CRM) system to log all escalation details and outcomes for future reference.
For example, imagine a large enterprise software provider getting an escalation from a major client. The issue is recurring software bugs that are disrupting the client’s business operations. The escalation starts when the client’s IT team reports the problem to the frontline support. The frontline logs the severity, affected systems, and the client’s concerns. When the case goes to the technical team, they document every interaction (from troubleshooting steps to client feedback) in a central system.
💡 Pro Tip: Use a CRM like HubSpot or Salesforce to log every detail like issue type, timeline, owner, and resolution steps. Use tags and custom fields to filter trends like recurring bugs or account-specific issues, so you can proactively fix root causes.
Escalation Management Metrics: What to Measure and Why
Tracking and analyzing metrics is crucial to ensure an effective escalation management process. Using these metrics, you can identify improvement areas, maintain high customer service standards, and make data-driven decisions. Here are some key escalation management metrics to measure and why they matter:
1. Escalation Rate
What to Measure: The percentage of cases or issues escalated out of the total number of cases handled.
Why It Matters: A high escalation rate may indicate that front-line support teams cannot resolve issues effectively, indicating a need for better training, more transparent processes, or improved tools. Conversely, a low escalation rate might suggest that issues are being resolved at the initial level, which is positive but should be monitored to ensure quality isn’t compromised.
Example: If your escalation rate is 20%, 1 in 5 customer issues are being escalated. If this number increases over time, it may be necessary to investigate whether there are specific types of issues that consistently require escalation and address the root cause.
2. Time to Escalate
What to Measure: The average time it takes for an issue to be escalated from when it was first reported.
Why It Matters: Delays in escalating issues can lead to prolonged resolution times, frustrating customers, and negatively impacting their experience. Measuring this metric helps ensure that issues are escalated promptly when necessary, reducing the overall time to resolution.
Example: If it takes an average of 2 hours to escalate a critical issue, but customer feedback suggests dissatisfaction with response times, this metric can be used to set targets for faster escalations, particularly for high-priority issues.
3. Resolution Time Post-Escalation
What to Measure: The average time it takes to resolve an issue after it escalates.
Why It Matters: This metric is crucial for understanding the effectiveness of your escalation management process. A long resolution time after escalation could indicate that the issue wasn’t escalated to the right team or that the receiving team lacks the resources or knowledge to resolve the issue faster.
Example: If the average resolution time post-escalation is 24 hours, and customer feedback indicates that this is too long, it may be necessary to provide additional resources or training to the teams handling escalated issues.
Recommended reading
7 Effective Escalation Email Templates and Best Practices for Quick Resolutions
4. Customer Satisfaction (CSAT) After Escalation
What to Measure: The customer satisfaction score for cases that have been escalated.
Why It Matters: Escalation management isn’t just about resolving issues—it’s also about ensuring customers are satisfied with the resolution process. Tracking CSAT after escalation provides insight into how well your teams handle escalated cases and whether customers feel their issues are being taken seriously.
Example: If the CSAT score for escalated issues is consistently lower than for non-escalated issues, it may indicate a need to improve communication, speed, or the quality of resolutions for escalated cases.
5. Escalation Outcome Analysis
What to Measure: The outcomes of escalated cases, such as resolved, unresolved, or further escalated.
Why It Matters: Understanding the outcome of escalated cases helps assess the effectiveness of the escalation management process. It can also provide insights into whether issues are escalated appropriately and whether suitable resolutions are implemented.
Example: If a significant number of escalated issues remain unresolved or require further escalation, it may be necessary to review escalation protocols and ensure that cases are directed to the appropriate teams from the start.
6. Repeat Escalation Rate
What to Measure: The percentage of cases escalated more than once.
Why It Matters: Repeated escalations can indicate that issues are not fully resolved or that the initial escalation did not reach the correct team. Measuring this metric helps identify gaps in the escalation process and ensures that issues are thoroughly addressed the first time.
Example: If 10% of escalated cases are being escalated again, it suggests that the issue wasn’t properly addressed initially or the resolution process was inadequate. This might require additional training or adjustments to the escalation process.
Common Challenges of Escalation Management
Delays, confusion, and unclear ownership make escalations drag and annoy customers. Here are the common problems and quick tips to overcome each.
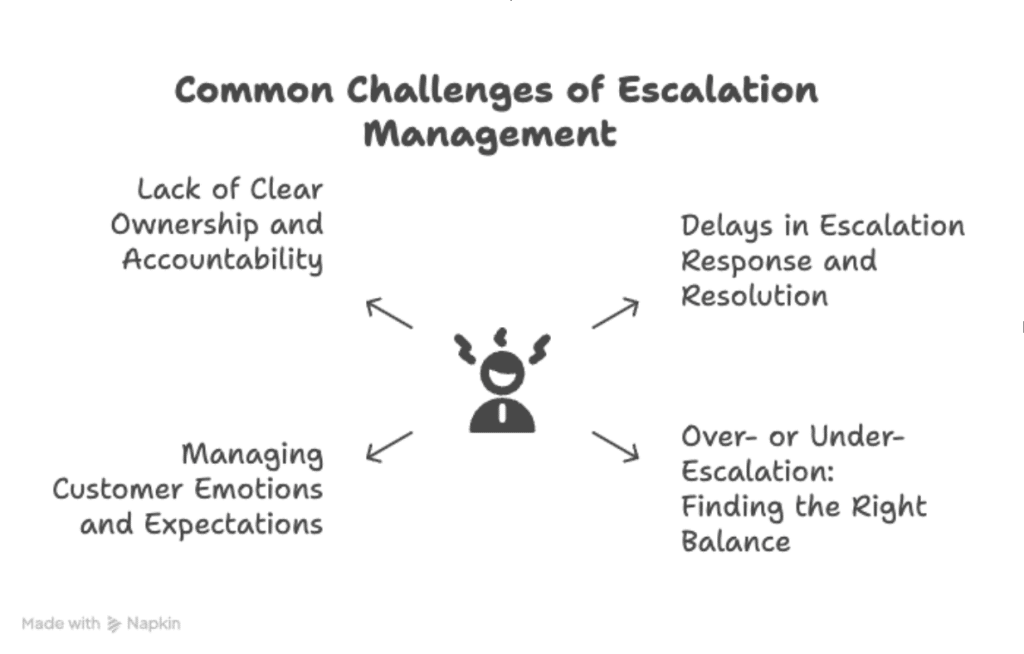
1. Lack of Clear Ownership and Accountability
Escalations bounce between teams when no one is clearly accountable. With multiple hands on one ticket, updates scatter, and key context gets lost, so customers end up repeating themselves. This creates bottlenecks, slows resolution, and wastes time deciding who owns the ticket. Externally, it signals disorganization and erodes trust.
💡What can you do? The moment an escalation is logged, assign one “ticket owner” and display their name prominently in your help desk so all collaborators know exactly who’s accountable.
2. Delays in Escalation Response and Resolution
Even if the steps are clear, escalations slow down when no one sets a response time or when experts are overloaded. These slowdowns usually come from outdated SLAs, tickets handed off by email or chat that get missed, and priority systems that no one understands.
💡What can you do: Publish tier-based SLAs (e.g., Tier 1 responds in 30 minutes, Tier 2 in 15 minutes) and set automated “breach alerts” that notify the owner 10 minutes before the deadline hits. You can also refer to these SLA templates to streamline support.
3. Managing Customer Emotions and Expectations
Even a 24-hour fix feels endless when someone is already stressed and unsure of what’s happening. If an agent misses acknowledging a customer’s feelings or sounds dismissive, the customer’s emotions flare up even faster than the technical problem itself. In this case, giving an honest timeline can really help simmer down the situation.
💡What can you do: Train agents to acknowledge emotions first (“I understand this is stressful”) and follow up with a time-bound promise (“I’ll update you every two hours until we solve this”).
4. Over- or Under-Escalation: Finding the Right Balance
Some teams push every issue up the chain. Others keep tickets too long, are worried about blame, or are confident they can fix everything themselves. This often slows down problems that truly need higher help.
💡What can you do: Create a straightforward tiered severity matrix; tie each level to exact impact criteria and response times so agents know precisely when to escalate and when to handle issues themselves.
Create Positive Customer Experiences Even When Things Go Wrong
Escalation management is a vital area of customer service that businesses must prioritize.
Although customer service escalations are unavoidable, handling them effectively can help you cultivate customer loyalty and retention and drive positive feelings toward your organization.
With a little effort and planning, you’ll be able to manage customer escalations in a timely and efficient manner. This can improve your relationship with customers and make their overall experience with your company much more memorable.
Frequently Asked Questions (FAQs)
1. What is an escalation in project management?
Escalation is the formal process of raising an issue, such as scope creep, schedule risk, or resource conflict, to a higher authority when it cannot be resolved at the current level. The goal is to secure faster decisions, additional resources, or executive alignment before the project derails.
2. What is an escalation cycle?
An escalation cycle is the series of predefined steps an issue follows once it’s flagged: initial assessment, priority assignment, routing to the right owner, status updates, resolution, and post-mortem review until the incident is closed and documented.
3. What is the basic rule of escalation?
Escalate only when you’ve reached the limit of your authority or expertise, and a delay will negatively impact scope, time, cost, or customer satisfaction. Escalation should add value, not just shift responsibility.
4. How to stop conflict escalating?
Listen actively, acknowledge emotions, and clarify misunderstandings early. Offer a concrete next step or timeline so the other party feels heard and sees a path forward; this diffuses tension before it intensifies.
5. What is an example of escalation management?
A key client reports a critical data-sync error. The frontline agent logs the ticket and, based on keywords, the help-desk tool auto-tags it “critical” and routes it to the Tier-2 engineering lead within minutes. The lead updates the client every hour, deploys a hotfix, and records the root cause in the ticket. After resolution, the support manager reviews the case in the weekly retro to adjust SLAs and prevent similar errors.
6. What are the four stages of escalation?
The 4 stages of escalation include:
- Identification – Recognize the issue and its impact.
- Assessment – Assign severity and priority.
- Routing & Action – Send to the right owner and work the fix.
- Resolution & Review – Confirm with the customer, then analyze lessons learned.
7. What are the 4 types of de-escalation?
4 types of de-escalation include:
- Verbal De-escalation – Using calm, respectful language.
- Environmental De-escalation – Adjusting space, noise, or privacy.
- Procedural De-escalation – Offering clear steps or choices to regain control.
- Emotional De-escalation – Acknowledging feelings with empathy and validating concerns to lower tension.