Skip to content


Google Classroom has acquired over 10 million users worldwide in a span of three years. These numbers speak volumes about how reliable and useful the platform is.
Before the Covid-19 crisis, Google Classroom was being used by only a few educators, but today it has been embraced with open arms and has shown all its stakeholders what they’ve been missing — an online platform which has the potential to break the invisible barriers of a classroom paradigm and bring learners closer to each other and their end goal.
Google Classroom is simple and intuitive. It does not take a lot of time getting used to. And it is designed to neatly fit into your daily workflow.
[cta_block]
Table of Contents
- Everything You Need to Know about Google Classroom
- 1. What is a Google Classroom?
- 2. Who can use Google Classroom?
- 3. What are the main features of Google Classroom?
- 4. How can you set up Google Classroom?
- 5. What devices does Google Classroom support?
- 6. Can independent educators who are not affiliated with a school sign up?
- 7. Is Google Classroom different when used by a school account as compared to a personal account?
- 8. Do students need a Google account to access Google Classroom?
- 9. How is Google Classroom related to G Suite for Education?
- 10. Can I access Google Classroom if my Gmail is disabled from G Suite for Education?
- 11. Can I use Google Classroom if my Drive is disabled from G Suite for Education?
- 12. Is real-time interaction possible between students, teachers, and parents possible?
- 13. Every student is different. How does Google Classroom help me provide personalized classroom experiences?
- 14. Does Google Classroom offer learning material that can be shared with students?
- 15. Can teachers assign group work on Google Classroom?
- 16. Who is eligible for the G Suite for Education?
- 17. How can parents use Google Classroom to keep track of the students’ work/progress?
- 18. Which apps and websites are integrated with Google Classroom?
- 19. How secure is the data shared by students and teachers? What are the privacy features of Google Classroom?
- 20. Which are the tools that allow teachers to give grades and feedback on assignments?
- 21. Can parents leave comments for teachers?
- 22. Can teachers have one-on-ones with students and parents?
- 23. What are AV tools available to teachers?
- 24. How do students find assignments, due dates, or grades in Google Classroom?
- 25. Can teachers leave voice comments on assignments?
- 26. Can students work on assignments without an internet connection?
- 27. How does Google classroom improve teaching experience?
- 28. What are Boom Cards? Does Google Classroom offer them?
- 29. How can teachers track student-by-student progress?
- 31. What could be the reason for teachers and students to not get email notifications?
- 32. Can students access the assignments of other students?
- 33. Can teachers create multiple choice questions using the ‘Ask a Question’ feature?
- 34. Does Google Classroom have scope for peer learning?
- 35. How can you time a quiz on Google Classroom?
- 36. How do you ensure your students don’t open other tabs and applications while working on assignments?
- 38. Can teachers and students collaborate on presentations?
- 39. What are the best ways to use the ‘Ask a Question’ feature in Google Classroom?
- 40. How can you add a grade category in Google Classroom?
- 41. Can students and teachers have an online debate or discussion in Google Classroom?
- 42. How can you limit email notifications from Google Classroom?
- 43. Which are top 5 Google apps that improve classroom interaction?
- 44. How can administrators effectively use Google Classroom Metrics?
- 45. Can we add guest speakers or coaches who are not from the school or institution?
- 46. Can we use archived material or assignments for a different class?
- 47. How can tagging a curriculum in Google Classroom help teachers?
- 48. How can a teacher get feedback from students before they exit a class?
- 49. How can teachers collaborate with other teachers with respect to assignments, material, or grades?
- 50. What is the future of Google Classroom?
- 51. How to attach files or add links to assignments?
- 52. How to share assignments with multiple classes?
- 53. How to provide different assignments for different students?
- 54. How to use the Google Calendar integration with Google Classroom?
- 55. How to archive a classroom?
- 56. How to reuse old posts?
- 57. How to schedule posts?
- 58. How to create self-grading quizzes with Google Forms?
- 59. How to grade assignments on Google Classroom?
- 60. How to invite co-teachers?
- 61. How to keep guardians in the loop on Google Classroom?
- 62. How to communicate with students over class comments and private comments?
- 63. How to send emails to students right from Google Classroom?
- Google Classroom paves way to interactive learning
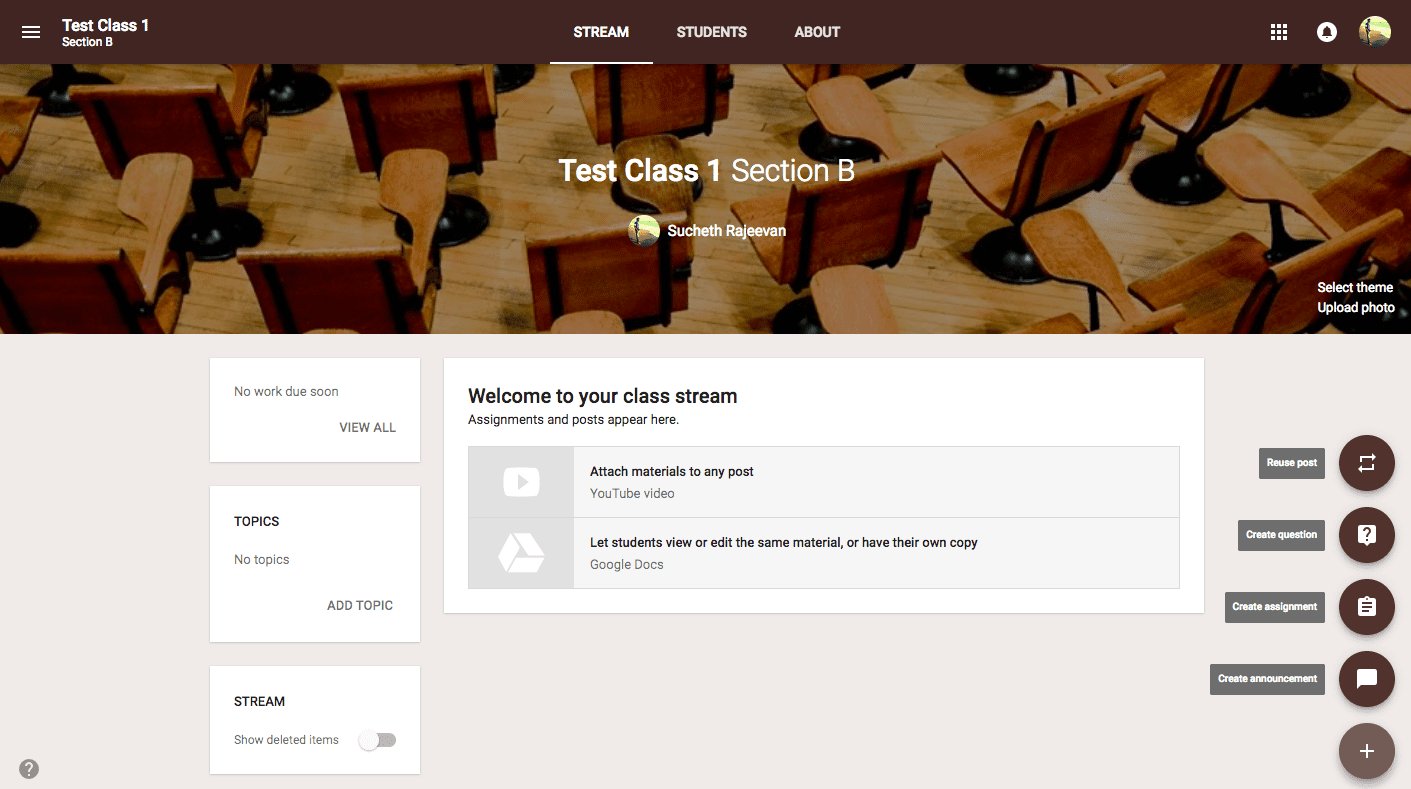
Everything You Need to Know about Google Classroom
1. What is a Google Classroom?
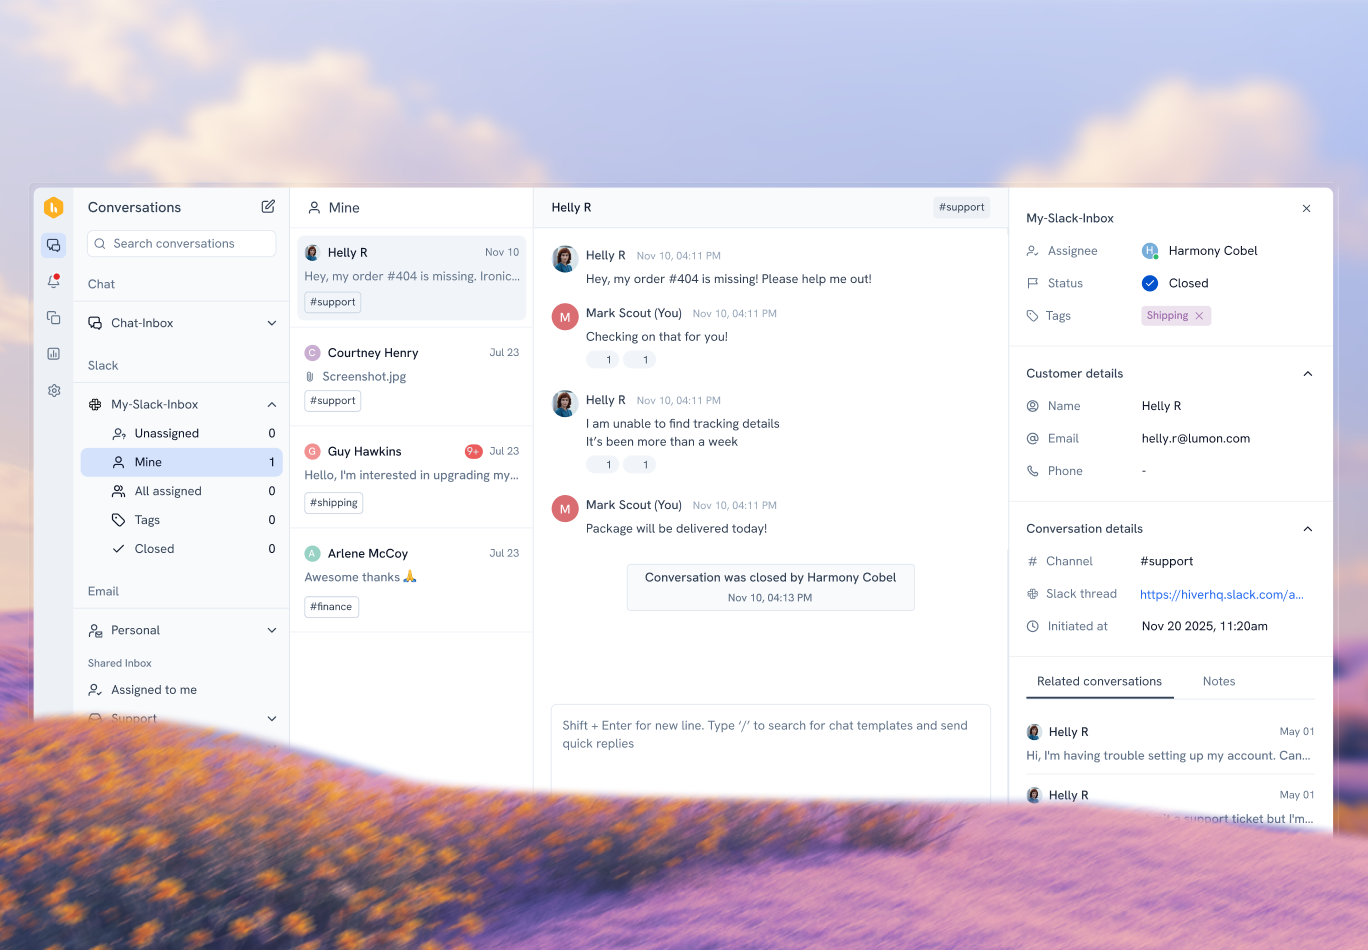
Google Classroom is a free web-based learning platform developed by Google, where teachers can run a class online, create curriculums, and share assignments with students in a paperless way. The platform simplifies teacher-student collaboration by leveraging the various G Suite services like Google Docs, Sheets, and Slides.
2. Who can use Google Classroom?
Basically, anyone with a Google account can use Google Classroom. Organizations using G Suite for Education, non-profits, schools, independent educators, home-schoolers, administrators, and families are all eligible to use Google Classroom. Teachers and students are primary users and can access Google Classroom through a school account.
3. What are the main features of Google Classroom?
Assignments: Teachers can create assignments using learning material like Youtube videos, Google Form surveys, or interactive PDFs from the drive. They can assign assignments to all students or individual students. Teachers can either immediately give out the assignment or schedule the assignment for a particular day.
Customizable Grading System: Teachers can choose a grading system and create grade categories. If teachers want the overall grades to be accessible to students they can choose from any of the following systems:
- Total Points Grading: Divide total points students earn by the maximum points possible.
- Weighted by Category Grading: The grade categories are assigned a weight. Then, the average scores of each grade category are calculated and multiplied with the grade weight to give you the overall grade out of 100%.
- No Overall Grade: If the teachers choose to not grade the students.
Virtual Discussions: Teachers can invite students to answer question-driven discussions and respond to classmates. Comments on google docs enable a two-way discussion, as teachers can give feedback to students; which is a great way to keep students engaged, especially when you can’t see them. Teachers can manage the discussions by choosing to mute some individual students from posting or commenting.
Announcements: Teachers can give updates to students through announcements. Announcements are posts with no assignments; they’re just notices for students; about deadlines, tests, or any class work. Teachers can schedule announcements and can control replies and comments made on the announcement post.
Live Classes: This is one of the latest features, where teachers can take a real-time class virtually through Google Meet. Teachers can add up to 250 people to a Hangout call and around 1,00,000 viewers can live-stream. .These meetings or lectures can also be recorded so that students who missed the live session can watch them later. This format of real-time virtual instruction is a cornerstone for interactive math classes, providing a virtual environment that closely mimics a physical classroom to keep students engaged.
4. How can you set up Google Classroom?
Anyone who has a personal Gmail account can set up Google Classroom by following these steps:
Step 1: Open your Gmail account.
Step 2: Click on the waffle on the top right corner which contains all the G Suite applications, and click on Classroom.
Step 3: You’ll enter a dashboard. Click the PLUS sign on the top right and choose ‘Create Class’. If you’re a student, you can click on ‘Join a Class’ and enter the code given by your teacher.
Step 4: Enter details – class name, subject, room, etc. Provide a class name that your students can easily identify with. For instance, Miss Anne’s Maths Class.
5. What devices does Google Classroom support?
Google Classroom is supported by Chrome, Firefox, Internet Explorer, and Safari. The Google Classroom app is also available on Android and Apple iOS mobile devices.
6. Can independent educators who are not affiliated with a school sign up?
Yes, if they have a Gmail account.
7. Is Google Classroom different when used by a school account as compared to a personal account?
Users with school accounts have access to applications under G Suite for Education and therefore, can leverage additional features that won’t be available to users with personal accounts. These features are:
- Email summaries of student work to guardians
- Full administration of user accounts
- Additional privacy and security settings
8. Do students need a Google account to access Google Classroom?
No, they can access Google Classroom through their school’s G suite education account.
9. How is Google Classroom related to G Suite for Education?
Google Classroom is a product of G Suite for Education, similar to Google Docs, Sheets, and Slides. As part of G Suite for Education, a user of Google Classroom can use other products or applications like Docs, Sheets, etc. This enables teachers and instructors to communicate and collaborate better with students.
10. Can I access Google Classroom if my Gmail is disabled from G Suite for Education?
Yes. Gmail doesn’t have to be enabled to access G Suite for Education. But if the administrator has not enabled Gmail, the teacher or student might not get email notifications.
11. Can I use Google Classroom if my Drive is disabled from G Suite for Education?
No. Google Classroom is a product of G Suite for Education and the drive contains all the other products such as Docs and Slides that help teachers and students share classwork and assignments with each other.
Without access to drive, teachers will not be able to create and share assignments or learning material. Students will not be able to submit work online. You might still be able to log in to the Classroom but the core features will be unavailable. Similarly, alternative sites like StuDocu have made it easy for students to share and access a vast supply of study material and notes online for free.
12. Is real-time interaction possible between students, teachers, and parents possible?
Yes. Google Hangouts, another product of G Suite for Education enables chatting, video conferencing, and video broadcasting. It makes remote learning possible; teachers can invite students to a conference call on Hangouts if they need extra tutoring. Teachers can also record live sessions until up to 8 hours. These recordings can be downloaded and shared on Youtube for future reference. Similar to video conferencing tools like Skype and Zoom, Hangouts allows screen share too.
13. Every student is different. How does Google Classroom help me provide personalized classroom experiences?
Google Classroom caters to different types of learners in 3 ways:
Who the students are?
Teachers can create assignments based on students’ proficiency in that particular subject or topic. There are options for remediation for those who are lagging behind and there are extension activities for those who are ahead of the others.
How do the students learn?
Students may also differ in the way they want to receive information. Some may like to read whereas others may want to watch or listen. Google Classroom lets you upload documents, videos, and audio files, making it possible for you to share learning material according to your students’ needs.
How can the students engage with the teacher?
Students have different ways of expressing themselves. Google Classroom allows students to submit their assignments in the form they prefer; as documents, videos, or audio files. This way the students have the opportunity to showcase their interests and talent – in a format they are most comfortable with.
14. Does Google Classroom offer learning material that can be shared with students?
Yes. There are a few educational apps integrated with Google Classroom from where teachers can upload and share learning material.
15. Can teachers assign group work on Google Classroom?
While creating an assignment, deselect the ‘All Students’ option and choose the students you want to assign the assignment to. Be sure to assign a group number, when you create a Title, for eg: Julius Ceasar-Group 1, to identify which students are assigned to which group.

16. Who is eligible for the G Suite for Education?
K-12 (terminology used in the US and Canada for publicly supported school grades from Kindergarten to grade 12) institutions and higher-education institutions that meet the criteria below.
- Institutions with verified non-profit status
- Government-recognised, formally accredited institutions that offer nationally or internationally-approved certifications at a primary, secondary and third level.
- Homeschools are also eligible if they are verified by the state homeschool organization.
17. How can parents use Google Classroom to keep track of the students’ work/progress?
In order for parents to receive notifications from teachers about their students’ progress, the teacher would need to invite them via Gmail. This can be done using the ‘Invite Guardian’ option on Classroom. Parents could also obtain the login credentials that the school has assigned their child to access their work.
Teachers can email summaries to the parents about their children’s’ progress. These summaries will not contain details of assignments and due dates.
18. Which apps and websites are integrated with Google Classroom?
There are apps that allow students to attend lectures given by their teacher on a different application like BrainPop (interactive and animated explainer videos), Typing Club (Gaming/data-driven activities for keyboarding skills), and Pear Deck (interactive slideshows for engaging students). Teachers can invite students from Google Classroom to the sessions in any of the above platforms through class rosters.
There are other apps that help teachers in administrative tasks. For eg; Pearson Education helps teachers share assessments, rosters, and content with single sign-on access. There are several educational websites that teachers can source content from and share with students in Classroom; For eg; Newsela, Khan Academy, American Museum of Natural History, Discovery Education, and Duolingo.
19. How secure is the data shared by students and teachers? What are the privacy features of Google Classroom?
Data shared on Google Classroom is highly secured. Google Classroom doesn’t have ownership of any data. The schools own the data and Google has its own server and platform services to keep this data secure. Administrators can easily monitor and manage data security. G Suite for Education has no ads and this avoids invasion of privacy by third parties.
20. Which are the tools that allow teachers to give grades and feedback on assignments?
Private Comment: If teachers want to leave feedback for a specific student, they’ll just have to choose the assignment from the Student Work page, click the student from the roster on the left, and choose ‘Add Private Comment’ from the bottom right panel.
Google Classroom Grading Tool: When a student’s assignment is opened, teachers can access a Grade Bar on the right where they can leave their grades along with any private comment below.
Comment Bank: Teachers can create a comment bank to which they can keep adding comments which will be saved to the teachers’ account. These comments can be accessed through the grading tool and used for any other assignment.

21. Can parents leave comments for teachers?
Yes, if the parents have been shared the link to the assignment by the teacher, they can leave comments using the ‘add private comments’ option.
22. Can teachers have one-on-ones with students and parents?
Yes. Teachers can set up a parents-teachers meeting though Hangouts Meet. Teachers can also do one-on-one tutoring for students using Hangouts Meet.
23. What are AV tools available to teachers?
Google Slides and Youtube. Google Slides is a product of G Suite for Education where teachers can make Powerpoint presentations to share with students. Google Slides also allows teachers to insert audio and video files into presentations. Additionally, teachers can upload and share Youtube videos that are relevant to the lessons they are teaching.
24. How do students find assignments, due dates, or grades in Google Classroom?
Students will find assignments and due dates on the ‘Classwork’ page. The students see their grades once the teacher has assessed the assignment and returned it to the student.
25. Can teachers leave voice comments on assignments?
Yes. Once they create the assignment, they can use an add-on on Google Docs called Kaizena which helps record and post voice comments.
26. Can students work on assignments without an internet connection?
Yes. Students can work offline on Google docs, Sheets, and Slides by selecting the ‘Make Recent Files Offline’ option.
27. How does Google classroom improve teaching experience?
Google Classroom is a big time-saver: With all files saved in one place, teachers have time to focus on lesson plans and assessments rather than spend time on redundant administrative work. Moreover, going paperless makes assessing and grading quick and hassle-free.

Increased levels of teacher-student engagement: AV tools, educational apps and websites integrated with Google Classroom give the teachers more scope to make lessons more interactive and engaging.
Makes teaching more focused and organised: Teachers can view and review classwork anytime, anywhere. They can also sort tasks based on what needs to be reviewed first and customize the grading system for students.
Student-teacher communication and collaboration is made easy: Teachers can ask questions and make/schedule announcements easily. Video conferencing tools helps teachers, students and parents stay in touch from the comfort of their homes or offices.
28. What are Boom Cards? Does Google Classroom offer them?
Boom cards are digital, self-checking interactive activities. Questions are displayed one at a time and students get instant feedback on their answers. Boom cards cannot be played in Google Classroom so teachers will have to access Boom Cards from the Boom Cards website. Once they sign in using their Google or Boom account, they can choose a boom card from the library and use the Fast Pin where a 4-letter code is displayed and share the code with their students.
There is also a URL in the same Fast Pin window at the bottom, which you can paste on the assignment page in Google Classroom. If teachers need to record the boom card data, they need to choose the Hyperplay link of a boom card instead of a Fast Pin.
29. How can teachers track student-by-student progress?
Teachers can monitor student by student progress by clicking the ‘Students’ tab on the main dashboard. Here, teachers can choose the student they want to monitor. They get details of the assignments assigned to the student, the assignments that have been submitted, and the ones that are pending, and information on grades.

30. What safety settings that parents can enable in their child’s Google Classroom account?
If the child uses a personal Gmail account to sign in to Google Classroom, parents can adjust the privacy settings on the Google Accounts Page. if the child is using a school-account, parents can consult the administrator for details on safety controls that are accessible to them.
You can set the information on The Personal Info page to be viewable by yourself only. On the Data & Personalisation page you can do a Privacy Check-up to understand how much of your data you are sharing; you can limit it accordingly. Check your activity controls and see what Google is tracking; you can ‘pause’ any activity which you don’t wish Google to track.
On the People & Sharing page, you can check what information or activity is seen by others and accordingly change the settings.
31. What could be the reason for teachers and students to not get email notifications?
This could be because your administrator has not turned on Gmail for users and Directory for G Suite for Education. The administration needs to add Google Classroom to the list of allowed domains so that the Classroom domain can deliver emails and email notifications.
32. Can students access the assignments of other students?
Yes. When the assignments are shared as an announcement post, they are shared with the class as ‘View Only’. This allows students to view other student’s assignments.
33. Can teachers create multiple choice questions using the ‘Ask a Question’ feature?
Yes. Teachers can post a multiple choice question on the stream page
34. Does Google Classroom have scope for peer learning?
Yes. Google Classroom has plenty of tools that allow students to help each other with assignments and share educational content.
Discussion Board: Teachers can post the question as one which all students can see and reply to.

Teachers can attach a document with the ‘Students can edit’ option. Children who are stronger in a topic can edit and give suggestions to their classmates who are finding the same relatively hard.

Teachers can also assign group work, enabling students to collaborate with each other on a project.
35. How can you time a quiz on Google Classroom?
You can use the Timifyme add-on in Google Classroom. Be sure to create an account on Timifyme to enable the add-on in Google Classroom.
36. How do you ensure your students don’t open other tabs and applications while working on assignments?
Teachers can activate the Locked Mode while creating the assignment which stops students from opening other tabs while working on a quiz or assignment. The locked mode only works on Chromebooks. It doesn’t work on laptops, desktop, or mobile devices.

Gradebooks lets teachers display, track, and manage grades for students. On the Google Doc, the sidebar has an option to grade and include a note for the student too.
Gradebook also helps classroom learning beyond school and college levels. Professional development courses can be graded too. Gradebook helps coordinate content and track the progress of training sessions and assignments.
38. Can teachers and students collaborate on presentations?
Yes. By using Google Docs and Slides, teachers and students can work together on the same project.
39. What are the best ways to use the ‘Ask a Question’ feature in Google Classroom?
Exit Tickets: Before students leave a class, the teacher can ask them to answer a question.
Wait Time: Google Classroom shows the teacher how many students are done answering the question and how many are yet to answer them.
Share a Resource: The students can share resources like videos, etc to validate their answers.
Multiple choice and Polls: The multiple-choice question format allows you to live poll the class. This is helpful if, for example, you want to know which tools your students are using for a particular project or the topic they’re interested in working on next.
Ask Students to Ask a Question: Create a question asking students to ask a question. For example, teachers can ask a question such as – What questions do you have about this topic? This creates a culture of discussion and promotes peer learning.

40. How can you add a grade category in Google Classroom?
You have the option to a grade category while you’re posting an assignment quiz or question. Under the grade category you can choose Test, Quiz, or Homework and select the assignment with any of these grade categories.

41. Can students and teachers have an online debate or discussion in Google Classroom?
Teachers can use Discussion Boards to post a question where students can reply with their answers and also see other’s answers. Teachers and students could also use Google Hangouts to conduct a live debate or discussion via video.
42. How can you limit email notifications from Google Classroom?
While there is no way to limit email notifications from Google Classroom, students and teachers have the option to turn them off completely. Turning them off could help manage your inbox but you might miss some important notifications about a class or student.
Hiver, an email management solution, helps organize and manage inboxes, and makes collaboration between colleagues and school admins easy. With Hiver, you can streamline all the updates about your classroom and keep your inbox organized.
43. Which are top 5 Google apps that improve classroom interaction?
- Google Cast for Education: Students and teachers can share screens to share resources, discuss, and learn together.
- Explain Everything: An interactive whiteboard app; interactions between teachers and students can be recorded and shared.
- Listenwise: A large podcast library of lessons, quiz templates, and interactive transcripts.
- Mathgames: Elementary teachers can give homework a break and assign fun math games and activities to their students.
- Science Buddies: It’s packed with free videos, lessons, and experiments. Extra quizzes and assessments are available when used with Google Classroom.
44. How can administrators effectively use Google Classroom Metrics?
Under Reports, Admins can see the ‘Highlights’ report which will indicate App Usage Activity for Gmail, Google Drive, Google Calendar, Google+, Google Classroom. The following metrics are available:
- Weekly active users
- The number of 14-day active classes
- The number of courses created
- The number of posts created by teachers and students
- For specific users, the number of classes created, posts created, and last active time in Classroom
45. Can we add guest speakers or coaches who are not from the school or institution?
Yes. If the speaker has a Gmail account and access to G Suite for Education, teachers can invite the speaker by creating a Google Meet link and sharing it with the speaker. You can also use Hangouts On Air where the guest speaker can provide a live stream. A maximum of 100 participants can join the Hangouts session but they’ll be restricted to viewing and instant messaging; they cannot share their screen or contribute via audio.

46. Can we use archived material or assignments for a different class?
An archived assignment will still be in Google Classroom until you delete it and so, it can be accessed by students and teachers.
47. How can tagging a curriculum in Google Classroom help teachers?
Tagging ensures teachers are more aware of their curriculum and its contents. Using tags also makes it easier to edit, add, and delete curriculums.
48. How can a teacher get feedback from students before they exit a class?
Teachers can make use of the ‘Exit Ticket’ feature and ask students if they have any questions or feedback before exiting the class.

49. How can teachers collaborate with other teachers with respect to assignments, material, or grades?
Teachers can add a co-teacher to collaborate with on assignments and other activities. This can be done by logging into Google groups, heading to the ‘People’ tab, and entering the email address of the teachers you want to collaborate with, and then selecting ‘Invite’.
50. What is the future of Google Classroom?
The classroom paradigm has been evolving to meet a new reality.. Student-led learning and collaborative classrooms have given both parties more room to explore, express, and engage themselves. Now more than ever, the world is more digitally connected and Google Classroom has been at the center of an organized, interactive, and effective education system. Virtual learning is becoming the new normal.
51. How to attach files or add links to assignments?
Google Classroom lets teachers attach or link PDFs, Google Drive files, or even YouTube videos while distributing assignments.
Here’s are the steps involved:
- Select a Classroom
- Click on the (+) button near the bottom-right of your screen
- Select ‘Create assignment’
- Assignment creation pop-up will appear, proceed to enter the title, instructions, topic, and the due date
- Click on the kind of attachment or link you would like to add
- Press ‘Assign’
Educators can also decide how their students interact with these files. These options will be accessible once you upload a file or attach a Google Drive link. A pull down menu will appear next to the file name with the following options:
(a) students can view the file – students can read the file, but not make any changes to it.
(b) students can edit the file – students can make changes to the file.
(c) make a copy for each student – each student will receive an individual, editable copy of the file. These copies will be saved in your Google Drive under the folder ‘Classroom’.
Bonus tip: You can also use it share templates that students need to follow or a list of questions they have to answer.
52. How to share assignments with multiple classes?
Google Classroom allows teachers to post the same assignment to multiple classrooms at once.
Here’s how to do this:
In the assignment creation pop-up, near the top-left corner, there is a pull-down menu that lists all the classes you teach. By default, it shows the class you are in at that moment. Click the downward pointing button next to it and select the classes you want.
53. How to provide different assignments for different students?
Google Classroom also lets you assign different assignments to different students.
Here’s how to do this:
In the assignment creation pop-up, there is a pull-down menu which lists the names of all your students from a particular class. By default, ‘All Students’ will be selected. To assign it only to a specific student or a specific group of students, click on downward pointing button, and select the name(s) of the student(s) accordingly.
Remember: You can do the same for announcements and questions.
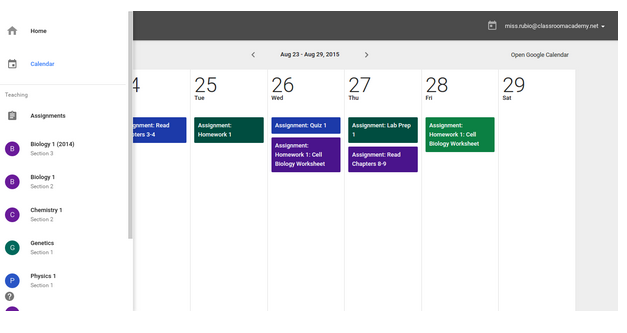
54. How to use the Google Calendar integration with Google Classroom?
Every time you create or join a class, a new calendar is automatically added to your Google Calendar. In this calendar, you can set up appointments and video conferences, and fix dates for field trips and exams. It also shows whatever assignments or questions that are due. In case you make any changes, it will get automatically updated on your students’ calendars too.
How to open Google Calendar from Google Classroom?
Select a Classroom > Click on the ‘About’ tab > Click on ‘Google Calendar’
You can also share this calendar with the parents and guardians of your students. This way they will be able to make appointments and also, see what is going on in class.
Here are the steps involved:
- Open your Google Calendar
- Hover your cursor over the calendar you want to share from under ‘My Calendars’ (left side pane)
- Click on the three-dot button that appears next to the calendar name
- Click on ‘setting and sharing’
- Check the box that says ‘Make available to public’
- Click on ‘Get Shareable link’
- Copy the link
- Share the link with the parents and guardians over email or through social networks
55. How to archive a classroom?
Generally, when you are done with a class, you wouldn’t want it to appear on your home screen anymore. Of course, you can delete it, but Google Classroom also allows you to archive a class. This way you will be able to reuse those posts again and save time.
Here are the steps involved:
a. To archive a class
- Go to the Google Classroom home screen
- Click on the three-dots button on the tile of the class that you wish to archive
- Select ‘Archive’ from the resulting drop-down menu
- A confirmation pop-up will appear, click ‘Archive’ again
b. To un-archive a class
- From the home screen of Classroom, click the menu button in the top left
- Select ‘Archived Classes’
- Click the three-dots button on the tile of the class you wish to restore
- Select ‘Restore’ from the resulting drop-down menu
- A confirmation pop-up will appear, click ‘Restore’ again
56. How to reuse old posts?
Google Classroom allows teachers to repost an earlier post. This comes in handy if you have repeat exercises.
This is not restricted to a particular class, meaning you can reuse posts from another class. You can even reuse posts from archived classrooms.
Here are the steps involved:
- Select a Classroom
- Click on the (+) button near the bottom-right your screen
- Select ‘Reuse post’
- The resulting pop-up will show a list of all your classes including the archived ones, select the class you want
- All the post you assigned to that class will be displayed (chronologically sorted), select the one you want to repost
- If the post has attachments, make sure to check the box below that says ‘Create new copies of all attachments’
- Click ‘Reuse’
- An assignment creation pop-up will appear, make any changes if you want, and then, press ‘Assign’
57. How to schedule posts?
Google Classroom also lets educators schedule posts in advance.
Here are the steps involved:
- Create your assignment or question
- In the bottom right, click the drop-down arrow and choose, ‘Schedule’
- Select the date and time
- Click ‘Schedule’
Remember: There is no option to schedule the same post for multiple classes. You would have to do it individually.
58. How to create self-grading quizzes with Google Forms?
Creating self-grading quizzes with Google Forms is an excellent time-saver. This allows students to see their test results right after they submit the quiz. Teachers can even pre-record feedback for right and wrong answers.
Here are the steps involved:
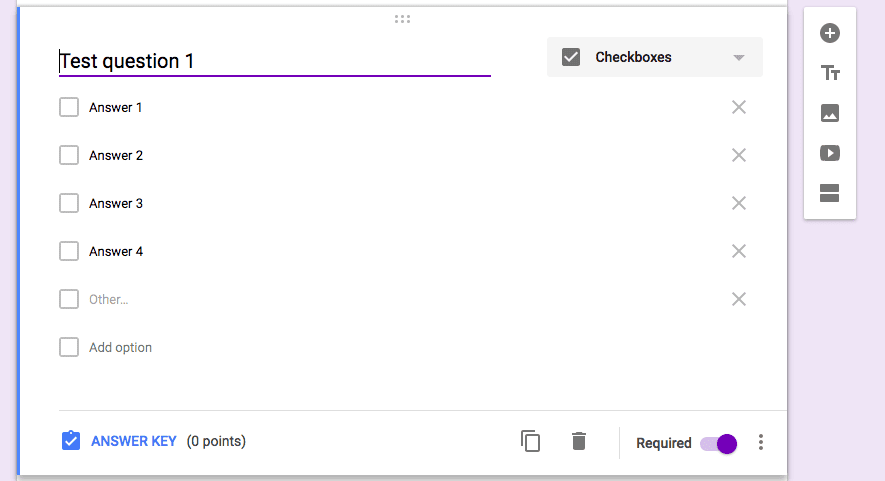
- Visit this page to create a new Google form
- Open the Settings menu (gear icon), select ‘Quizzes’ tab, and toggle ‘Make this a quiz’
- Customize the options that appear below, make sure to check ‘Immediately after each submission’ under ‘Release grade’
- Return to the form, enter your questions along with their instructions, attachments, and options
- Add the answer key for each question, the points for each right answer, and your feedback for right and wrong answers
- Review the form by clicking ‘Preview’ (eye button) on the top right – answer all the questions once and check if everything is working as you hoped.
- Go to the ‘Response’ tab, turn on ‘Accepting responses’ and click on the ‘+’ button to create a spreadsheet for collecting the responses
- Return to your Google Classroom, create a new post (question, assignment, or announcement) and add the particular Google Form as an attachment by clicking the Google Drive button
- Students will be able to view the Form as an attachment to the post
59. How to grade assignments on Google Classroom?
Along with distributing assignments, Google Classroom allows students to turn them in and teachers to evaluate them from right inside the platform. This way the entire process can be paperless.
Here are the steps involved:
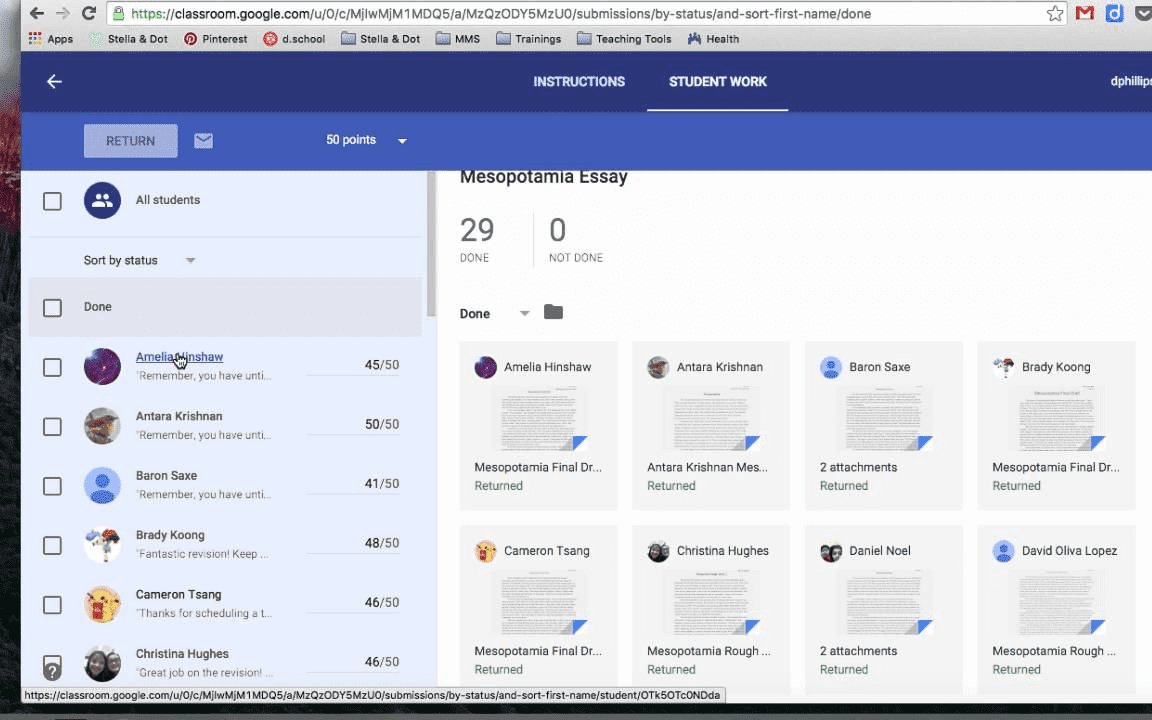
- Select a Classroom, click the ‘Stream’ tab to see all the latest assignments
- Click the number above ‘Done’ to see a list of students who have turned in the assignment
- Click on the name of the student to expand his or her assignment
- Open the attachment to view their assignment
- Review the assignment, add comments if you have to
- Go back to the ‘Student Work’ page
- Set the total points for the assignment, by default, it will be out of 100 points
- Enter the points earned by the student
- Select the student, and click ‘Return’
- A confirmation pop-up will appear where you can add private comments, when finished, click ‘Return Assignment’
Remember: Assignments need to be returned in order for the students to see their grades. They will also receive an email notification when their assignments are returned.
60. How to invite co-teachers?
There may be instances where two or more teachers are collaborating on a particular subject or a topic. Google Classroom makes this process easier by allowing you to invite colleagues to your Classroom.
Here are the steps involved:
- Go to the corresponding Classroom
- Go to the ‘About’ tab, and click on ‘Invite Teachers’
- Type the name or the email of the teacher
- This invitation will appear in the invited teacher’s home screen, they will have to click ‘Accept’
Remember: co-teachers will also get full admin privileges.
61. How to keep guardians in the loop on Google Classroom?
In Google Classroom, teachers have the provision to keep guardians in the loop with automated email summaries of their ward’s progress in the classroom. It consists of details such as missing work, upcoming work, and class activity.
By default, email summaries feature will be turned off. Here’s how you can turn this on:
- Select a class
- Click ‘Students’ tab
- Toggle ‘Include this class in guardian email summary’
After turning it on, you will have to invite the guardians. In the ‘students’ tab itself, beside the names of your students, you will see an option to ‘Invite Guardians’, enter the email addresses of the guardians, and press invite.
Remember: if you are not able to invite guardians, contact your school admin to get the access.
62. How to communicate with students over class comments and private comments?
There are two ways you can communicate with students right inside your Google Classroom – class comments and private comments. Let’s explore:
Class comments: These comments are like your Facebook post comments. They appear in the ‘Stream’ tab and will be visible the entire class. By default, both students and teachers can add and reply to comments.
For example, if a student has a question about an assignment, they can make comment below it, and you can reply to it. Even other students will find it useful as these comments will be visible to the entire class.
Teachers can also alter the permission level. There are three options to choose from: students can post and comment, students can only comment, and only teacher can post and comment. To tweak this, go to the ‘Students’ tab, there is a drop-down menu (below the ‘class code’) with all the three choices.
Private comments: This is for one-to-one conversations between a student and a teacher. It won’t be visible to other students, neither will it appear in the ‘Stream’ tab.
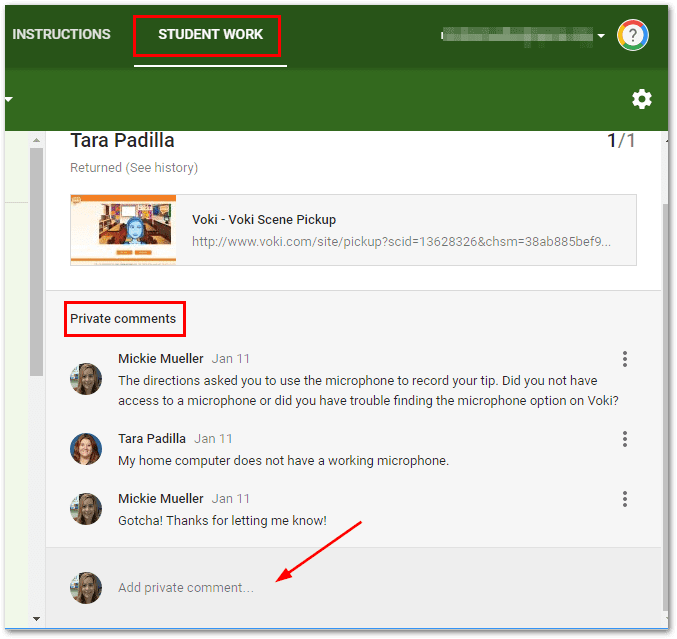
Students have the option to add private comments in their assignment turn-in pop-up. Teachers can view and reply to these comments from the ‘Grading’ screen.
63. How to send emails to students right from Google Classroom?
Besides Private Comments, Google Classroom also allows teachers to communicate with students via email.
Here are the steps involved:
- Select a classroom
- Click ‘Student’s tab
- Select the student(s) you want to send an email
- Click ‘Actions’, select email
- A Gmail pop-up will appear, enter your message and click ‘Send’
Remember: You need to have Gmail turned on for this feature to work. Contact your school admin if you haven’t.
Google Classroom paves way to interactive learning
Let’s face it, change is not easy. We resist change all the time, even when we know it is good for us. Why? Mostly because of the initial effort we need to put in to learn and adjust to things.
As you can see, this is not the case with Google Classroom. It makes the transition so easy that you only need some basic technical knowledge to get started. Within no time you will be able to streamline your basic classroom operations and tasks, and spend quality time teaching.