 Skip to content


Google Workspace (formerly G-suite) is undoubtedly the best suite of productivity features. You find everything you need inside it: email, calendar, documents, and more. It’s built for individuals and businesses wanting to work smarter and in a more efficient manner.
Out of all the beneficial features Google Workspace provides, one that stands out is email forwarding.
Google Workspace email forwarding ensures the right emails find their way to the correct inboxes. Efficient email forwarding means no missed opportunities. It means staying connected, always.
In this guide, we’ll go in-depth into the world of Google Workspace email forwarding. We’ll explore 5 ways to set up email forwarding rules and how they are beneficial. We will also discuss the best practices to set up email forwarding rules, to help you get the most out of it.
Table of Contents
- What is Email Forwarding in Google Workspace?
- 5 Types of Email Forwarding in Google Workspace
- Best Practices for Safe Email Forwarding in Google Workspace
- The Way Forward: A Real-Time Email Management Platform
- Frequently Asked Questions (FAQs)
What is Email Forwarding in Google Workspace?
Email forwarding in Google Workspace lets you automatically direct incoming emails from one account to another. This ensures that messages reach the right inbox without manual effort. Unlike traditional manual forwarding, this feature uses automation/rules to configure the process.
For example, if you run a business with a generic email like info@business.com, you can set up rules so that emails containing words like “purchase” or “price” are instantly sent to your sales team (sales@business.com). You can also configure Google Groups for specific departments to ensure that team-wide communication is streamlined.
Meanwhile, emails mentioning “help” or “issue” can be forwarded directly to customer support (support@business.com). This way, each department gets the emails they need without any delay, keeping your operations smooth and efficient.
[cta_block]
5 Types of Email Forwarding in Google Workspace
Google Workspace offers multiple ways to forward emails to the right recipient. Let’s find out what they are.
1. User-level email forwarding
As the name suggests, user-level email forwarding can be set up by any Gmail user. It allows individual users to determine a destination for their incoming emails other than their primary inbox.
For example, let’s say you are working for a business’s support team, you are planning to take a vacation. Now, you wouldn’t want to return to an overflowing inbox with queries needing immediate attention, right? To manage this, you can use user-level email forwarding to forward all emails sent to your inbox to your teammate while you’re away.
This way, the team stays agile by quickly addressing customer queries and ensuring that nothing is overlooked.
How to configure user-level email forwarding in Gmail?
Please note that in order to set up user-level email forwarding, you should ensure that your admin has enabled automatic forwarding for your domain. If you want to enable this feature as an admin, check out these steps.
Step 1: Log in to your Gmail account
Step 2: Click on the gear icon, and then select ‘See all settings.’

Step 3: Go to the tab “Forwarding and POP/IMAP.”
Step 4: Select “Add a forwarding address” and then enter the email address where you want the incoming emails to be forwarded to.

Step 5: Click “Next” and then follow the verification steps. Then click “Proceed”.

Step 6: A verification message will be sent to the recipient’s address. Click on the verification link and follow the steps to confirm the forwarding address.

Step 7: Once the address is confirmed, go back to the settings page on the original Gmail account and refresh your browser.
Step 8: Go to the “Forwarding and POP/IMAP” tab.
Step 9: Select “Forward a copy of incoming mail to”

Step 10: Choose what you want to happen with the Gmail copy of your emails. We recommend keeping the email’s copy in the Inbox.

Step 11: Click “Save changes”

2. Email forwarding by Google Workspace admins (Global Forwarding)
Admin-level email forwarding, also known as global forwarding, is a powerful feature that allows GW administrators to set rules for redirecting emails. Instead of having users manually forward emails, admins can configure settings to automatically send emails to a different address.
So when is this beneficial?
Let me explain this with an example. In a business setup, employees come and go and departments get restructured. Now, let’s say a project manager transitions out of your company.
This is where a GW admin can set up global forwarding. Instead of these emails going unread and piling up, an admin can set a rule to auto-forward all incoming messages from the former employee’s inbox to their replacement or their supervisor.
How to configure global forwarding automatically?
Please note that to enable this, you have to be a Google Workspace admin.
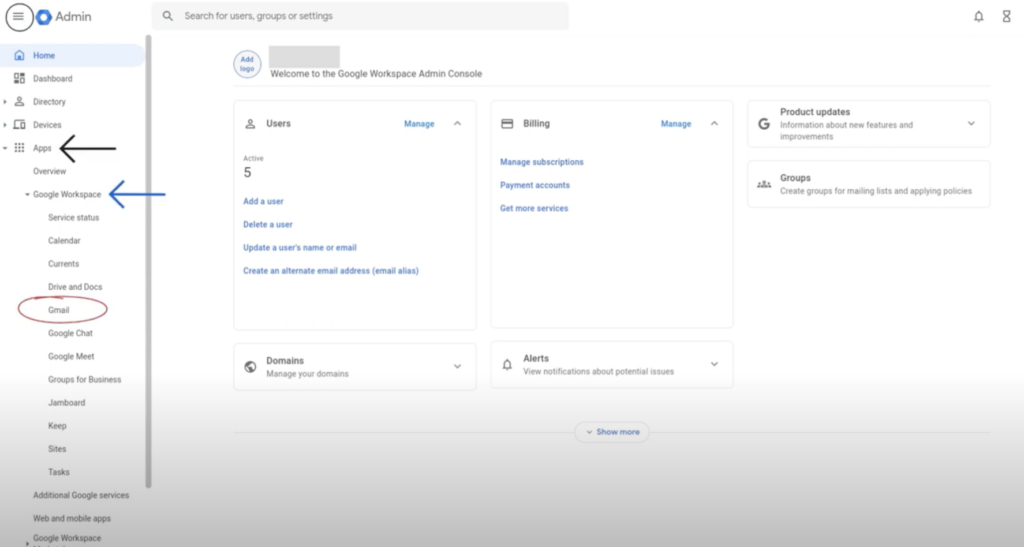
Step 1: Go to Google Admin Console and log in to your admin account
Step 2: Navigate to “Apps” > “Google Workspace” > “Gmail”

Step 3: Select “Default routing”,

Step 4: Select “Configure” to add a rule. In case you already have some rules set up, select “Add another rule”.

Step 5: Then define the rule. In this example, I am setting email forwarding for just one address. Enter the email address from which you want to forward emails. You can also select multiple mail addresses or even group email addresses.

Step 6: Scroll down and select “Also deliver to”. Click “Add” and enter the address where you want to forward the emails. (recipient address). Then click “Save”

Step 7: Under “Options” select “Perform this action on non-recognized and recognized addresses”. And click “save”

One key difference between user-level and global forwarding is that with the latter, you can set up these routing rules for single user, multiple users, or groups. On the contrary, with user-level forwarding, you can only set up email forwarding to only one specific email address.
You may also like: G Suite Security: The essential checklist for Admins
3. Email forwarding from a Google Workspace Group
This method enables you to forward emails to a number of recipients simultaneously. If you use a group mail address (ex: marketing@yourbusiness.com) you can route emails received in this address to individual group members. This ensures that every member of the team gets a copy of any emails received in the group email.
For example, imagine you have just launched a new product campaign and customer feedback, inquiries, and leads start pouring in to your group mail id: marketing@yourbusiness.com.
Instead of checking the group mail every time, you can route these emails to every member of the marketing team. This way, no single person gets overwhelmed. Everyone on the team gets a copy and no message goes unnoticed.
How to set up group-level email forwarding?
In order to auto-forward group emails, you have to be a group admin or group manager of your GW group.
Step 1: Log in to your Google Workspace account, go to “Google Apps” and then “Groups”.

Step 2: Select the relevant group mail ID. If the group doesn’t exist yet, use this guide to create one.

Step 3: Click on the “Add Members” icon.

Step 4: A pop-up box will appear. Add the members who should receive forwarded emails.
Step 5: Finally, click on “Add Members” again to save the process.

4. Catch-all email forwarding
Catch-all email forwarding enables you to receive emails sent to a non-existent or misaddressed email ID in your domain. With this type of forwarding, you can prevent emails from getting bounced by redirecting them to a pre-determined email ID.
For example, a customer wants to reach out to your customer support team . But they accidentally mail their concern to “businessupport@business.com.” instead of “customersupport@ybusiness.com”. This is a wrong mail ID. With catch-all Email Forwarding activated, this email can be forwarded to the in the designated inbox (customersupport@business.com).
How to set up catch-all email forwarding?
Please note that to configure this, you have to be a Google Workspace admin
Step 1: Log into the Google Admin Console.
Step 2: Select “Apps” > “Google Workspace” > “Gmail
Step 3: Scroll down to the bottom and click “Routing.”

Step 4: Then click “Configure”

Step 5: Name your routing rule to easily identify it later

Step 6: Then select “Inbound” under “Email message to affect”

Step 7: Then select “Modify message” and scroll down

Step 8: Select “Change envelop recipient” > “Replace recipient.” Then enter the email address where you want all the emails to be forwarded to (recipient address)

Step 9: Scroll down and click “Show options.”

Step 10: Under “Account types to affect,” click “Unrecognized/Catchall”. Finally, click “Save”

You may also like: 8 Examples of Bad Customer Service and How to Avoid Them
5. Filtered or rule-based Forwarding
Filtered or rule-based forwarding is used to auto-forward emails based on some specific criteria, such as keywords, sender address, or attachments. When an incoming email matches the predefined criteria, it is automatically forwarded to a designated address.
For example, imagine a brand frequently receiving partnership proposals and vendor communications. To expedite the proposal review process, the business can set a forwarding rule: Any email with “partnership proposal” in the subject line gets forwarded to both the CEO and the head of partnerships. This ensures timely reviews and faster decision-making.
How to set up rule-based forwarding?
Step 1: Click on the gear icon in Gmail and select “See all settings.”
Step 2: Go to ‘Filters and Blocked Addresses’. Then click on “Create a new filter”.

Step 3: A box will appear, where you have to define the criteria for your filter. This can be based on several aspects:
- From: Emails from a specific sender.
- To: Emails addressed to a particular recipient.
- Subject: Emails with a specific word or phrase in the subject.
- Has the words: Emails containing specific words or phrases in the body.
- Doesn’t have: Emails that do not contain specific words or phrases.
- You can also choose to filter emails with attachments or based on their size.
For the purpose of this guide, I will create a filter of a couple of keywords. Then, click on “Create filter.”

Step 4: To forward the email, tick the box next to “Forward it to:”

Step 5: From the dropdown menu, choose the email address you want to forward the emails to. If the address isn’t listed, you’ll need to add a new one and verify it.
Step 6: Once you’ve set up your forwarding action, click on “Create filter” to save it.

Recommended read: Gmail Filters 101: Your Definitive Guide To Gmail Filters
Best Practices for Safe Email Forwarding in Google Workspace
By now, you must be convinced that the email forwarding feature in GW is quite convenient. It’s a great email management practice to ensure no communication slips through the cracks.
However, if these forwarding techniques are not managed properly, it can pose security risks and forwarding loops. Here are a couple of best practices to ensure that your information stays protected all the time.
1. Conduct regular audits
It is essential to periodically review your email forwarding settings – just like you do your finance audits. This proactive approach helps identify and address outdated or unnecessary forwarding rules.
If you are running a business, you can ask your GW admins to review and audit these automations. They can ensure that email forwarding rules align well with everyone’s workflow and also adhere to security best practices.
2. Enable two-factor authentication (2FA)
2FA works by requiring a second form of verification in addition to your password. This could be a code sent to your phone or a security key. It’s an effective deterrent against unauthorized account access attempts.
When you make changes to forwarding rules, having 2FA enabled ensures that changes are genuinely made by the account holder.
Recommended read: Email Security Best Practices: Your Ultimate Guide
3. Educate team members
Often, security breaches happen due to a lack of knowledge. Organize regular training sessions or workshops to educate employees about the significance of secure email forwarding practices.
Whenever there are updates or changes in the email system or forwarding features, circulate notifications across the team or organization.
4. Review domain lists
Maintain a list of trusted domains. Only allow forwarding to these domains, or at the least ensure there’s an additional verification step if emails are being forwarded to non-whitelisted domains.
Recommended Read: 23 Email Management Best Practices and Tips
5. Avoid email forwarding loops
An email forwarding loop is a cycle that occurs when email messages are indefinitely routed between two or more email accounts due to interconnected or overlapping forwarding rules. This repetitive sequence can lead to system overloads and potential data losses, as the email message becomes trapped in an endless loop, unable to reach a designated endpoint.
How to avoid creating loops?
- Monitor Forwarding Chains: Be aware of how you’re setting up forwarding rules. If you’re forwarding email A to email B, ensure email B isn’t forwarding back to email A.
- Use Warning Systems: Google Workspace can detect and warn users of potential email loops. Make sure to not ignore these warnings.
- Regular Reviews: Periodically check your forwarding rules and the rules of major groups within your organization. Keeping tabs can help detect and rectify loops.
The Way Forward: A Real-Time Email Management Platform
Google Workspace email forwarding might seem daunting, but with the right strategies and knowledge, it can become a powerful feature to ensure no communication is missed. But email forwarding alone won’t cut it. Your business should focus on optimizing email management for maximum efficiency.
This is where Hiver comes into play. A seamless solution built for teams, Hiver transforms your Google Workspace into a collaborative hub, streamlining email workflows without the need for constant forwarding.
From shared inboxes to automations to actionable analytics, Hiver ensures that your team stays on top of every email – without having them leave their Inbox.
Frequently Asked Questions (FAQs)
- Can I set up email forwarding for multiple addresses in Google Workspace?
Yes, however to set this up, you’ll need a GW admin account. Admins can configure this through global forwarding rules, where you can forward emails from a single account to multiple recipients or even group addresses.
- Is it possible to forward only specific emails in Google Workspace?
Absolutely. With rule-based email forwarding, you can create forwarding criteria based on keywords, sender addresses, or even attachments.
- How can I avoid bouncing emails if they are sent to a non-existent email address?
If you have catch-all email forwarding enabled, any email sent to a non-existent or misspelled address within your domain will be automatically redirected to a designated inbox.
- What is the difference between user-level and admin-level forwarding in Google Workspace?
User-level forwarding allows individual users to forward their emails to a single address, while admin-level (global) forwarding enables administrators to set up forwarding rules for multiple users, groups, or the entire domain.


