Skip to content


It’s a busy day at work, and you’re looking through your inbox for a specific email. You’re not able to find it amidst all the clutter. Frustrating, right?!
That’s where Microsoft Outlook offers an effective solution: email filters.
Outlook filters automatically help you sort, organize, and manage your emails based on specific criteria. By using these Outlook filters, you can find exactly what you need without manually going through every email.
In this guide, we’ll walk you through the step-by-step process of setting up Outlook Filters.
Table of Contents
- What are Outlook Filters?
- How to Set Up Outlook Filters?
- Practical Examples of Outlook Filters
- Advanced Outlook Filter Techniques
- Troubleshooting Common Issues With Outlook Filters
- The Way Forward
- Frequently Asked Questions (FAQs)
[cta_block]
What are Outlook Filters?
Outlook filters are a set of features offered by Microsoft that help you automatically sort and organize incoming emails based on certain criteria you set up. Think of them as rules you create to tell Outlook how to handle specific types of emails so you don’t have to organize your inbox manually.
For example, let’s say you get a lot of email messages from your manager, and you don’t want to miss any of them. You can create a filter that automatically moves any email from your manager to a special folder called “Important.”
This way, every time an email from your manager lands in your inbox, it’s instantly moved to the “Important” folder so you can easily find it later.
Outlook Filters can do all sorts of things: flag emails, mark them as read, categorize them, or even delete them if they’re spam.
Recommended read: How To Create And Use Email Templates in Outlook
How to Set Up Outlook Filters?
Here’s a step-by-step guide to help you create filters in Microsoft Outlook.
We’ll explore how to set up filters in both the desktop and web versions of Outlook. Depending on the version you use, you can easily create filters with these steps.
Create filters in Outlook’s web version
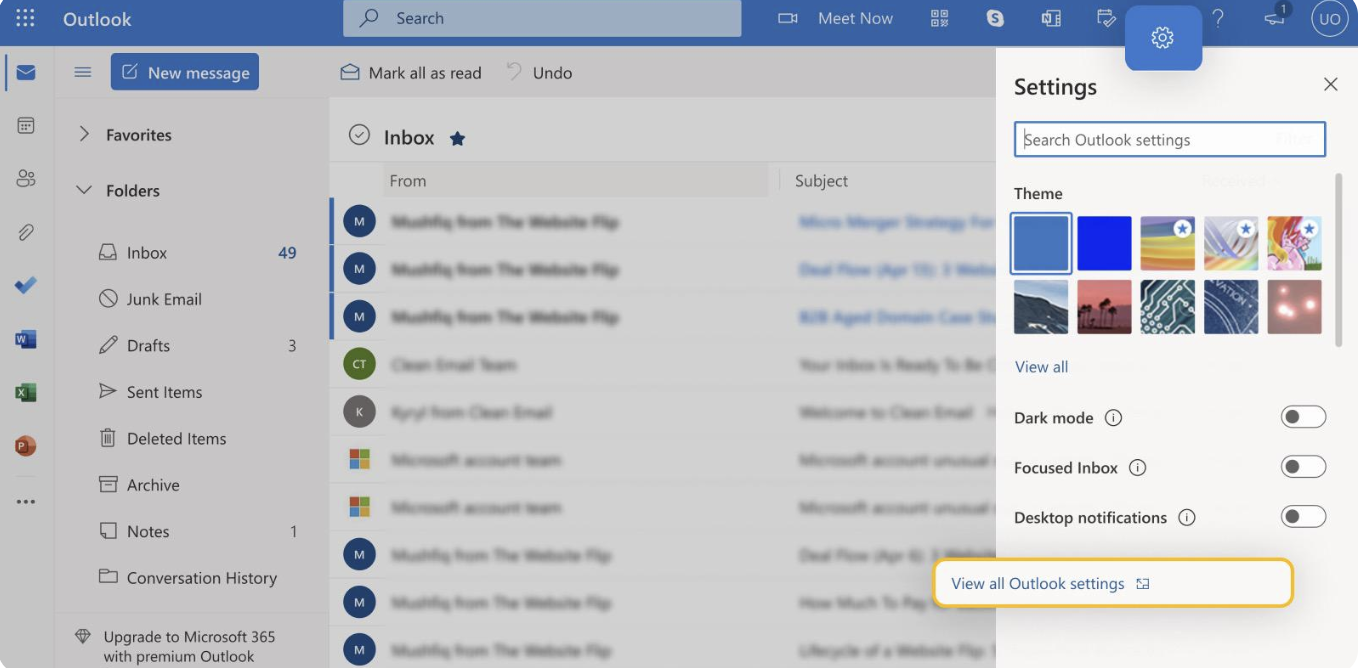
Step 1: Open your web browser and go to outlook.live.com. Log in with your email and password.
Step 2: In the upper right corner, click on the gear icon to access the settings menu. Then click on “View all Outlook settings”
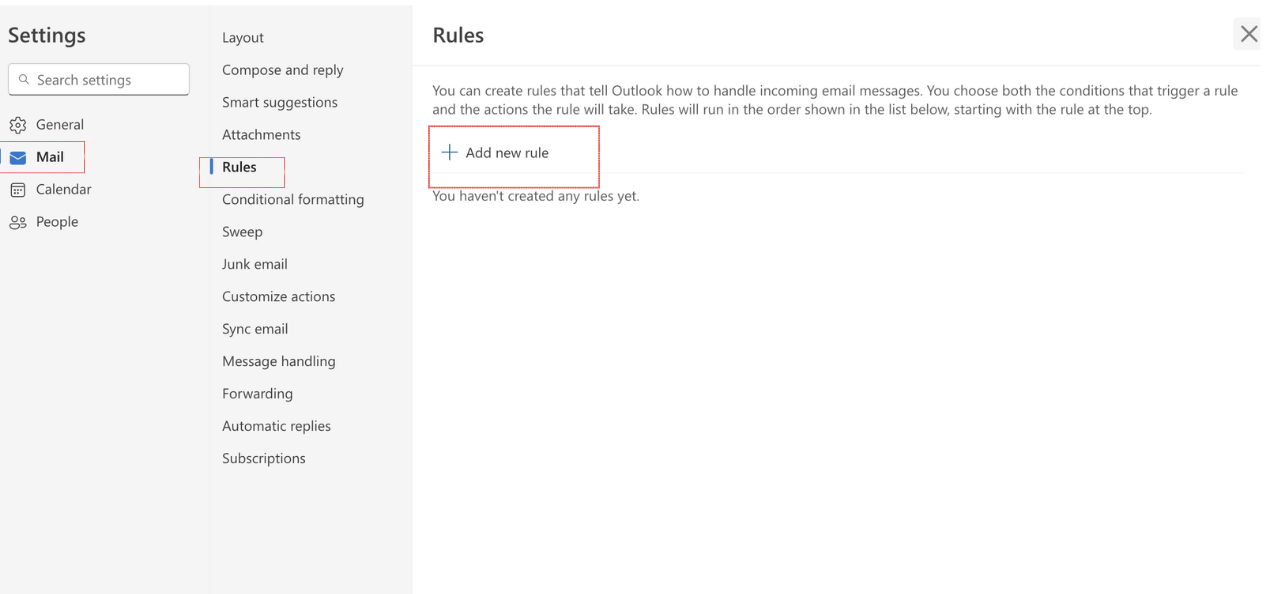
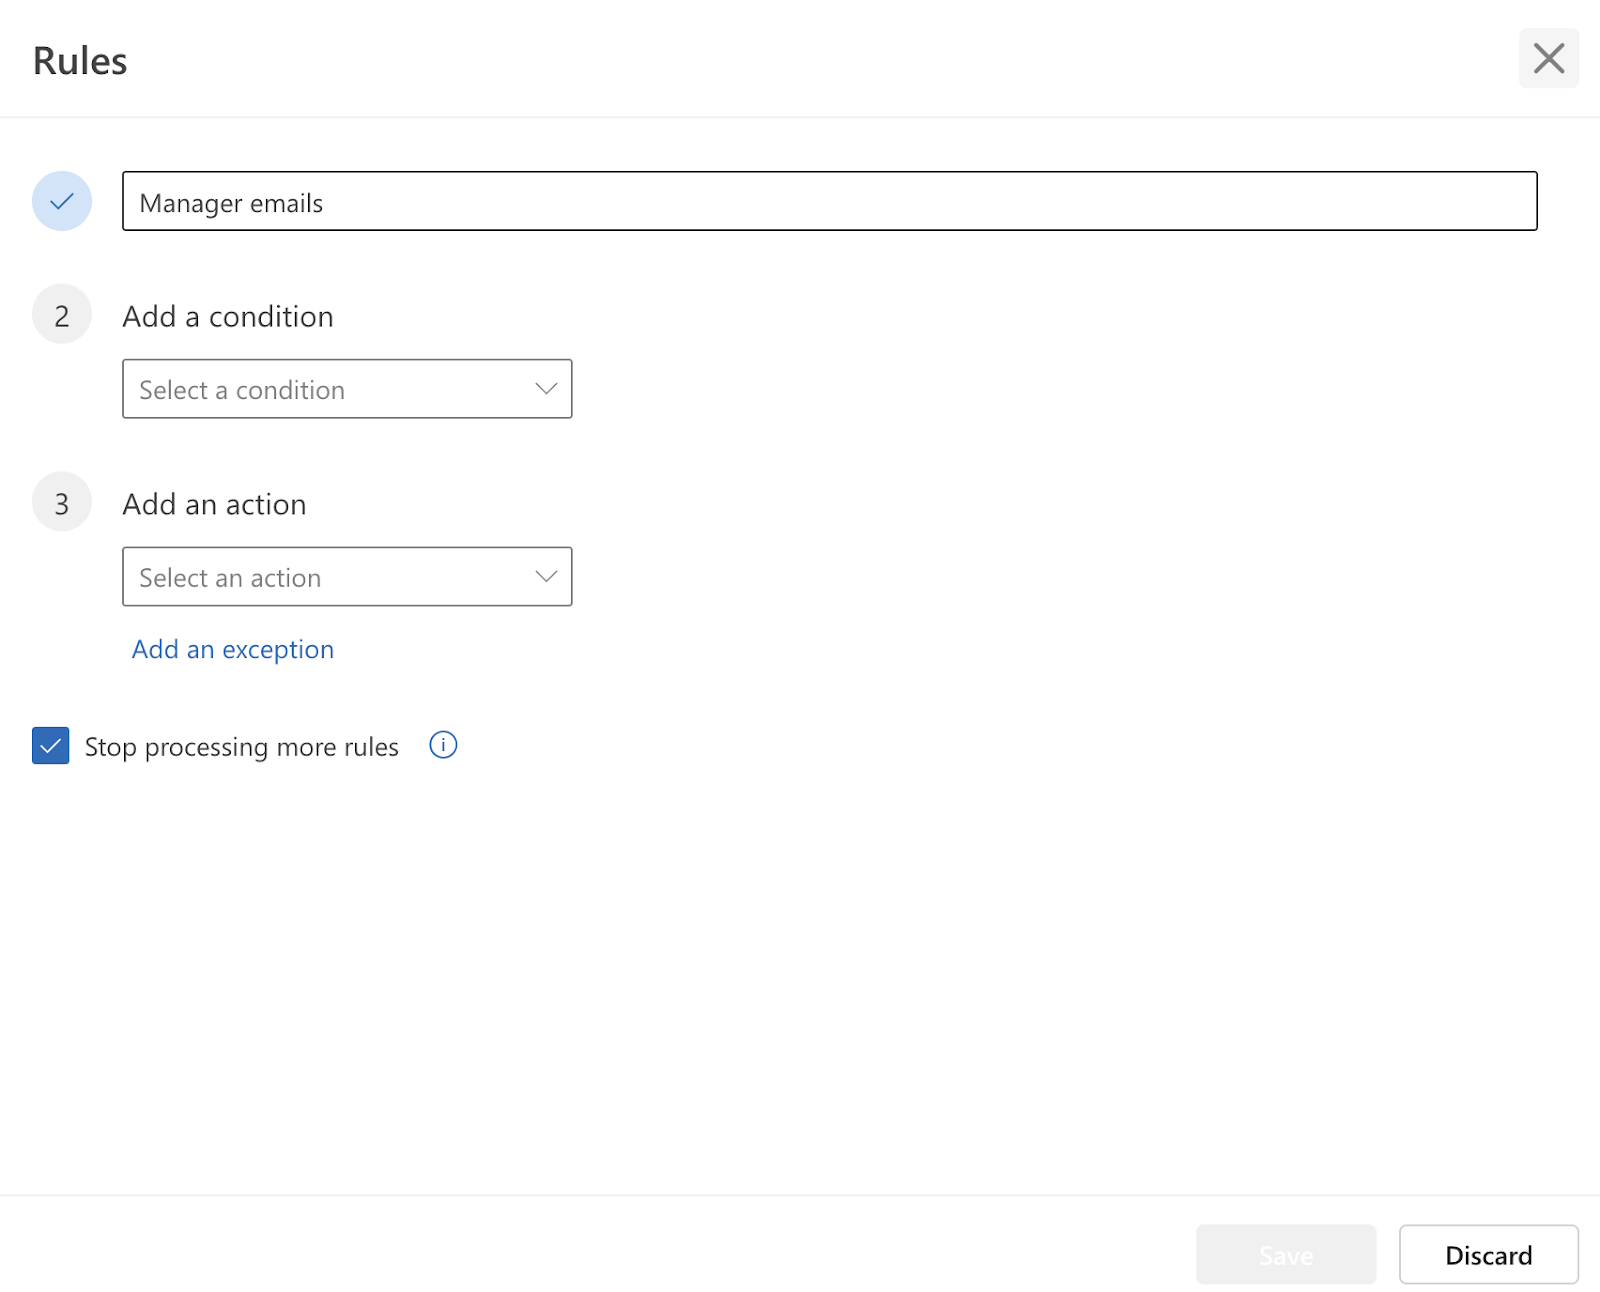
Step 3: In the settings window, go to “Mail” and then select “Rules.”
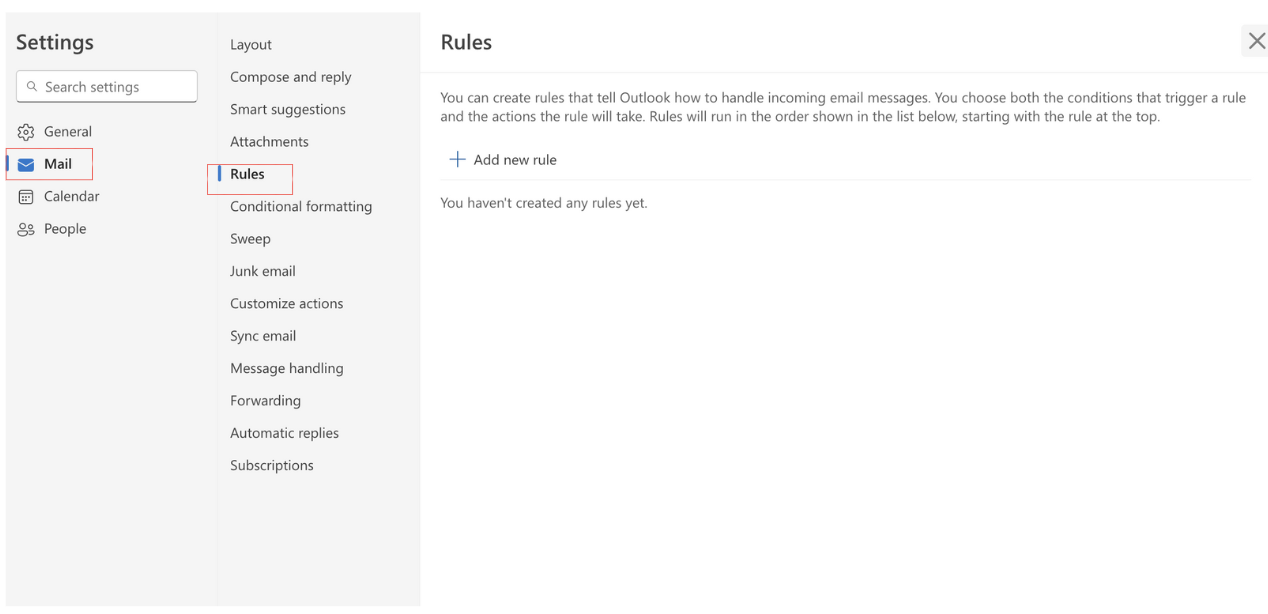
Step 4: Click on “Add new rule.”
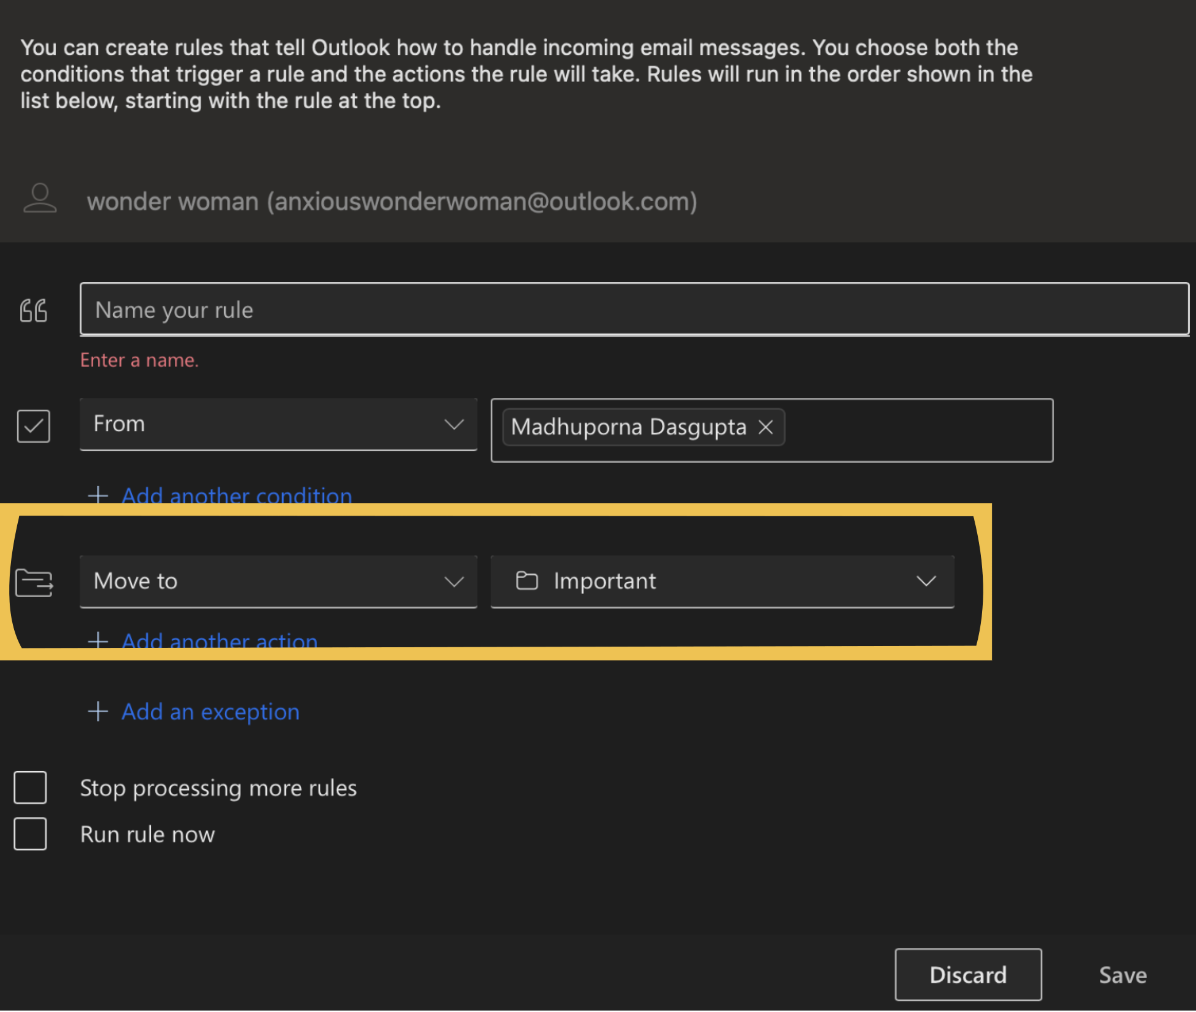
Step 5: Give your rule a name, something easy to remember like “Manager Emails.”
Step 6: Click on “Add a condition” and choose what you want the filter to look for. In this example, I want to filter emails received from my manager. So, select “From” and enter your manager’s email address.
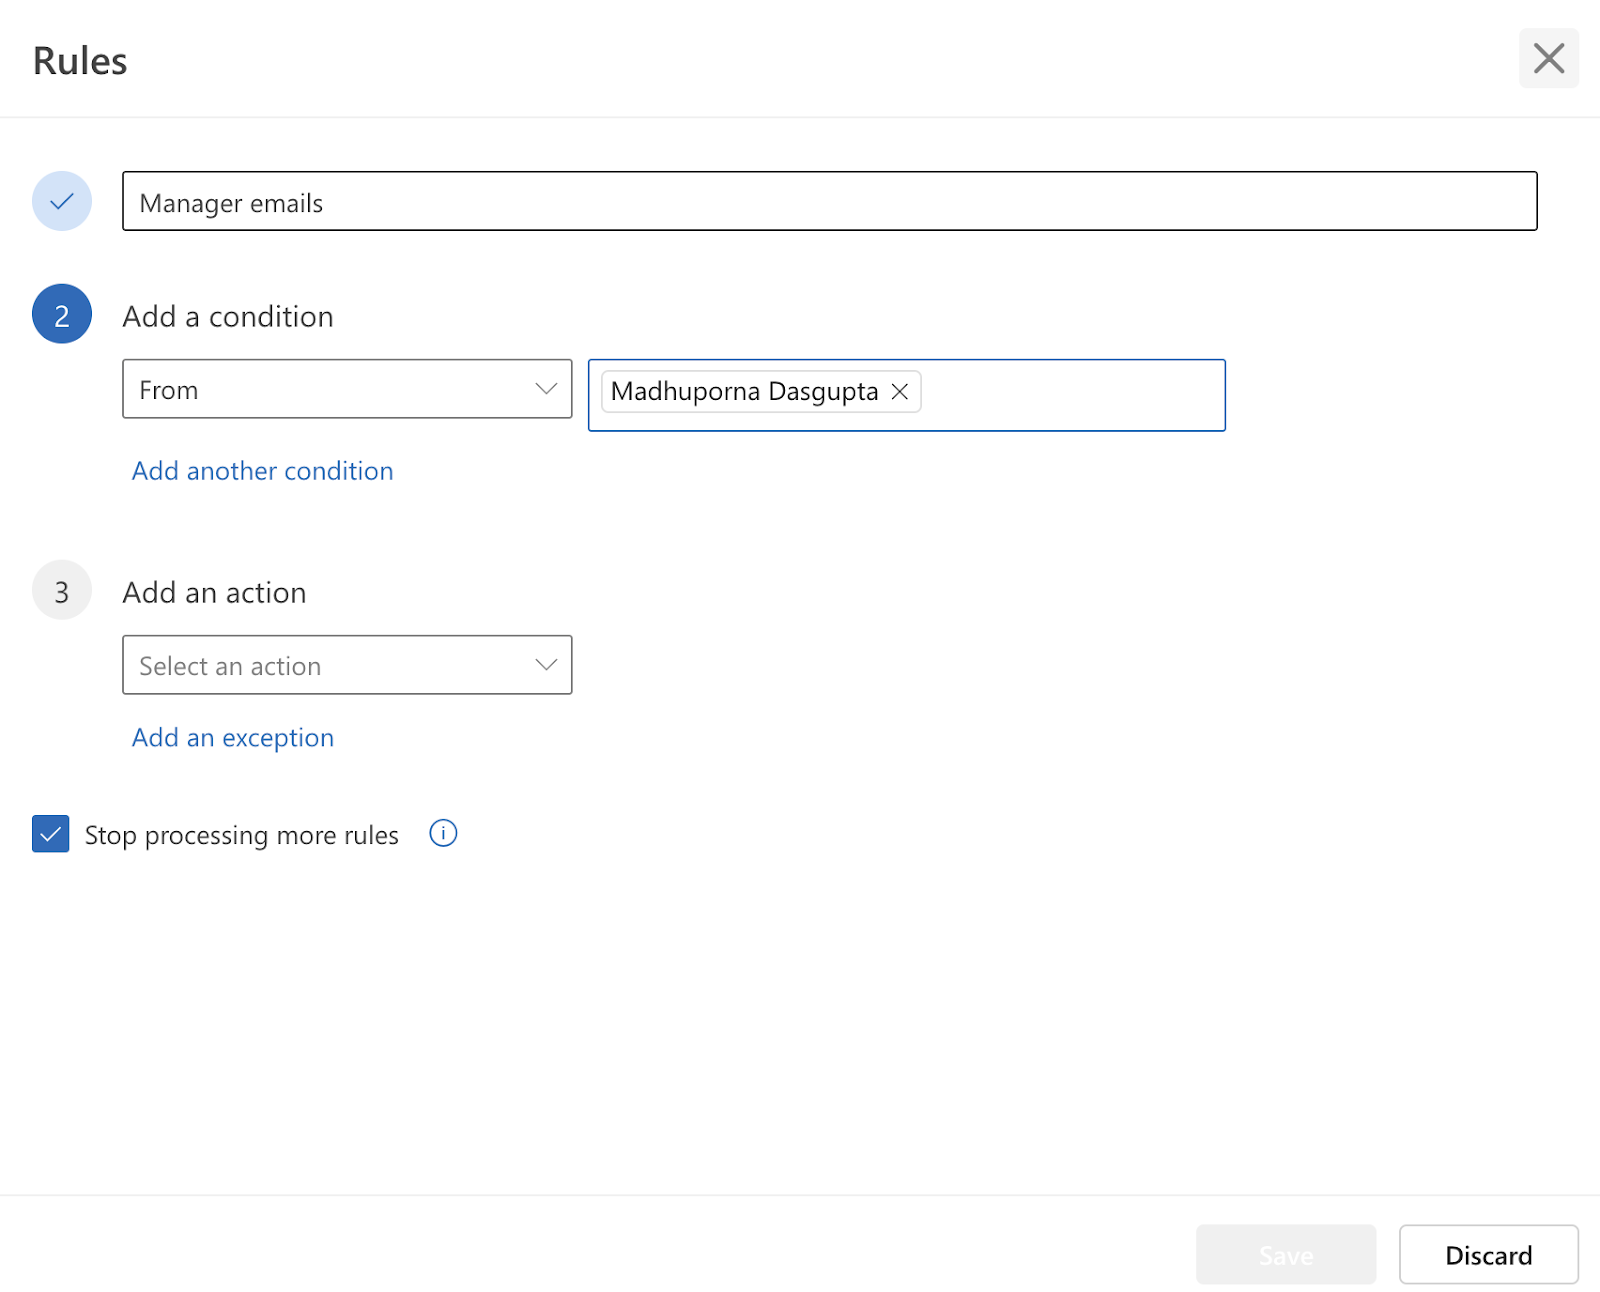
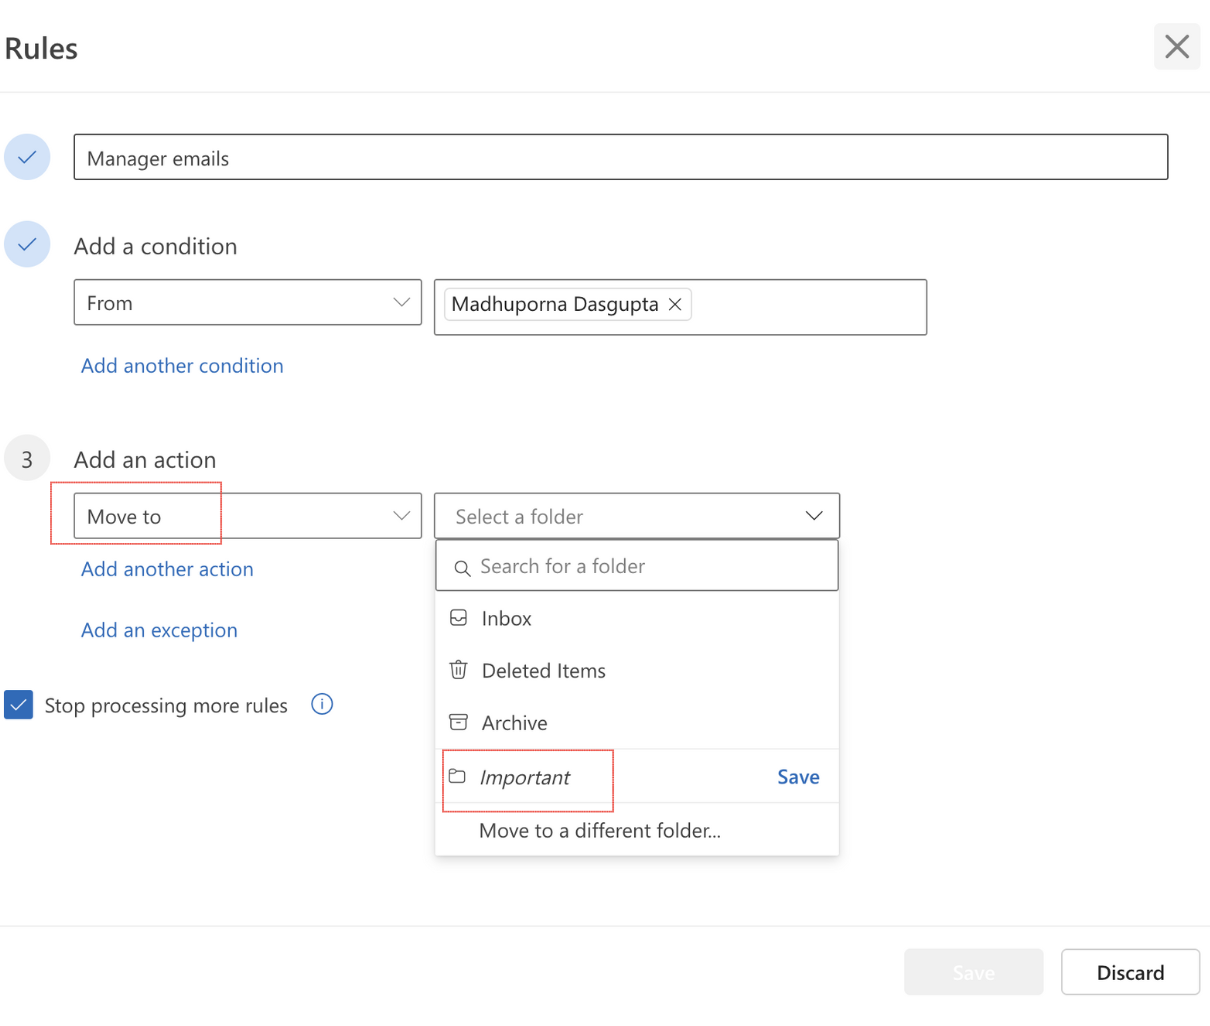
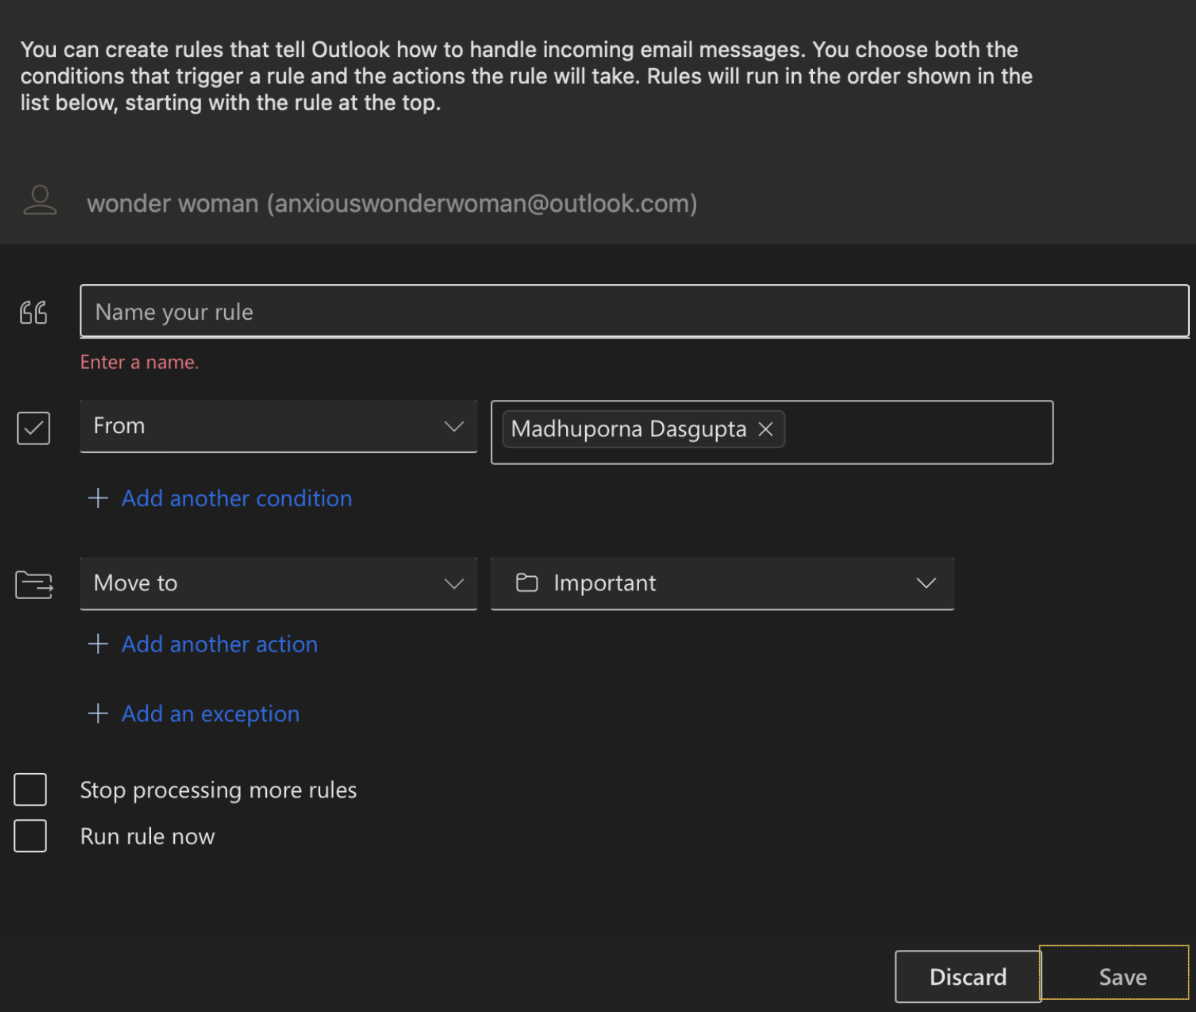
Step 7: Next, click on “Add an action” and choose what you want to happen. For example, select “Move to” and then “Create new folder”. And then name the folder “Important”. Then click “Save”.
Step 8: Click “Save” to create your filter.
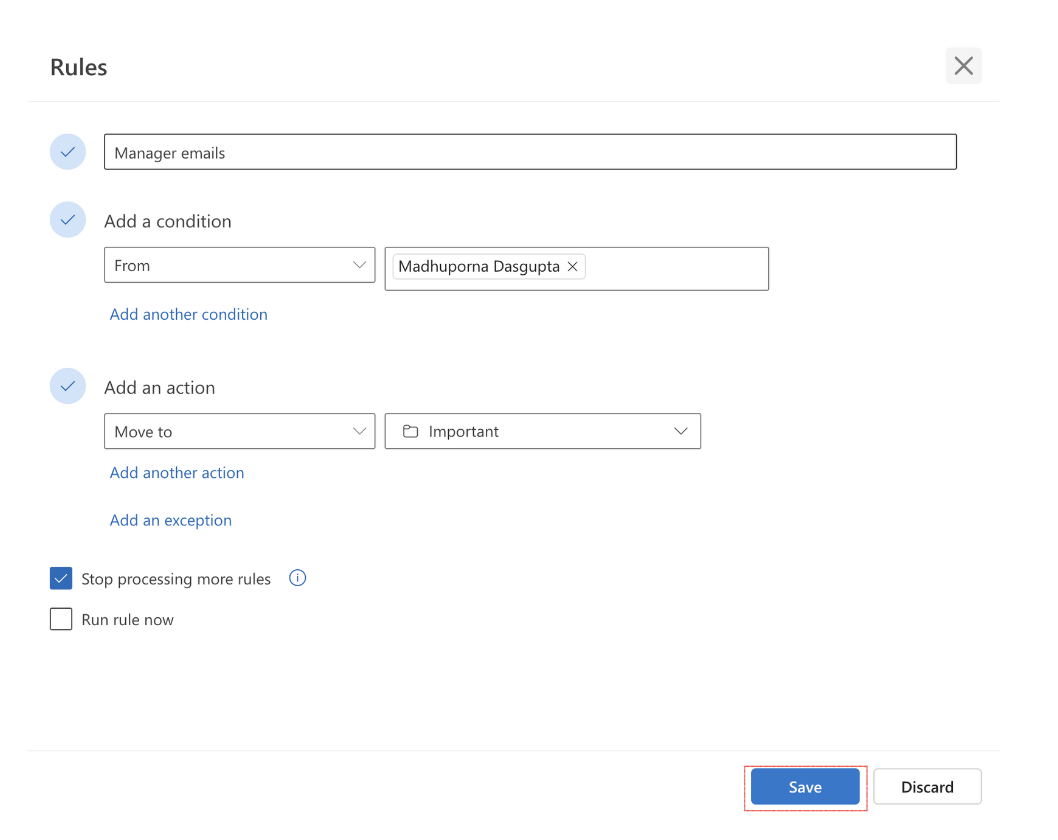
And you’re done creating your very first filter in Outlook.
Create filters in Outlook’s desktop version
If you use Outlook’s desktop version, here’s how to set up filters. The process is quite similar to the web version, but there are a few differences in the initial steps.
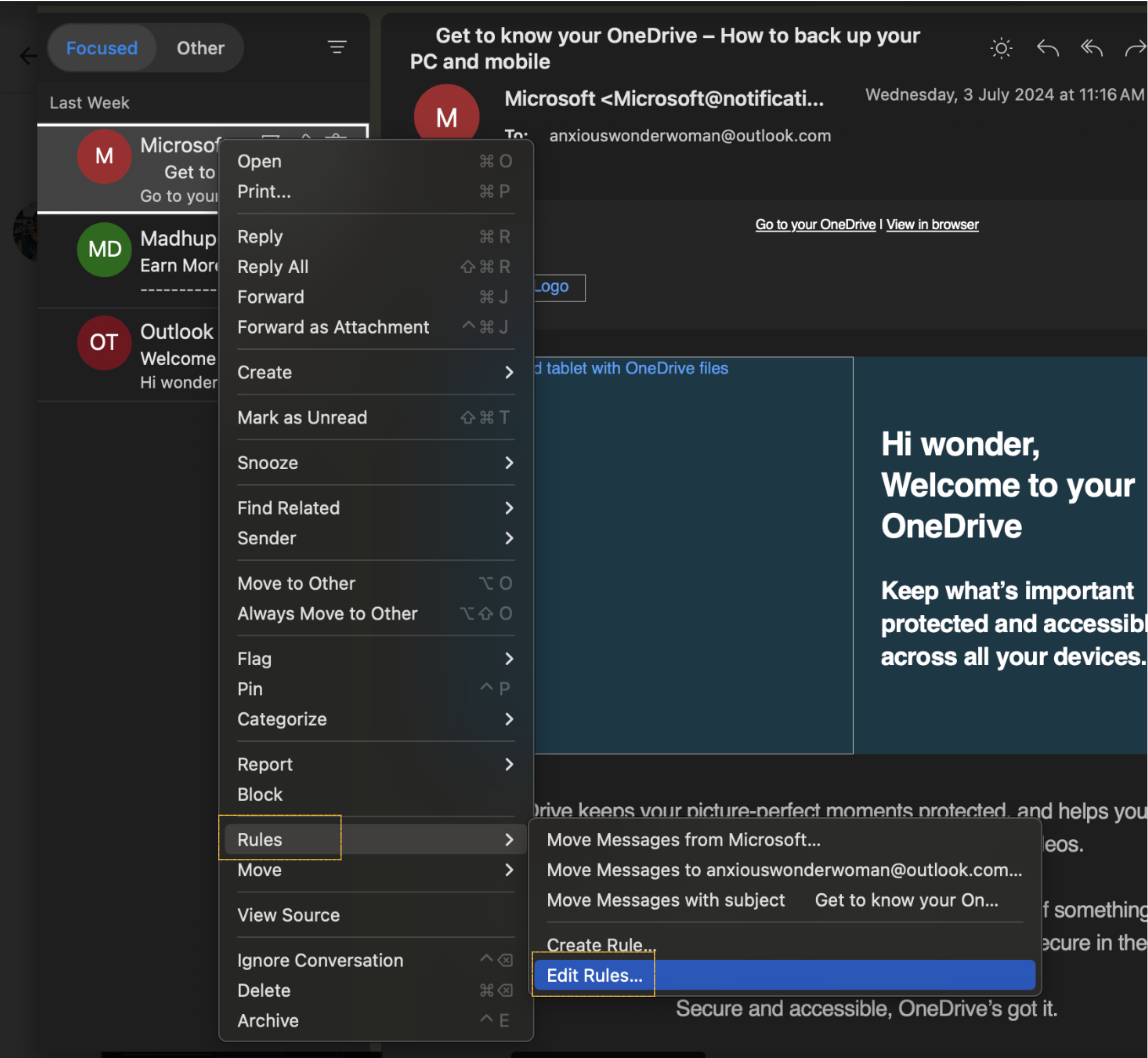
Step 1: Right-click on any message in your inbox or a specific Outlook folder and select Rules and then Manage Rules & Alerts (Windows) or Edit Rules (Mac).
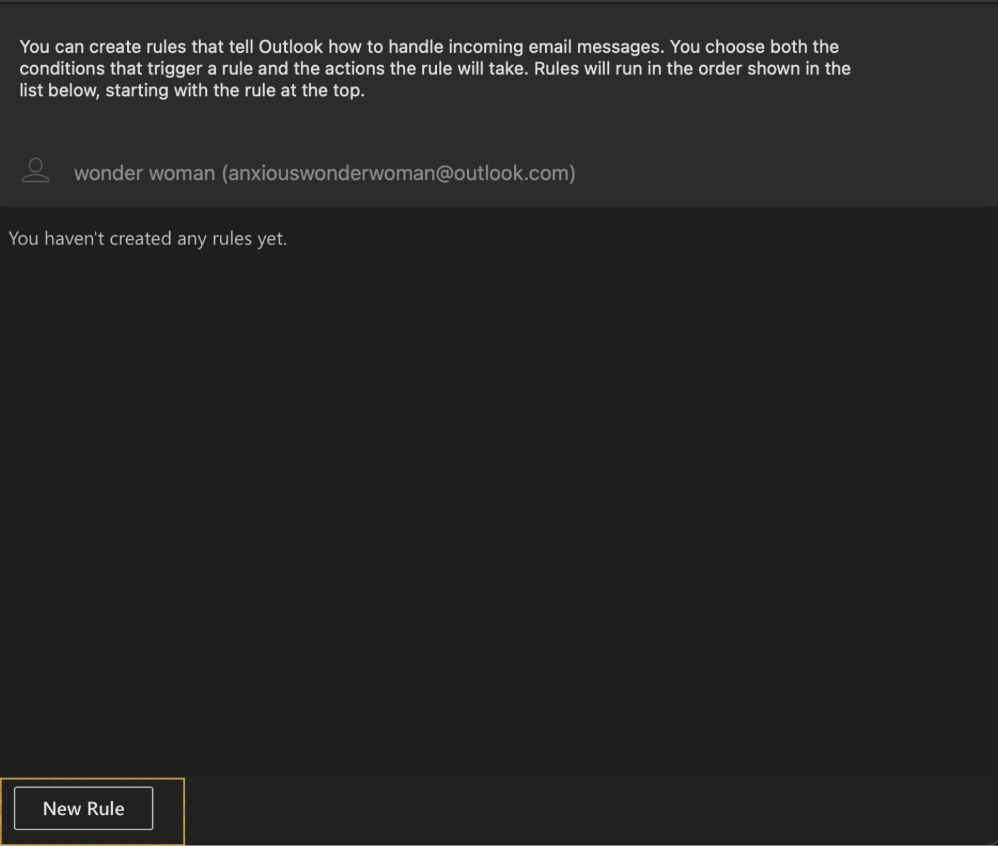
Step 2: Create a new rule. To do this, press the “Add New Rule” button on Windows or the “New Rule button” on Mac.
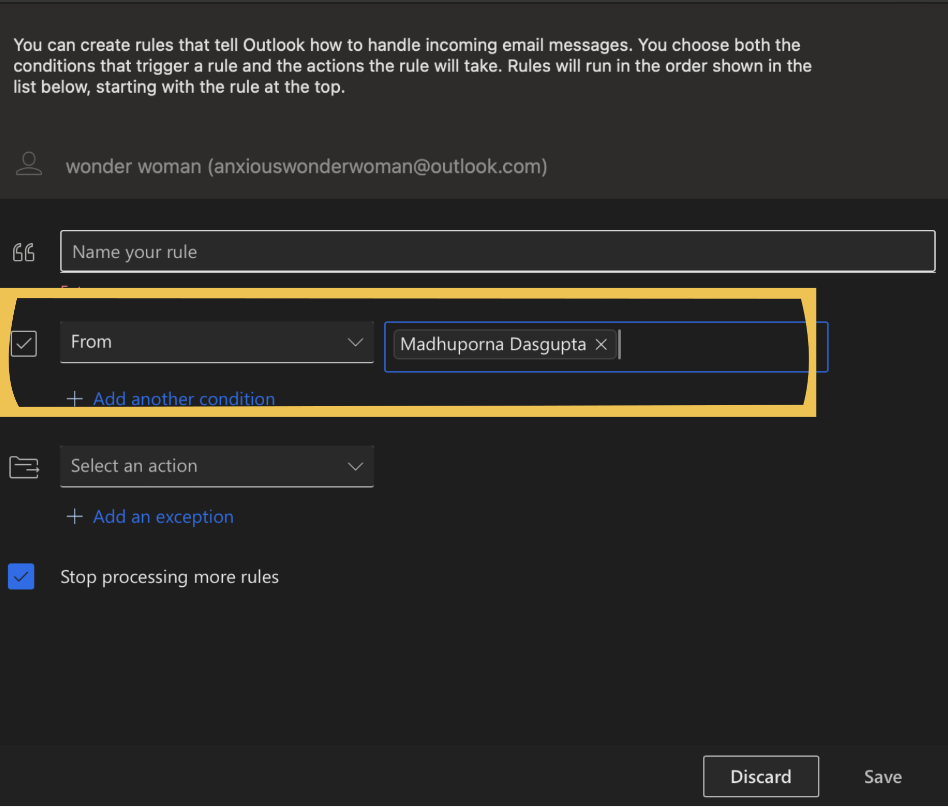
Step 3: Give your rule a name. For example, I am naming the rule as “Manager Emails.”
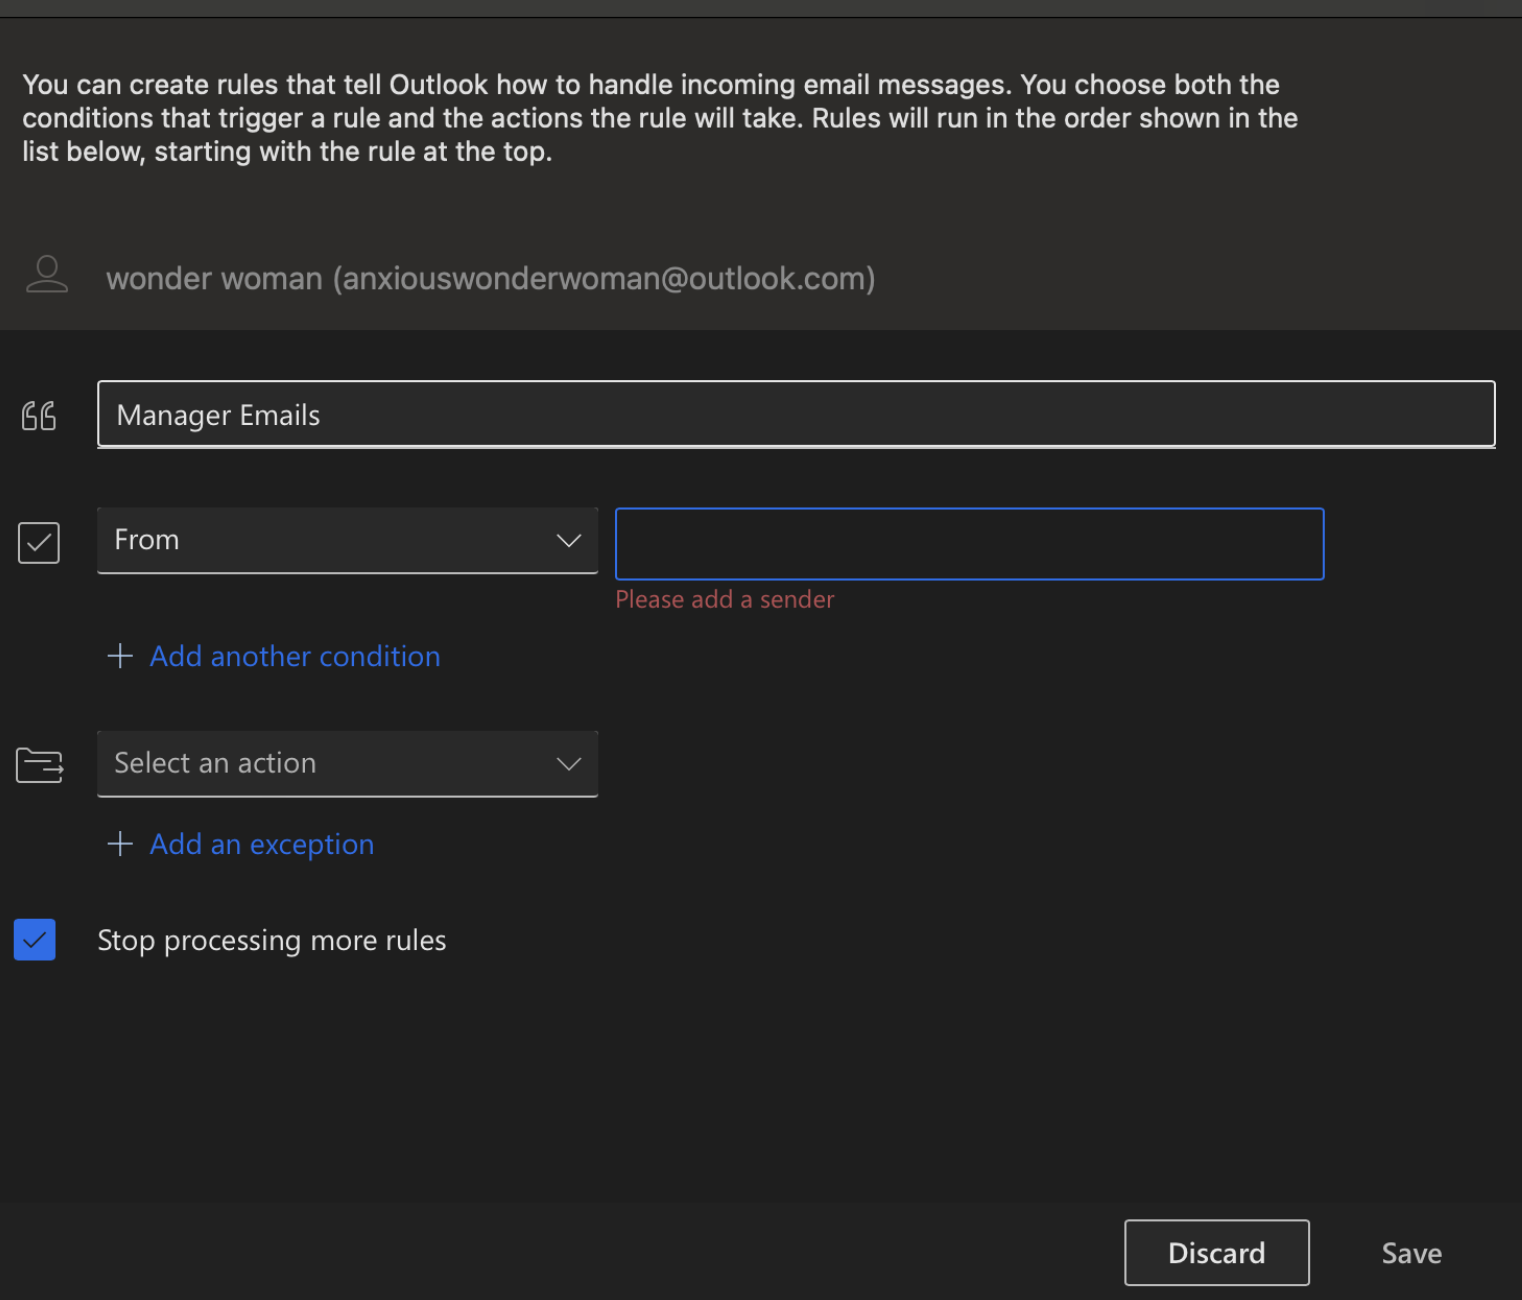
Step 4: Now, we’ll have to add the condition. In this example, I want to filter emails received from my manager. So, select “From” and enter your manager’s email address.
Step 5: Click on “Add an action” and choose what you want to happen. For example, select “Move to” and choose the “Important” folder. This way you can move messages received from a specific email ID to a separate folder.
Step 6: Click “Save” to create your filter.
And that’s how you set up a filter in the outlook desktop version
Recommended read: How To Create Rules In Gmail
Practical Examples of Outlook Filters
Using Outlook filters can help you manage your inbox better. You’ll be able to sort through the clutter, prioritize important messages, and stay organized.
Here’s a review of how a user manages their inbox with Outlook filters.
Here are some use cases to help you filter emails in your Outlook inbox.
1. Filter by specific senders
As the heading suggests, let’s say you want to ensure that all emails from your manager are easily accessible in your inbox. Here’s how to do it:
Step 1: Open the filter settings to create a new rule. To do this, follow the steps mentioned in the above section on “How to Set Up Outlook Filters”.
Step 2: In the New Rule window, add the name of the rule. Then in the “Add a condition” section choose “From” and enter your manager’s email address.
Step 3: In the “Add an action section” Select “Move to” and choose a specific folder you want to move these emails. And then click “Save” in the end.
This way, all emails from your manager will automatically move to the designated folder, ensuring you never miss an important message.
2. Organize emails by keywords
Let’s say you’re involved in multiple projects. You want to organize emails regarding a single project named “Project Alpha” into one folder.
Here’s how to do it:
Step 1: Open the filter settings to create a new rule. To do this, follow the steps mentioned in the above section on “How to Set Up Outlook Filters” based on the Outlook version you use (desktop/web).
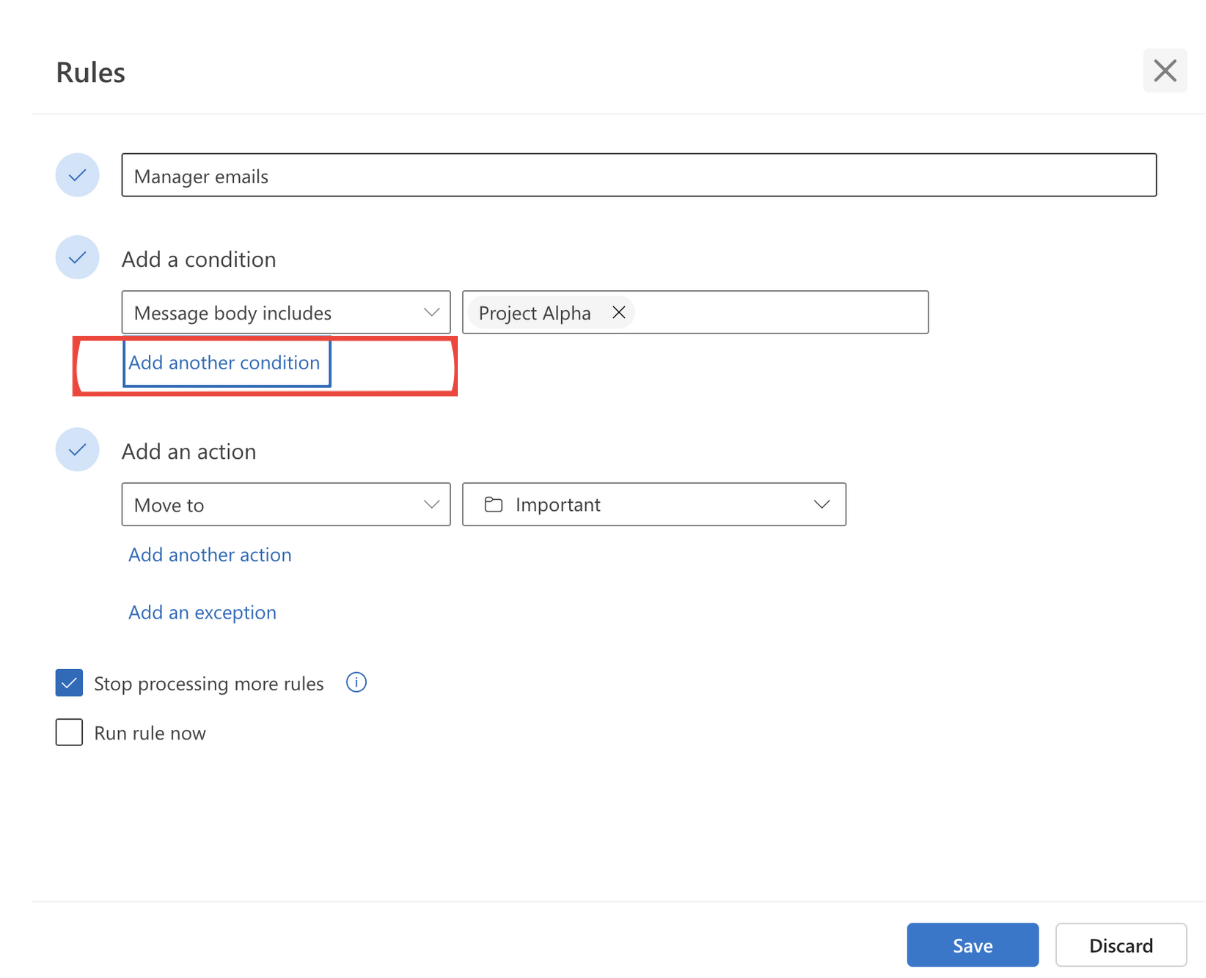
Step 2: In the New Rule window, add the name of the rule. Then, in the “Add a condition” section choose “Message body includes” under the keywords section. Then, add the keyword beside the condition. In this example, I’ve used “Project Alpha”
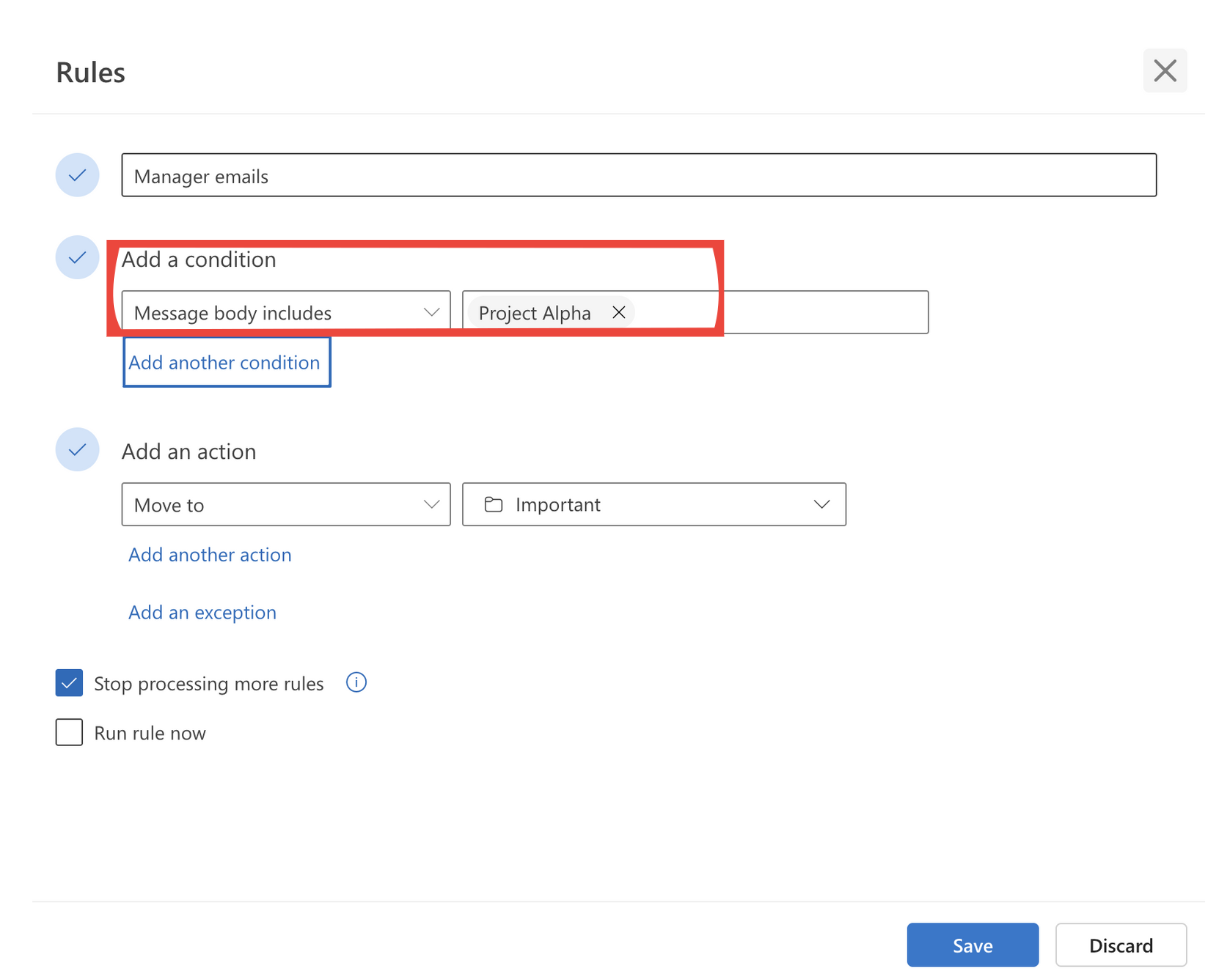
Step 3: Click on “Add another condition.”
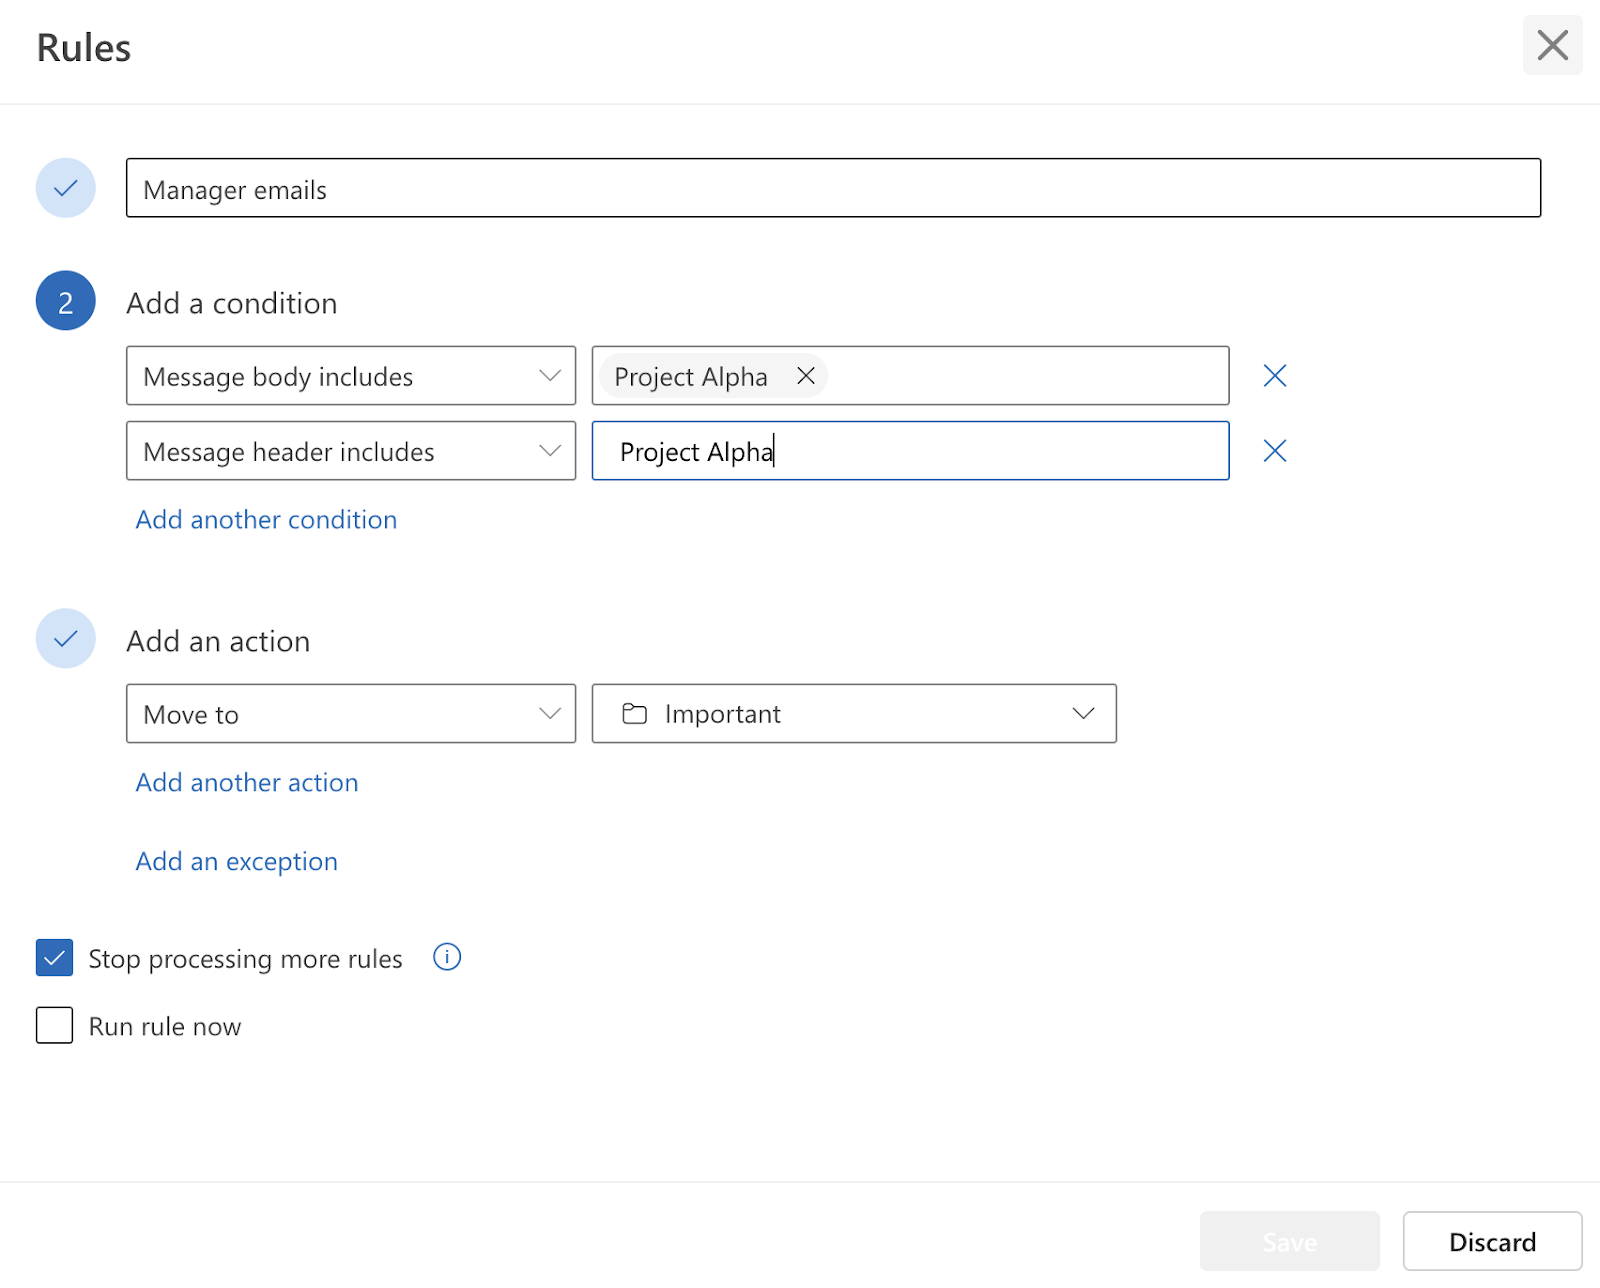
Step 4: Choose “Message header includes” under the keywords section. Then, add the keyword/specific words beside the condition. In this example, I’ve used “Project Alpha”
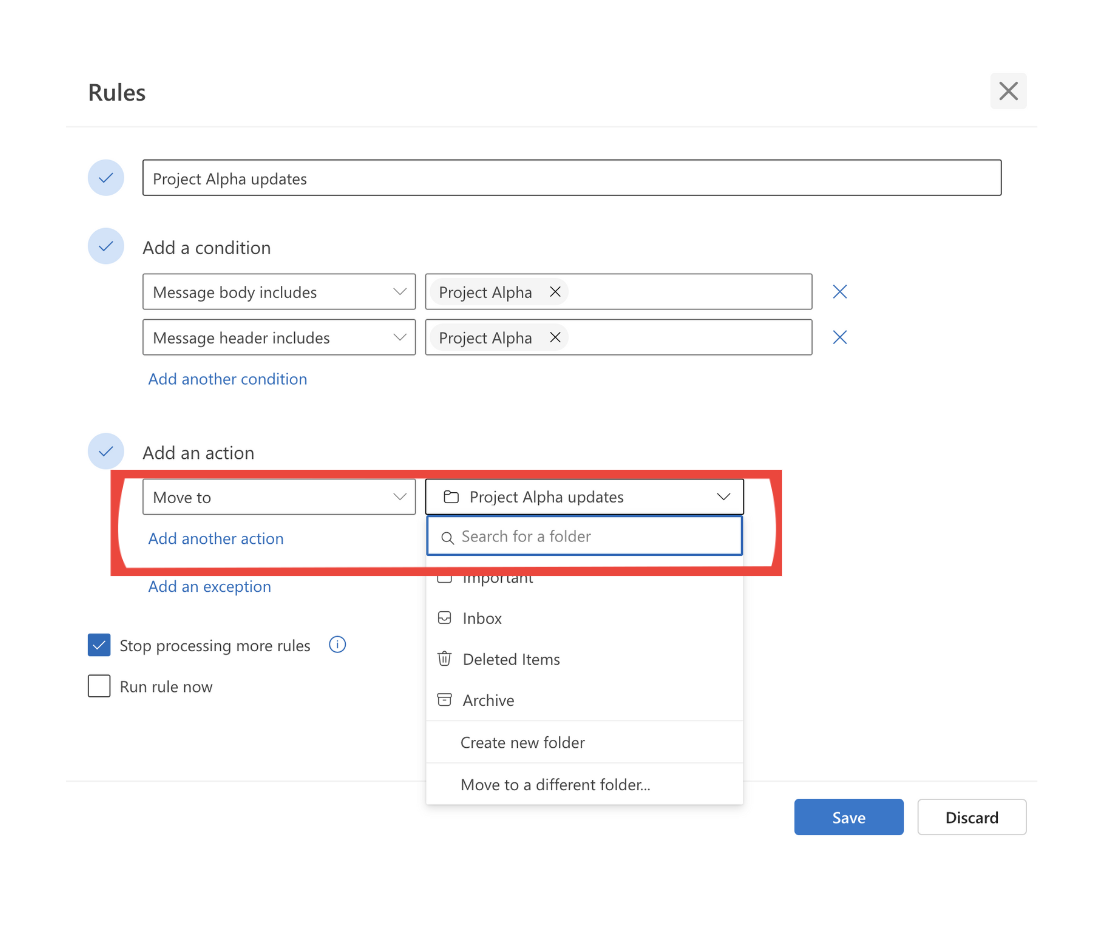
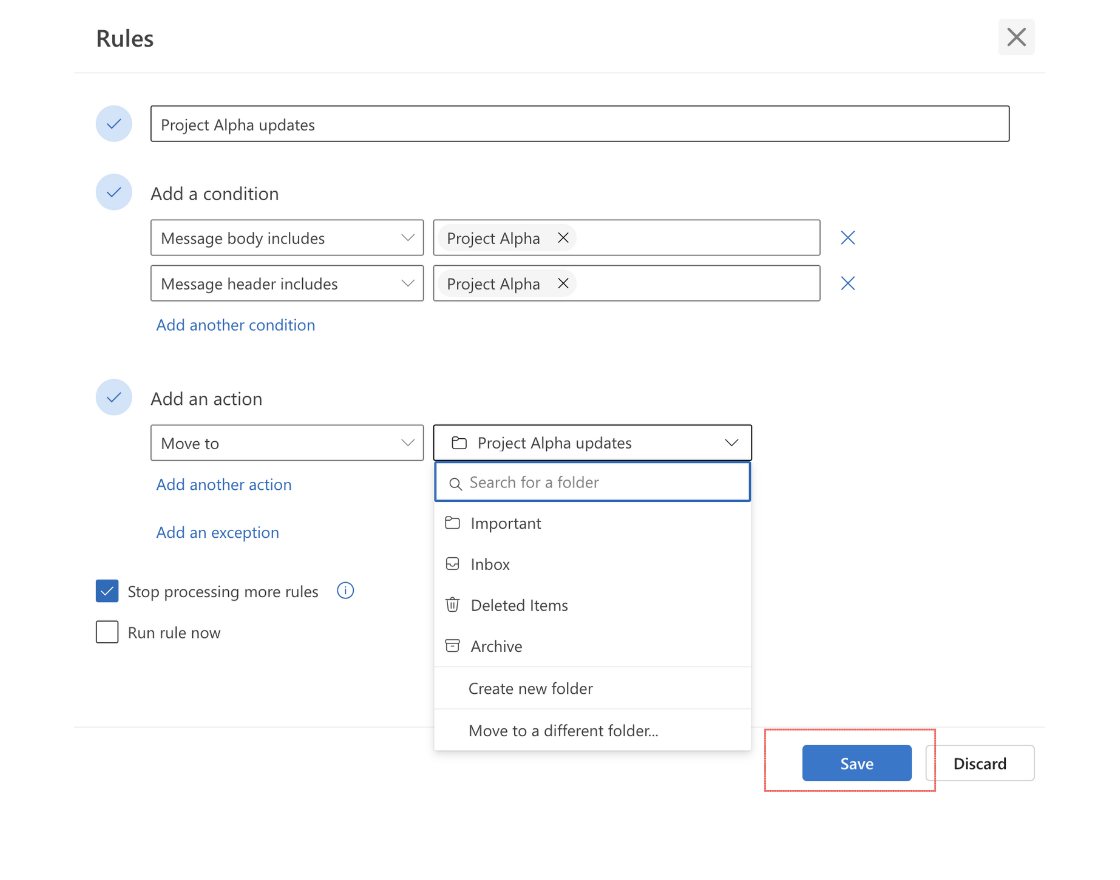
Step 5: In the “Add an action” section, Select “Move to” and choose a specific folder you want to move these emails to. For this example, I have named the folder “Project Alpha updates”.
Step 6: Finally, click “Save” to save your filter.
3. Categorize and tag emails
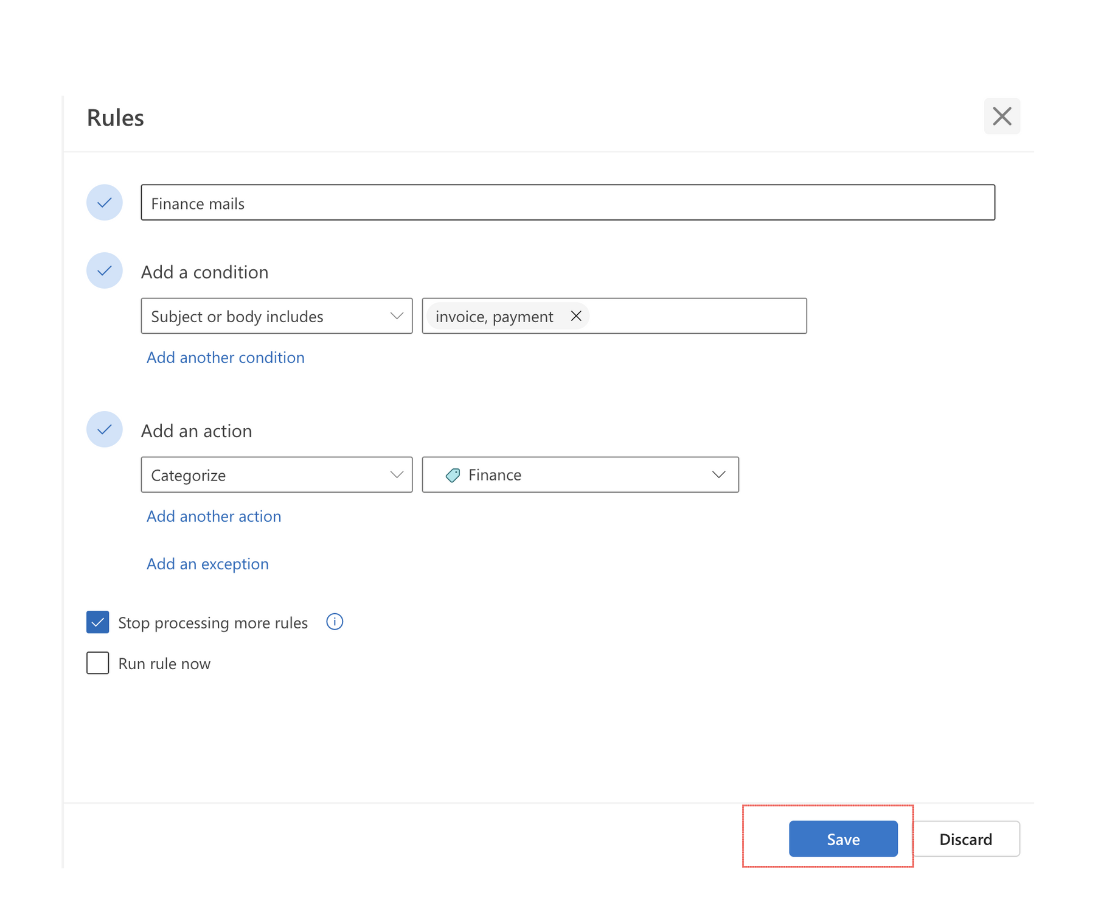
Now let’s take an example where you want to categorize and tag all incoming emails related to finance. Here’s how you do it.
Step 1: Open the filter settings to create a new rule. To do this, follow the steps mentioned in the above section on “How to Set Up Outlook Filters” based on the Outlook version you use (desktop/web).
Step 2: In the New Rule window, add the name of the rule. Then, in the “Add a condition” section, choose a criteria such as “From” and enter email addresses of stakeholders from whom you usually receive finance related emails. So, this means, this filter would be applicable to any mail from this email ID.
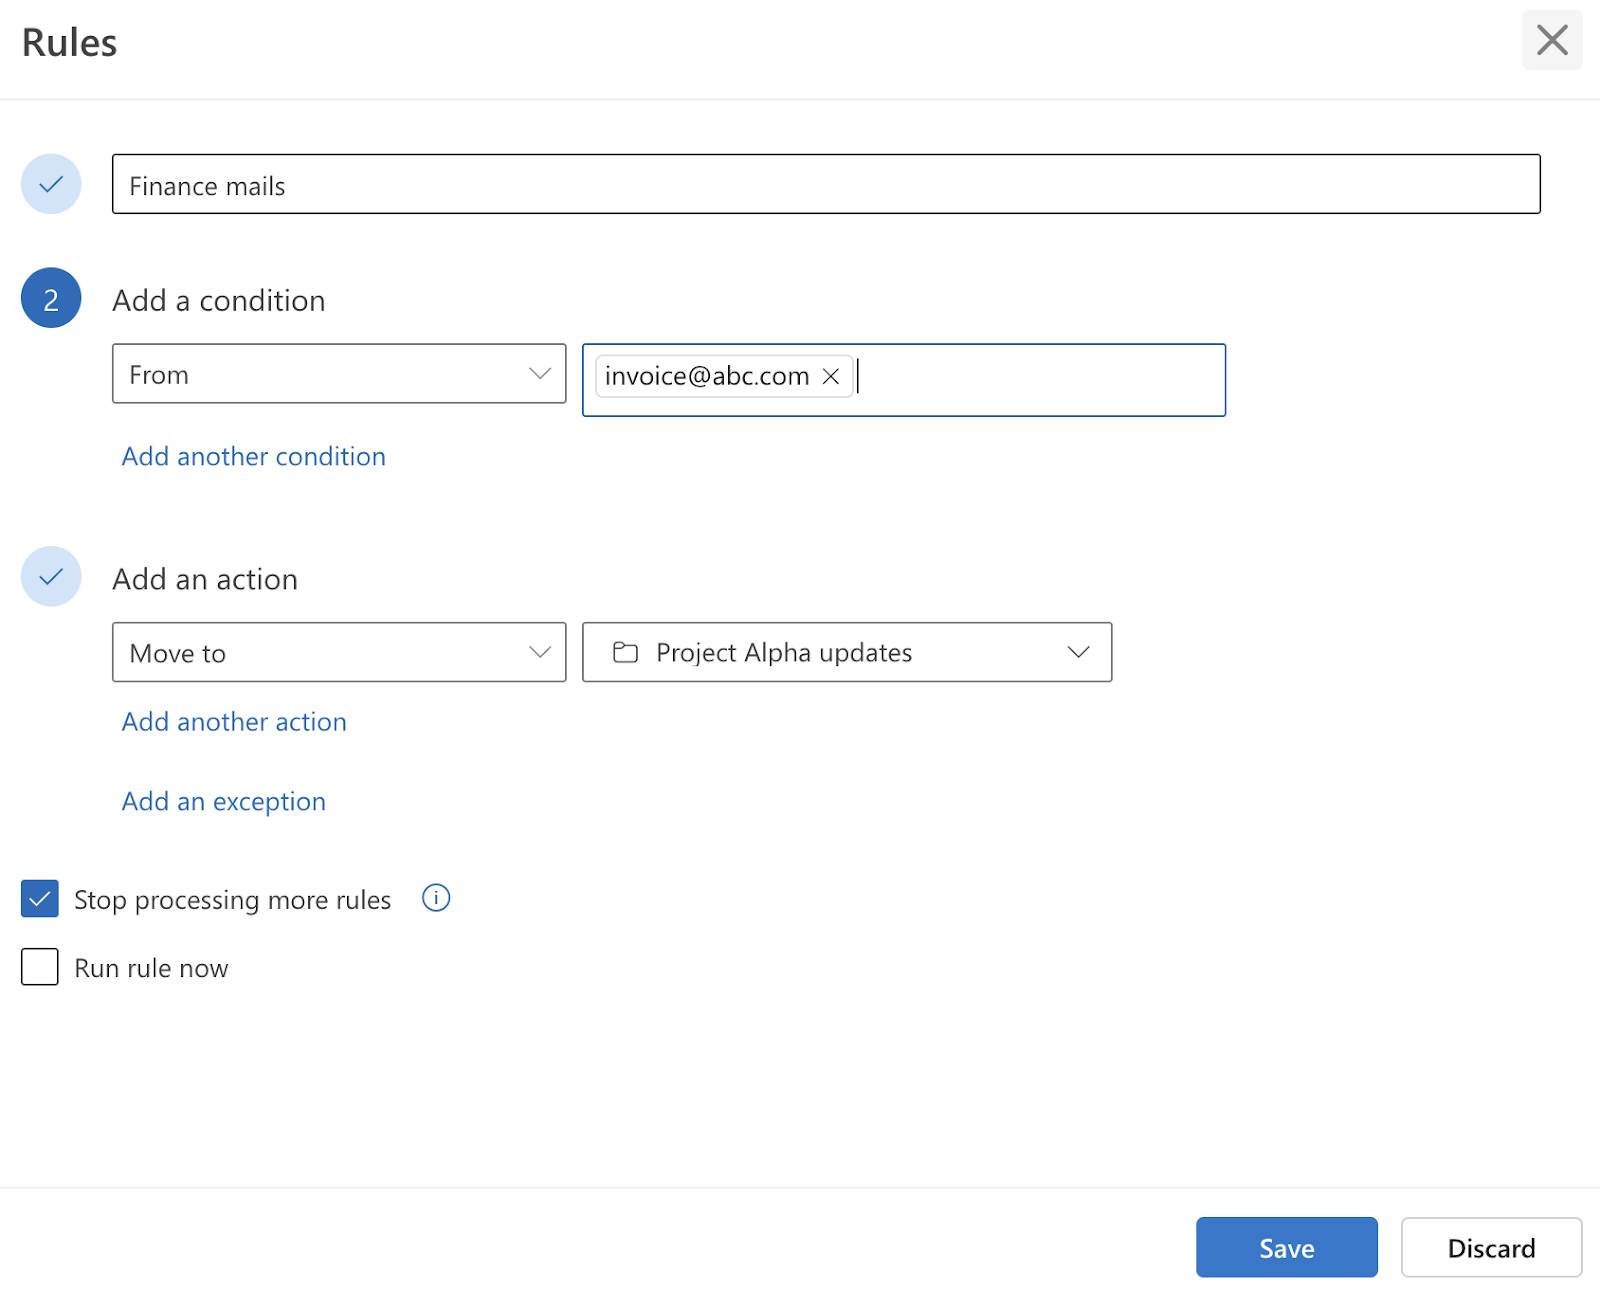
Or, you can also filter emails with specific keywords. To do this, choose “subject or body includes” under “Add a condition” and enter the specific keywords like “invoice” or “payment”.
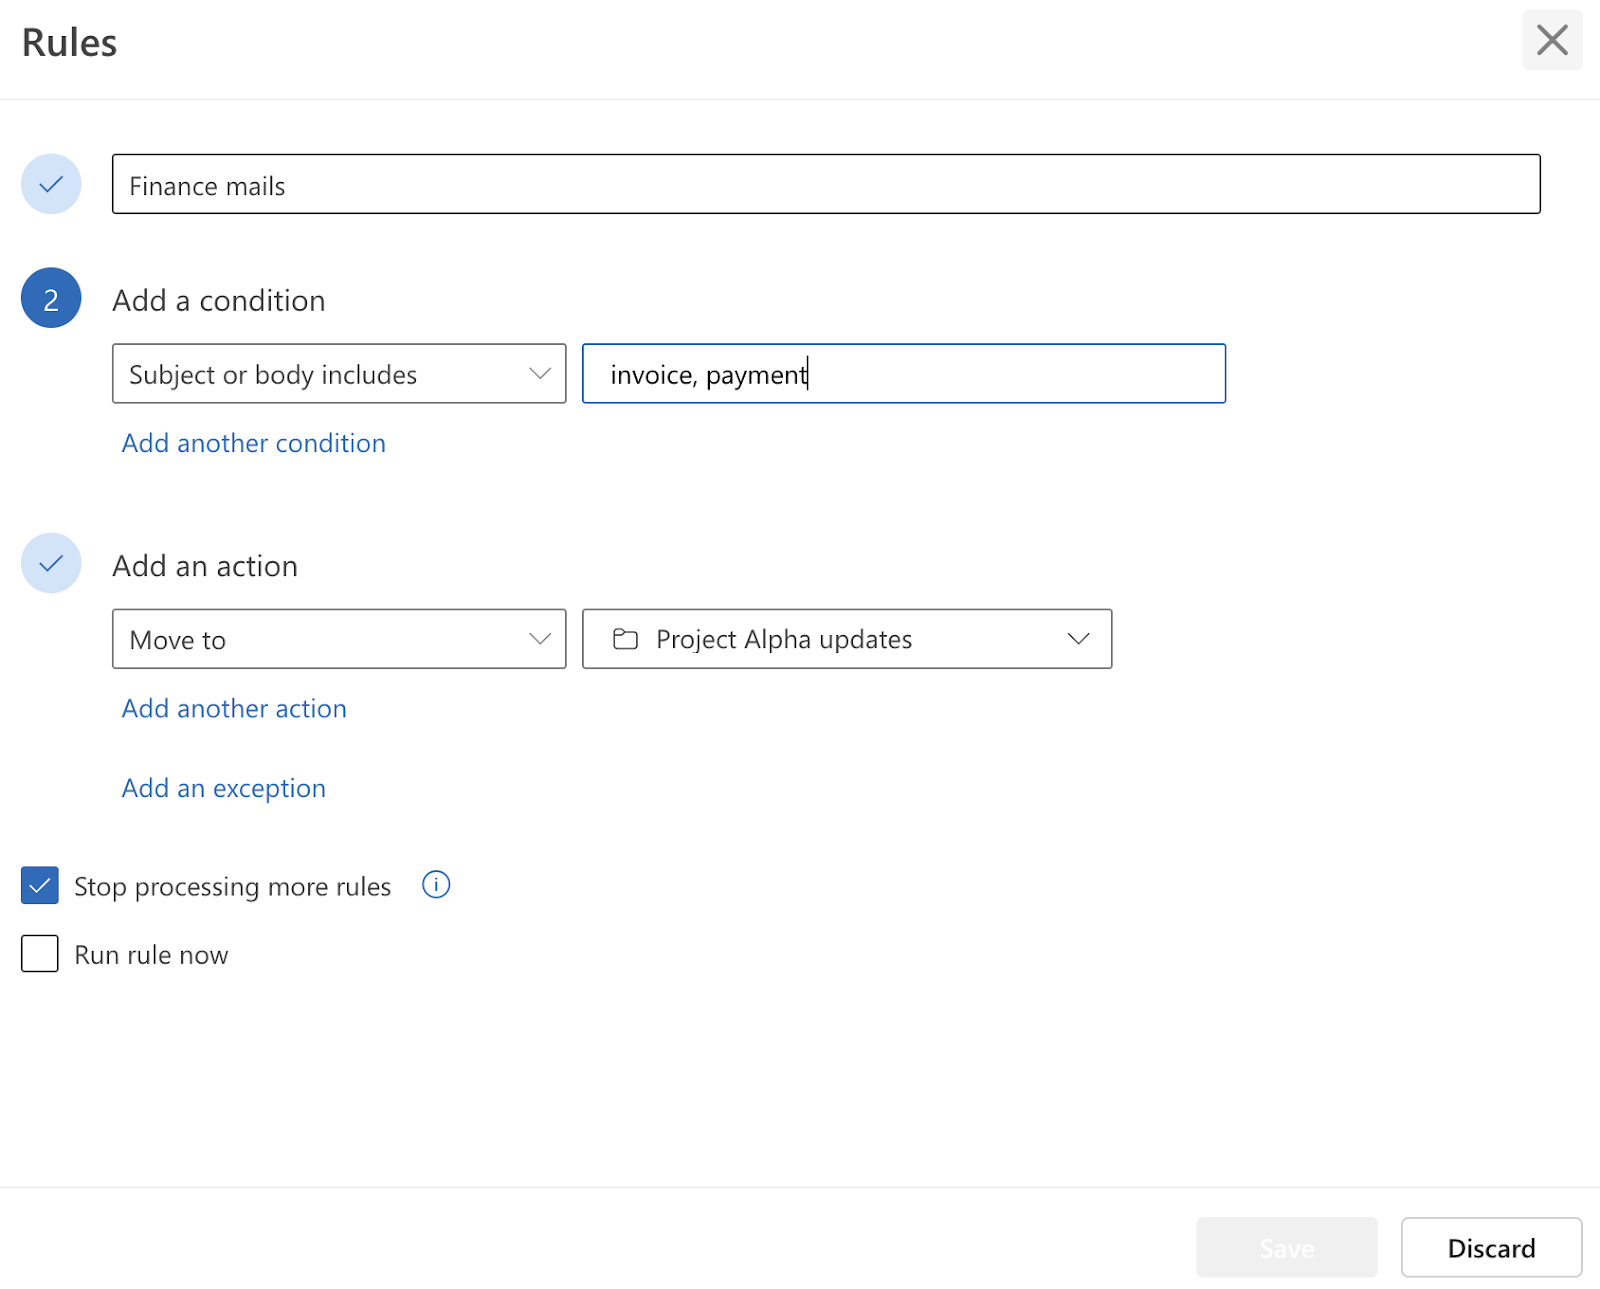
Step 3: Under “Add an action” section, select “Categorize” and choose “New category.”
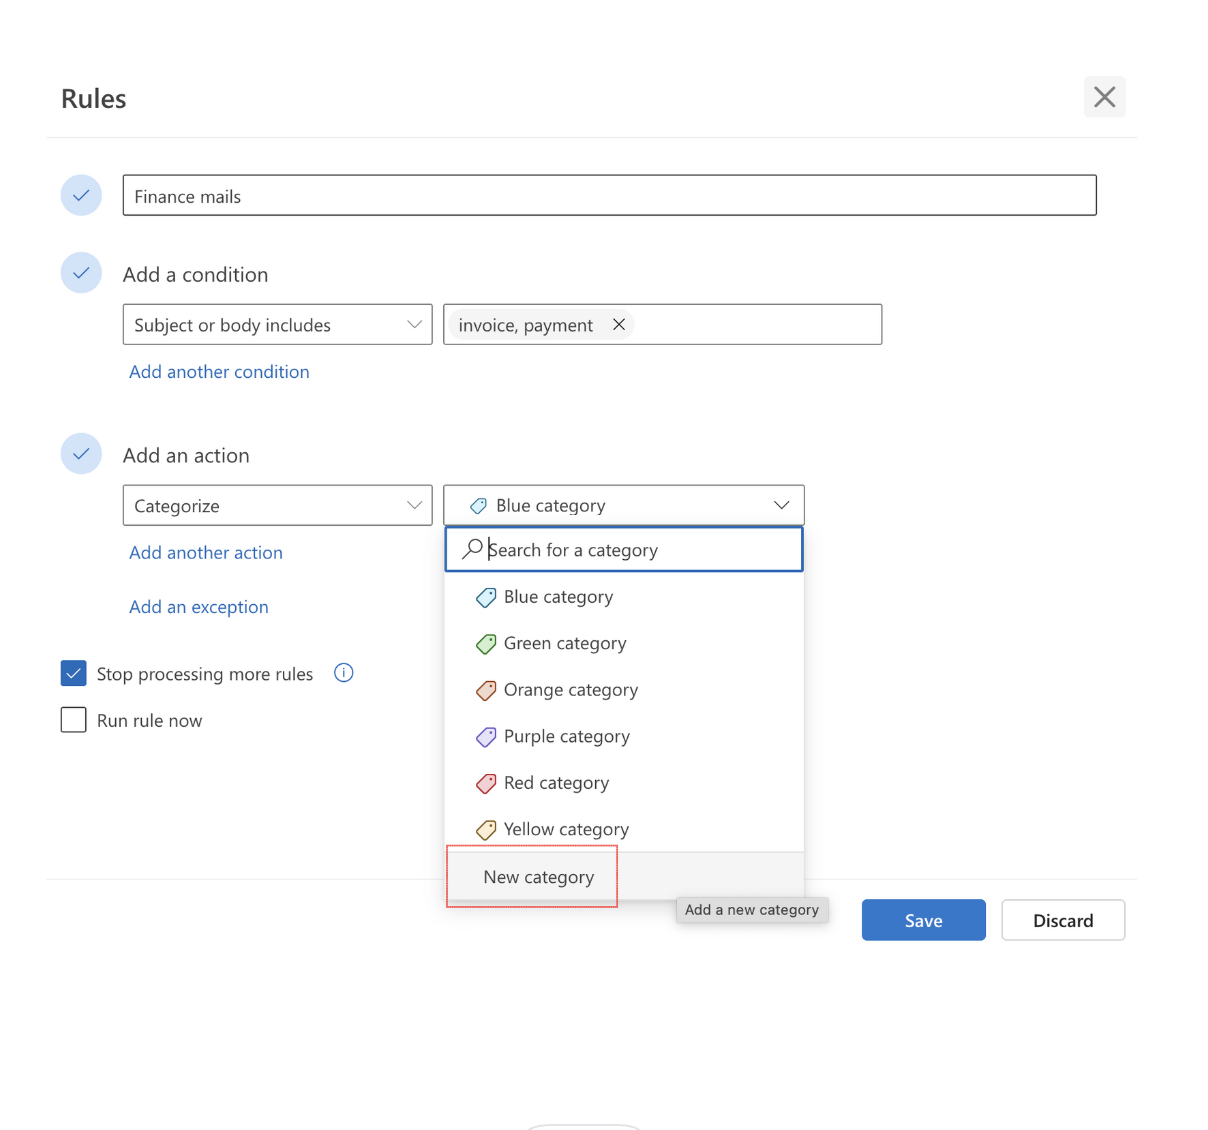
Step 4: Name your category, and choose a color to tag it. Then click “Save”.
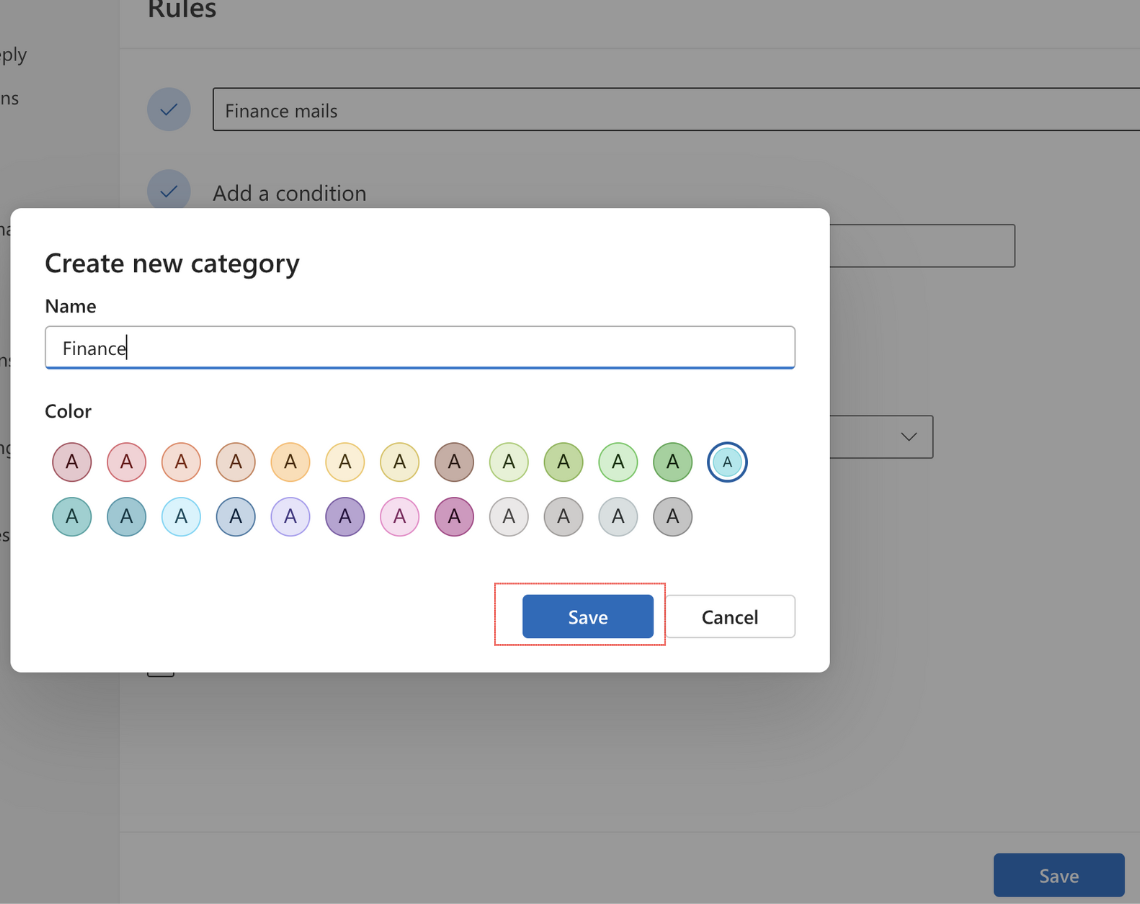
Step 5: To save this filter, click “Save”. And you’re all set to categorize and color-code your outlook emails.
Advanced Outlook Filter Techniques
You can create email filters for complex scenarios. Outlook’s advanced techniques, like combining multiple criteria and exceptions, can help you create highly customized email workflows.
Here’s how to make the most out of these advanced features.
1. Combine multiple criteria
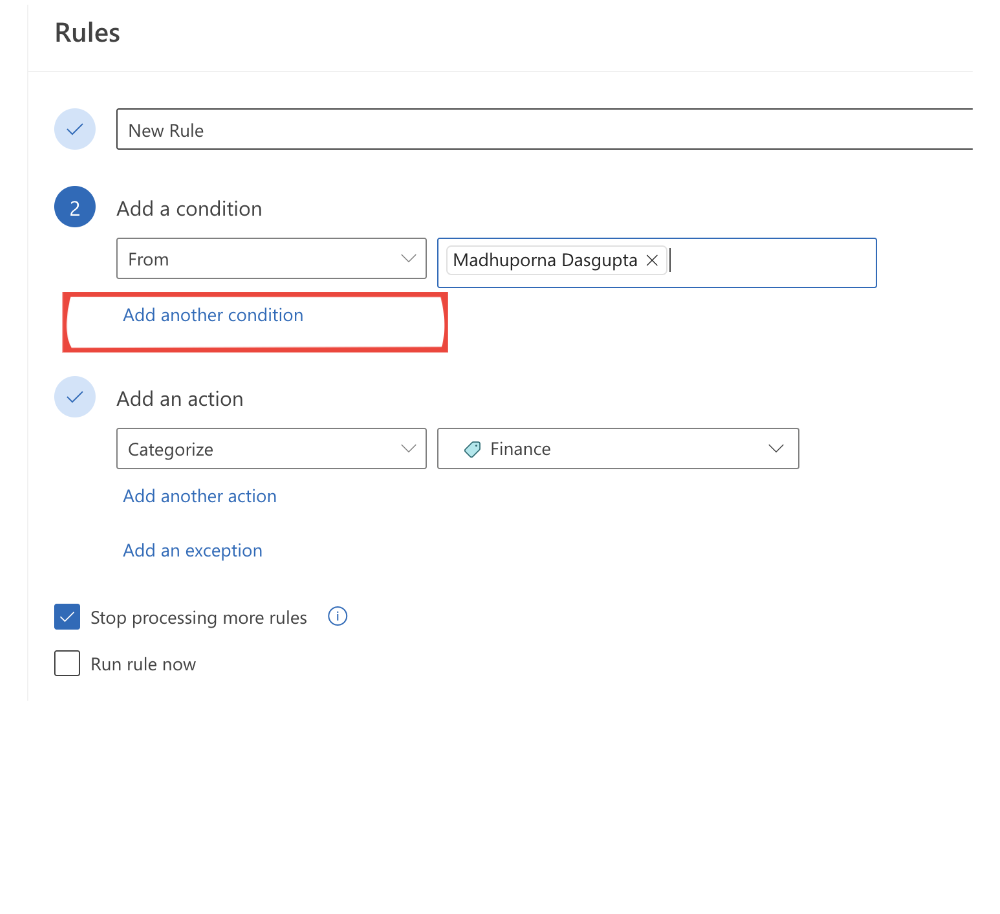
Let’s take a situation where you want to filter emails from your manager about a specific project. Let’s call this project “Project Alpha.” Here’s how to do it:
Step 1: Open the filter settings to create a new rule. To do this, follow the steps mentioned in the above section on “How to Set Up Outlook Filters” based on the Outlook version you use (desktop/web).
Step 2: In this step, you’ll have to select multiple conditions. In the “Add a condition” section, choose “From” and enter your manager’s email address.
Step 3: Then click “Add another condition.”
Step 4: Select “Subject and body includes” from the drop-down menu. Then, add the keyword “Project Alpha” to the keyword field.
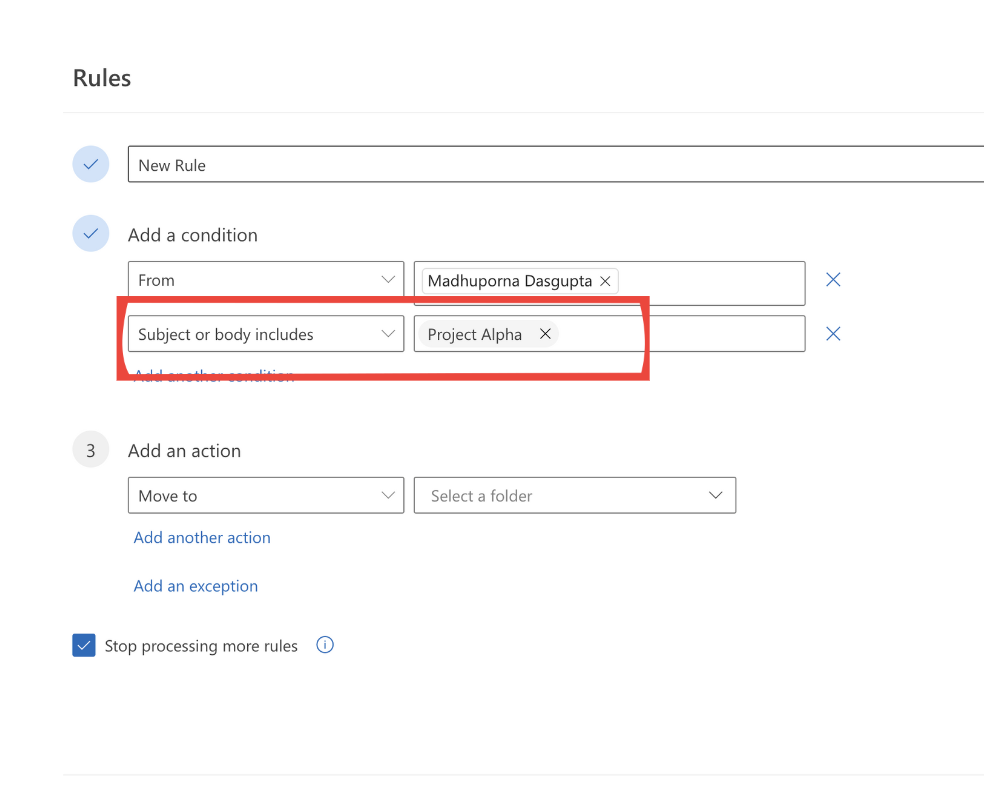
Step 5: In the “Add an action” section, Select “Move to” and choose the “Project Alpha” folder.
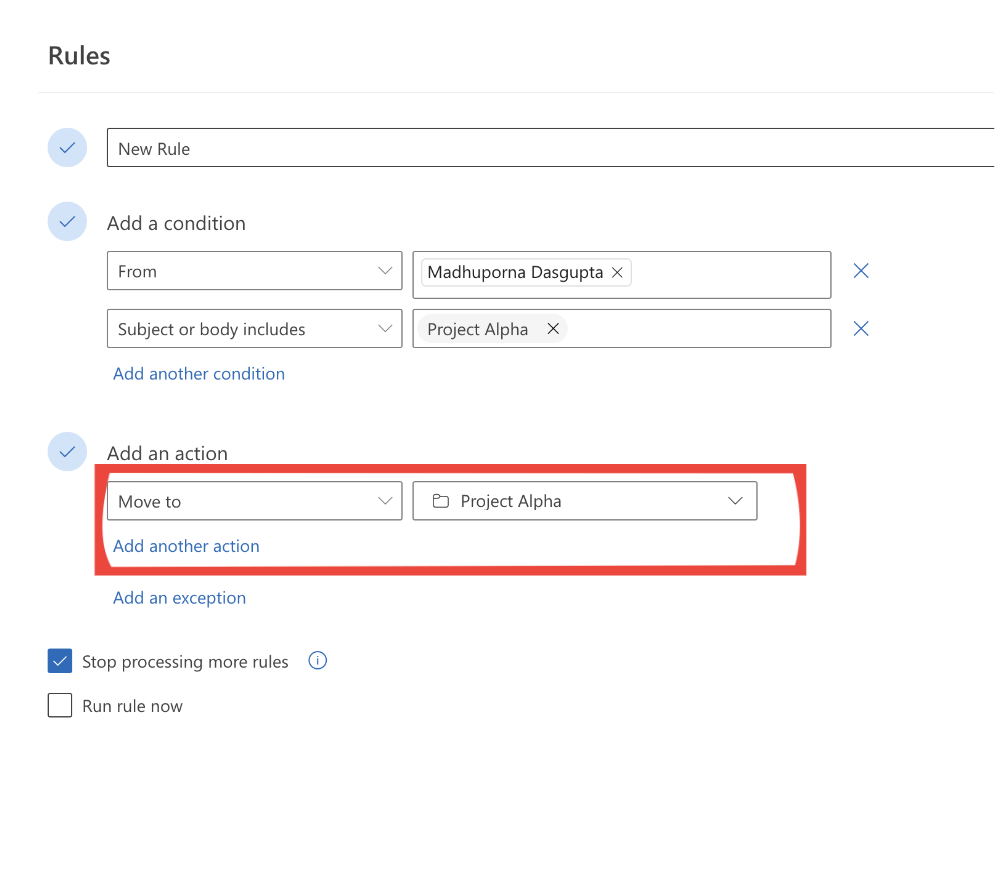
Step 6: Finally, click “Save” to save your filter.

2. Use conditions and exceptions
There can be instances where you want to filter emails with an exception to the rule. For example, you might want to filter all emails with attachments except those from your team.
There can be instances where you want to filter emails with an exception to the rule. For example, you might want to filter all emails with attachments except those from your team.
Here’s how to do it:
Step 1: Go to the filter settings to create a new rule. To do this, follow the steps mentioned in the above section on “How to Set Up Outlook Filters” based on the Outlook version you use (desktop/web).
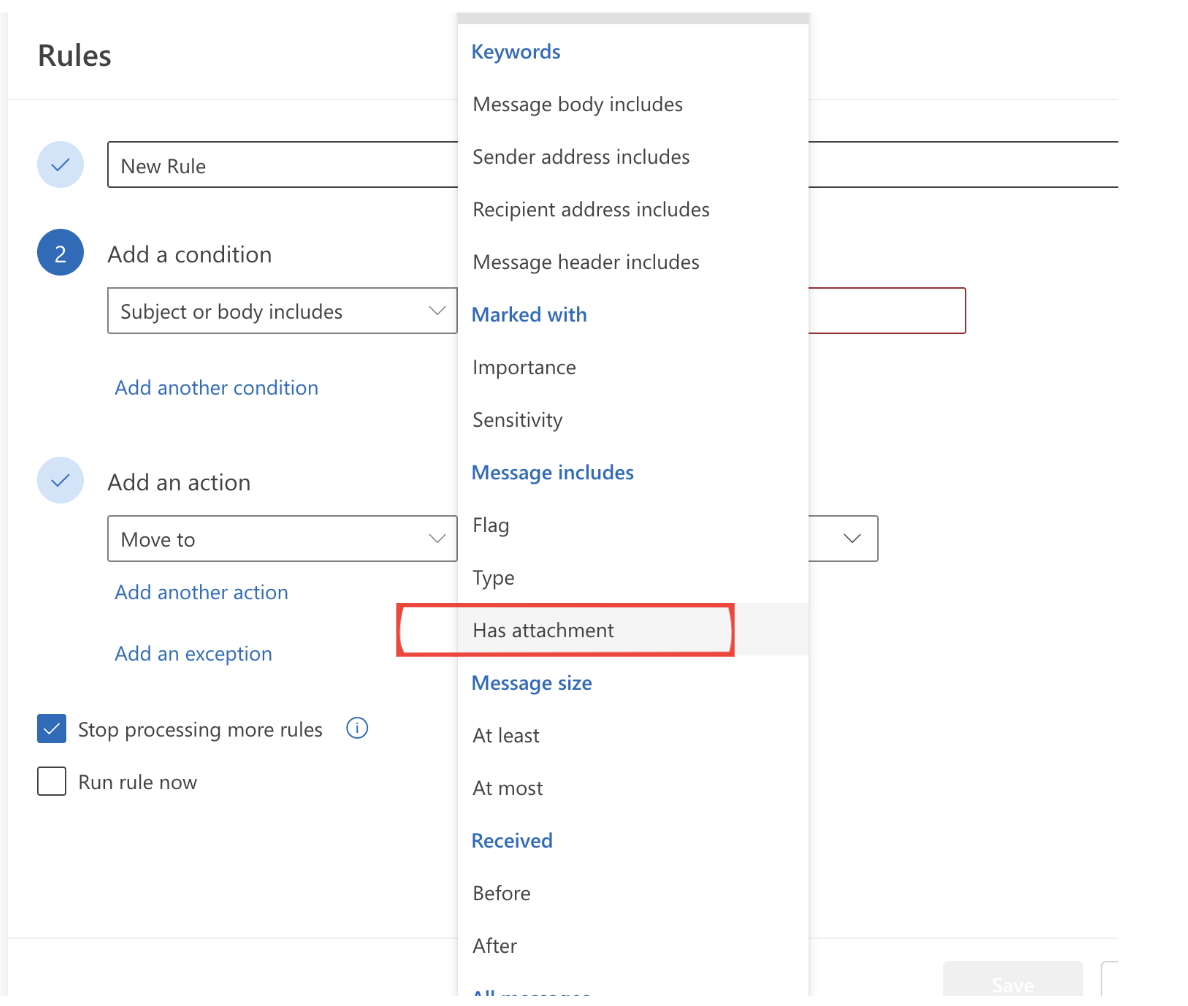
Step 2: In the “Add a condition” section, choose “Has attachment” to filter all emails with attachments.
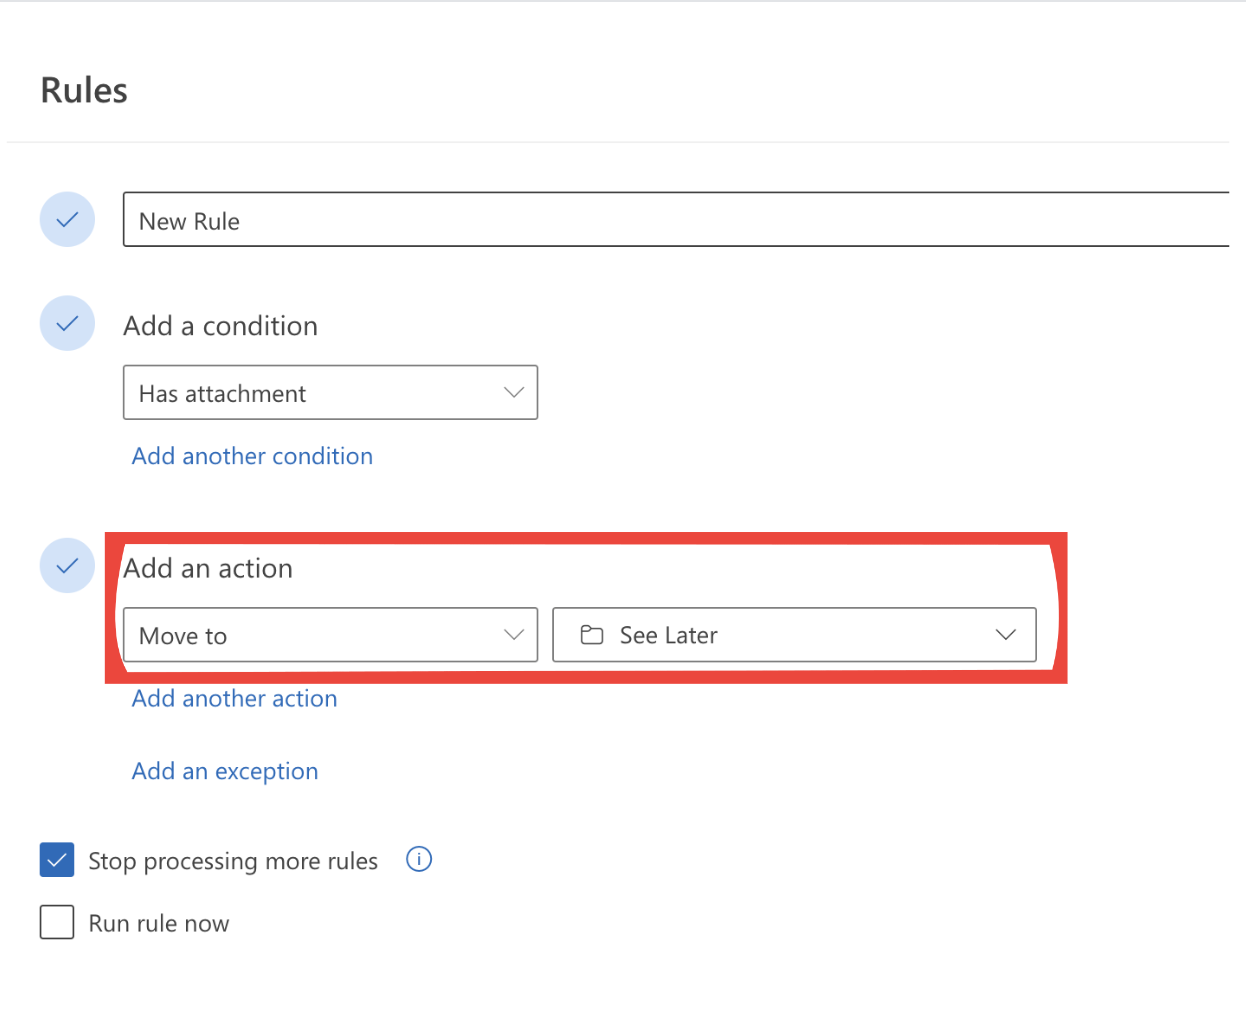
Step 3: In the “Add an action” section, choose “Move to” and select the folder where you want to move the emails. In this case, I have created a folder named “See Later”
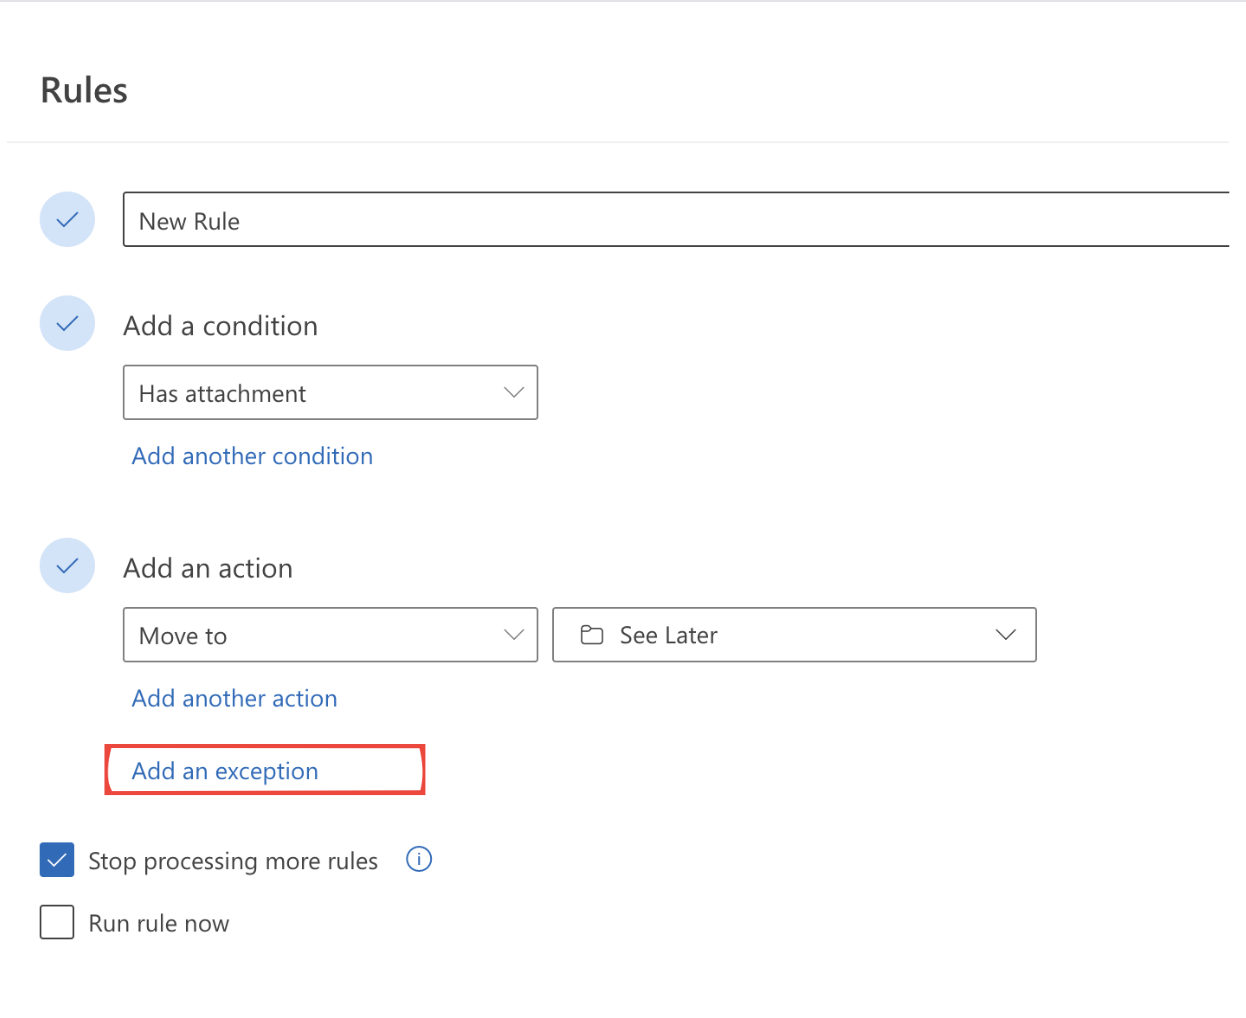
Step 4: Now, click “Add an exception”
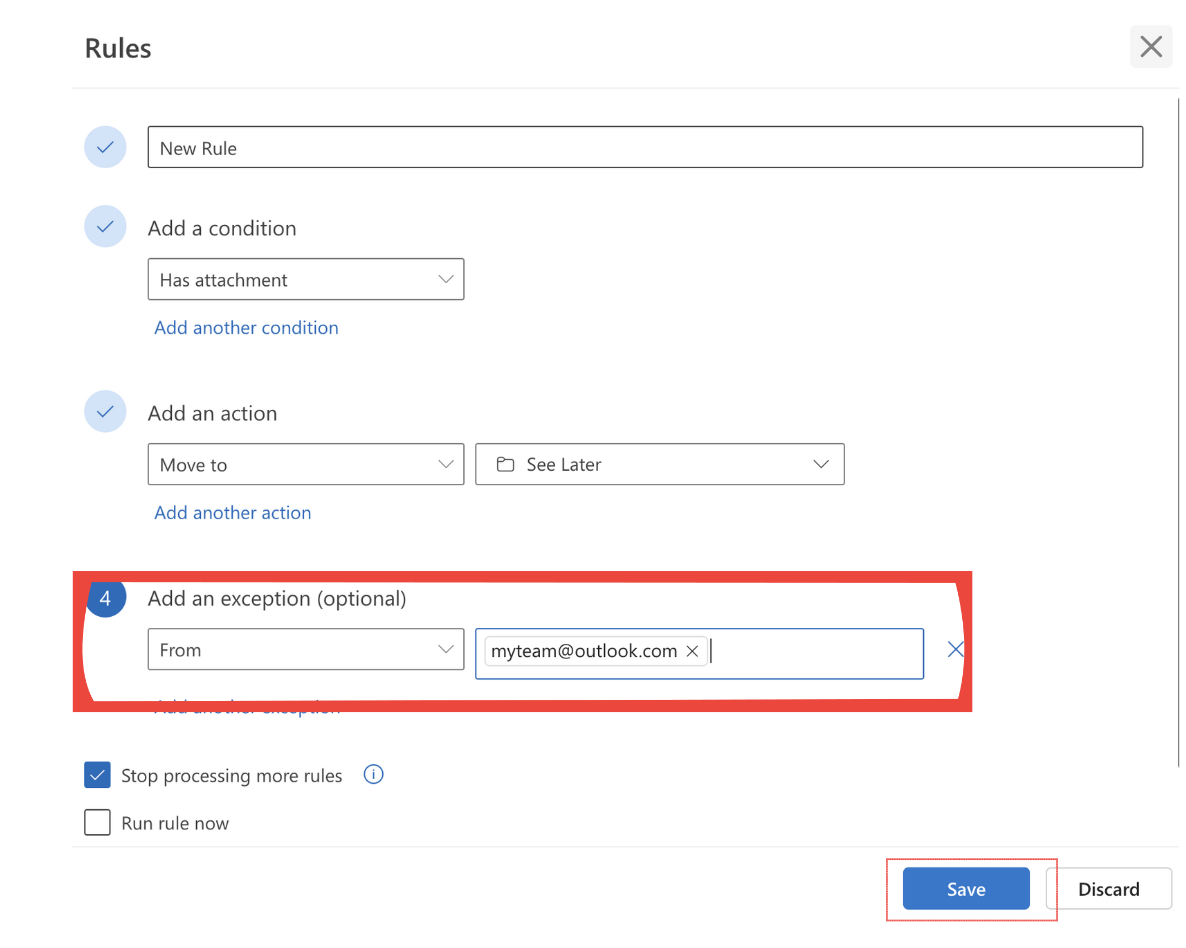
Step 5: Then, choose “From” and enter your team member’s email addresses. Finally, click “Save” to save the filter.
3. Set-up complex filters
Let’s say you want to filter emails from a particular client who sends you emails about high-priority projects. This is a complex condition that will require you to set up multiple filters.
Here’s how to do it:
Step 1: Go to the filter settings to create a new rule. To do this, follow the steps mentioned in the above section on “How to Set Up Outlook Filters” based on the Outlook version you use (desktop/web).
Step 2: Under “Add a condition, choose “From” and enter your client’s email address. Then, add another condition and choose “Subject or body includes”. Type out the keywords. For example: “Urgent” or “High Priority.”
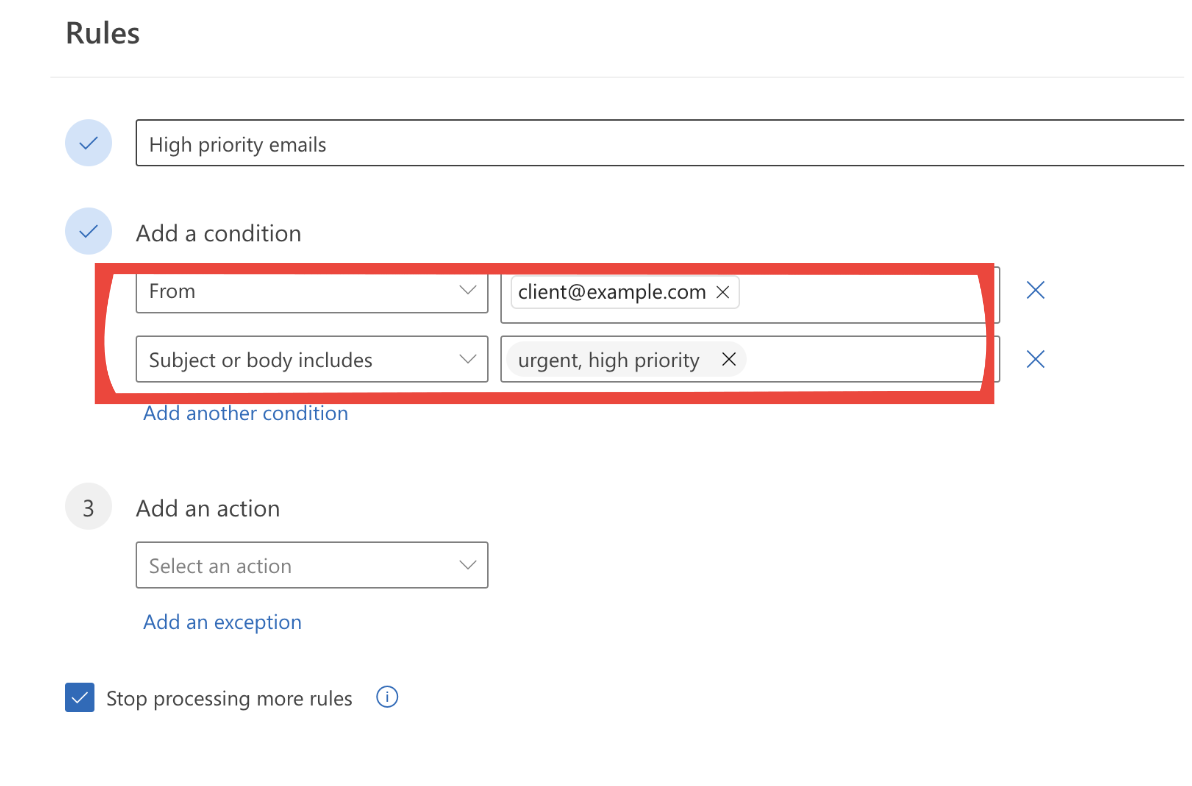
Step 3: Under “Add an action” section, select “Categorize”. Create a new category and name it as “High Priority.” You can also color-code the tag. Finally click “Save” to save the filter.

So, in this way, you can select multiple conditions to create your own custom filters to organize your Outlook inbox.
Troubleshooting Common Issues With Outlook Filters
Sometimes, Outlook filters might not work as expected. This can disrupt workflows and cause delays.
But, fret not – I’m sharing a step-by-step guide on how to fix two of the most common issues with Outlook filters,
Issue 1: Your filters aren’t applying to incoming emails.
Solution:
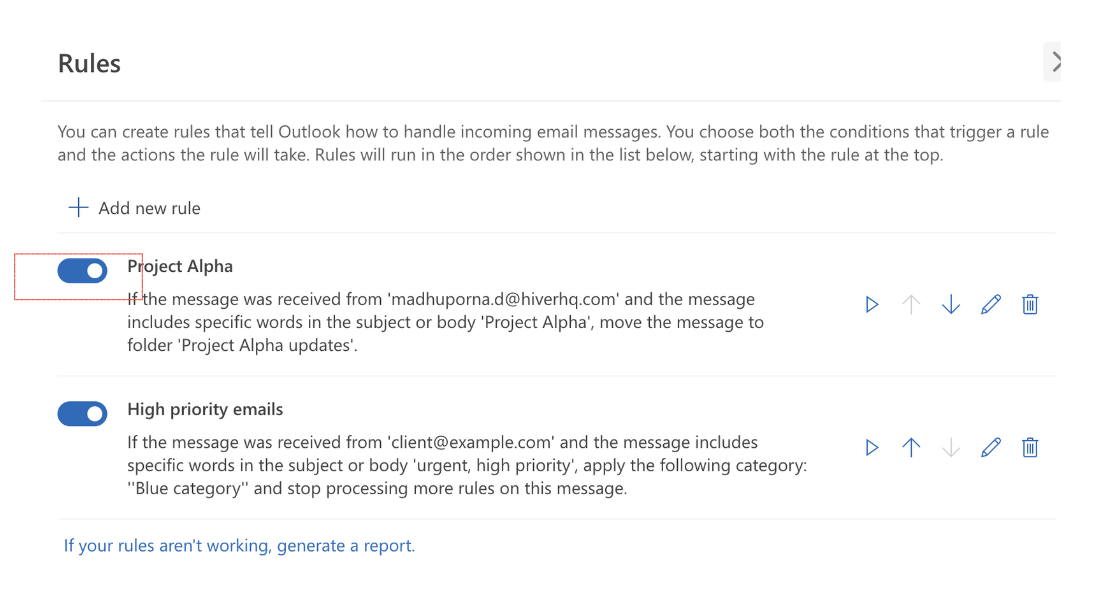
- Ensure your filters are set up correctly. Go to “Rules” and double-check the conditions and actions.
- Make sure your filters are in the correct order of priority.
- Ensure your filters are turned on. The toggle button should be turned on for all your active filters.
.
Issue 2: Multiple filters are creating conflicting actions for the same email.
Solution:
- Go through your list of filters and identify any that might be conflicting with others.
- Reorder the filters so that the most important ones apply first. Use the “Move Up” and “Move Down” buttons in the “Rules” window.

- Where possible, combine similar filters into one to reduce conflicts.
The Way Forward
Outlook filters are powerful features that can help you organize your inbox and set up custom workflows. With Outlook, you can filter emails by sender or keywords, or even use a combination of both to create your own custom filter.
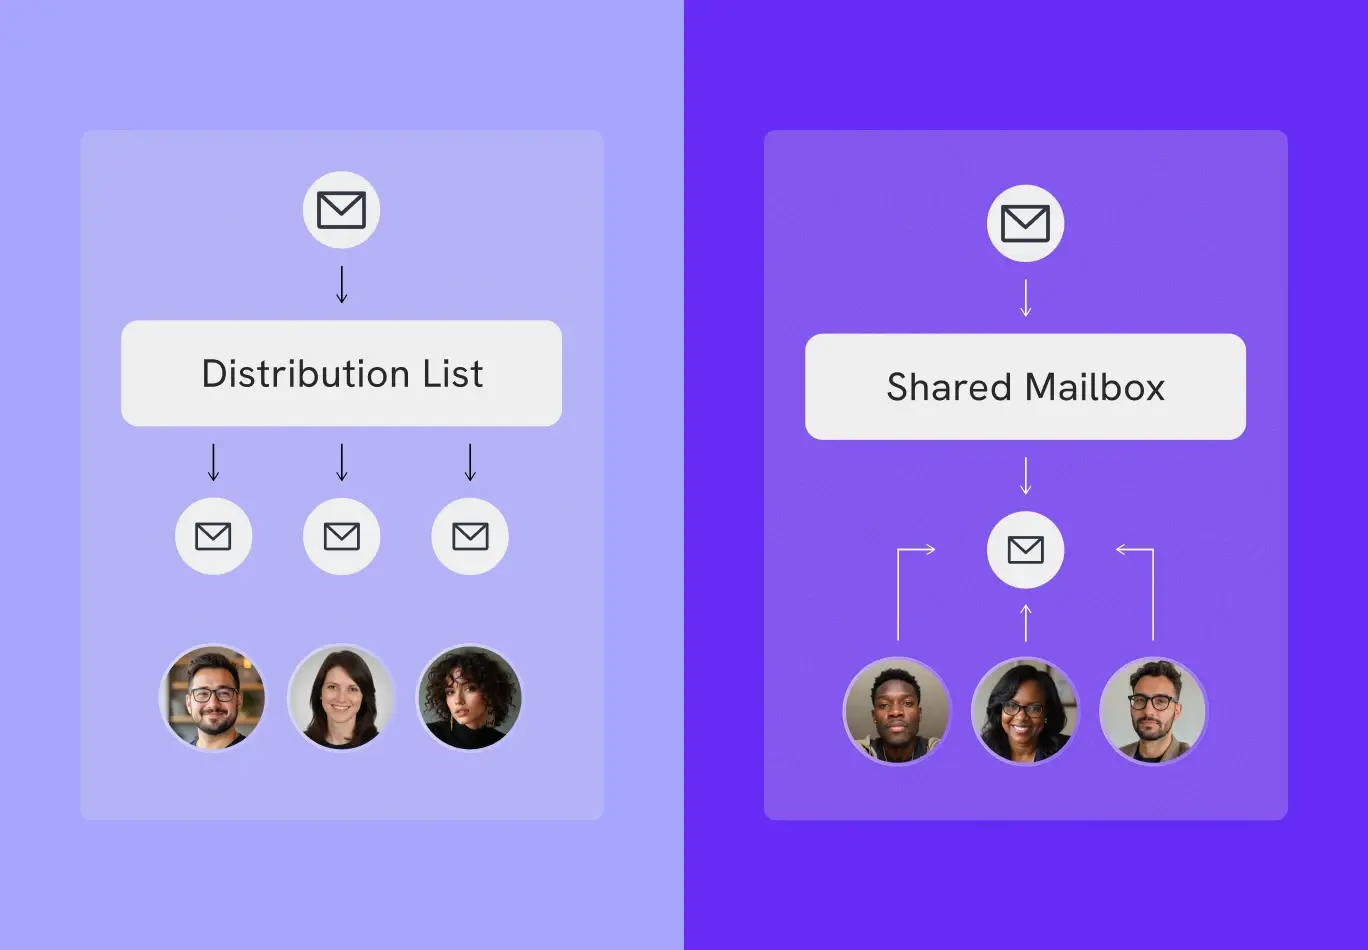
But if you are someone who manages a shared inbox (an email that multiple team members have access to), then setting up individual filters can become cumbersome.
For such instances, tools like Hiver can help. With Hiver, you can set up rules and filters for your entire team without having to manage them individually. You can also assign and track emails and manage your team’s workload within Outlook’s familiar interface.
Sounds interesting? Try it for free.
Frequently Asked Questions (FAQs)
- Why are Outlook filters important?
Outlook filters help you manage your inbox efficiently by automatically sorting and organizing emails. They save you time, reduce email overload, and ensure important messages are easily accessible.
- What are the best practices for setting up filters?
Here are some of the best practices to follow:
- Keep the filters simple and specific,
- Regularly review and update them, and
- Prioritize filters to ensure the most important ones apply first.
- How can I use the search filter in Outlook?
To use the search filter, click on the search bar at the top of your Outlook window. Enter keywords or phrases, and Outlook will display emails that match your search criteria. You can also use advanced search options to narrow down results further. Here’s a detailed guide on Outlook’s search filters.
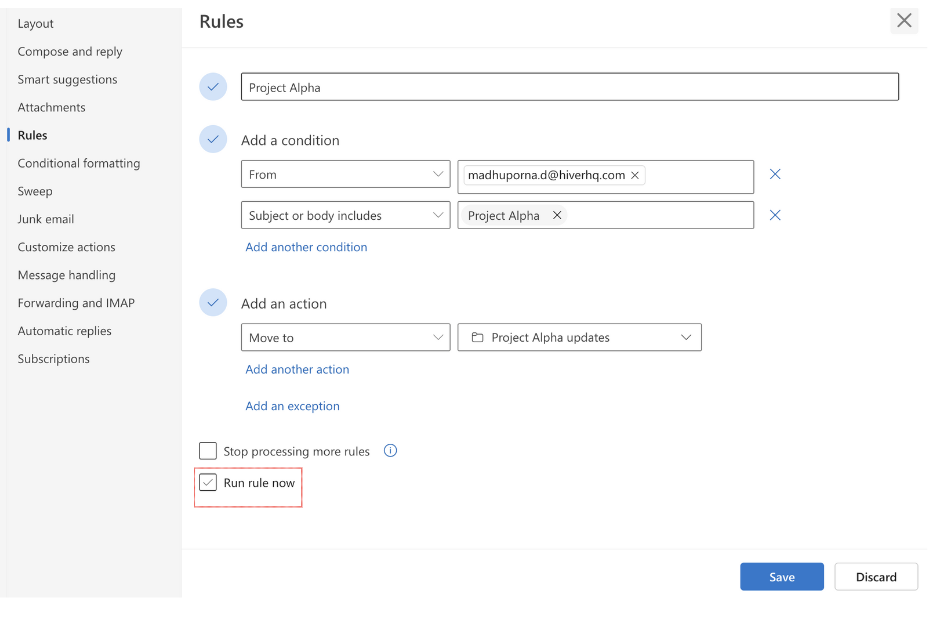
- Can I apply filters to existing emails in my inbox?
Yes, you can run your filters on existing emails by selecting the filter and choosing “Run Rules Now” in the “Rules” window.
- Can I set up filters on the Outlook mobile app?
While the mobile app offers some filtering capabilities, it’s best to set up and manage complex filters on the desktop or web version of Outlook.
- How do I delete a filter in Outlook?
Go to “Rules” from your Outlook account. In the settings, select the filter you want to delete and click “Delete.” Confirm your action to remove the filter.