Skip to content


A McKinsey report found that we spend about 28% of our workday managing emails*. That’s a huge chunk of time that could be used for more important tasks.
So then, how do you spend just the right amount of time and effort dealing with emails on a daily basis? At the same time, how do you ensure your inbox remains clutter-free and important emails are responded to on time?
If you’re using Gmail by Google Workspace, there’s a way – by setting up rules for your inbox.
With Gmail rules, you can automatically sort, label, and even delete emails based on pre-defined criteria.
Let’s see how to set rules in Gmail.
[cta_block]
Table of Contents
- How to Create Rules in Gmail?
- Common Use Cases for Gmail Rules
- Advanced Tips on How to Set Rules in Gmail
- Create Rules in Gmail To Keep Your Inbox Organized
- Frequently Asked Questions (FAQs)
How to Create Rules in Gmail?
Creating rules in Gmail is quite a straightforward process. It can save you a lot of time and effort and keep your inbox organized. Follow these steps to set up rules for your inbox:
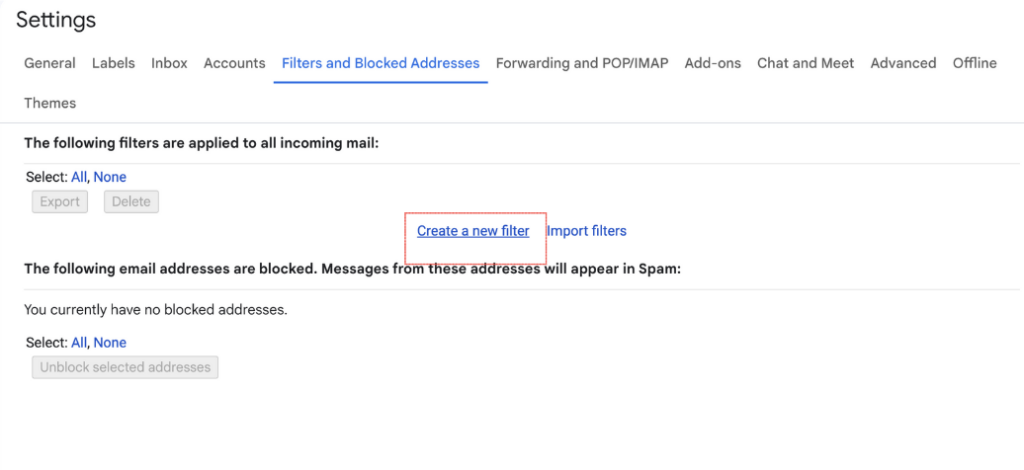
1. Access Gmail settings
Step 1: Log in to your Gmail account and click the gear icon in the upper right corner to open Settings.

Step 2: Click on “See all settings” to access the full settings menu.
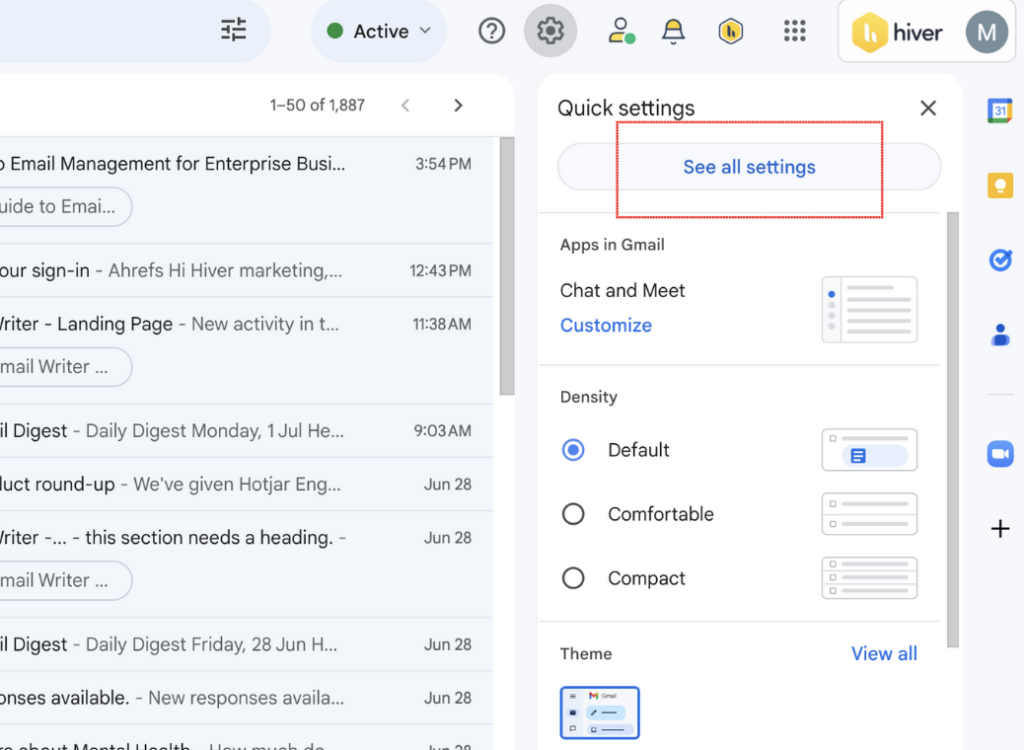
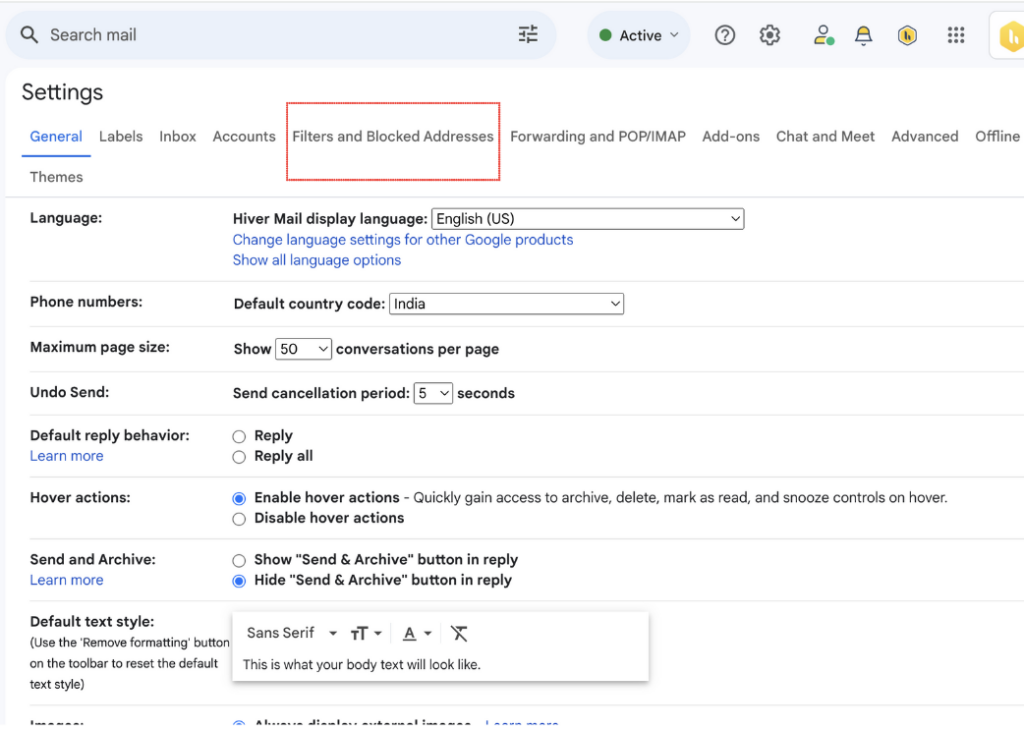
Step 3: Navigate to the “Filters and Blocked Addresses” tab.
2. Create a new filter
Step 4: Click “Create a new filter.”
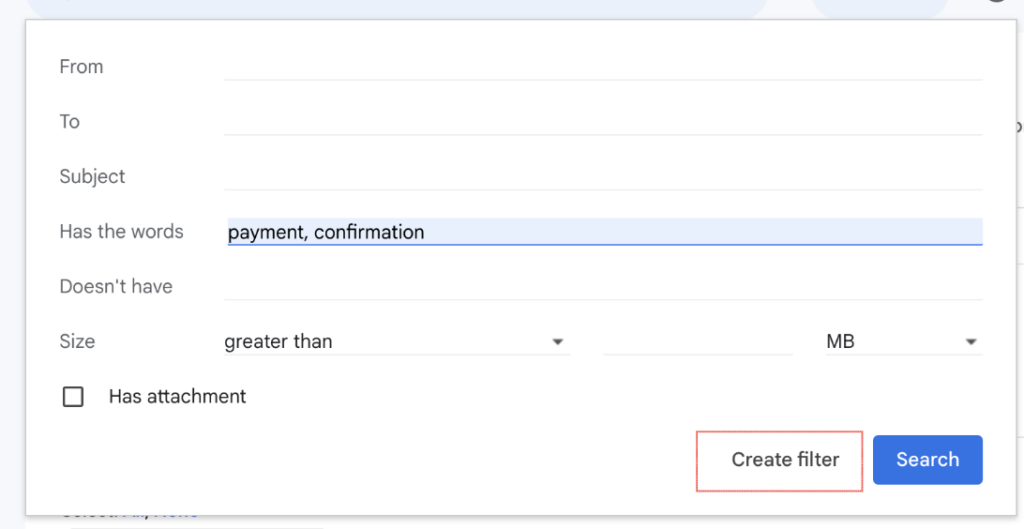
Step 5: Fill in the criteria for your filter. You can filter emails by sender, subject, keywords, and more. For example, you can enter the email address in the “From” field to filter messages from a specific sender. And then click on “Create filter” button.

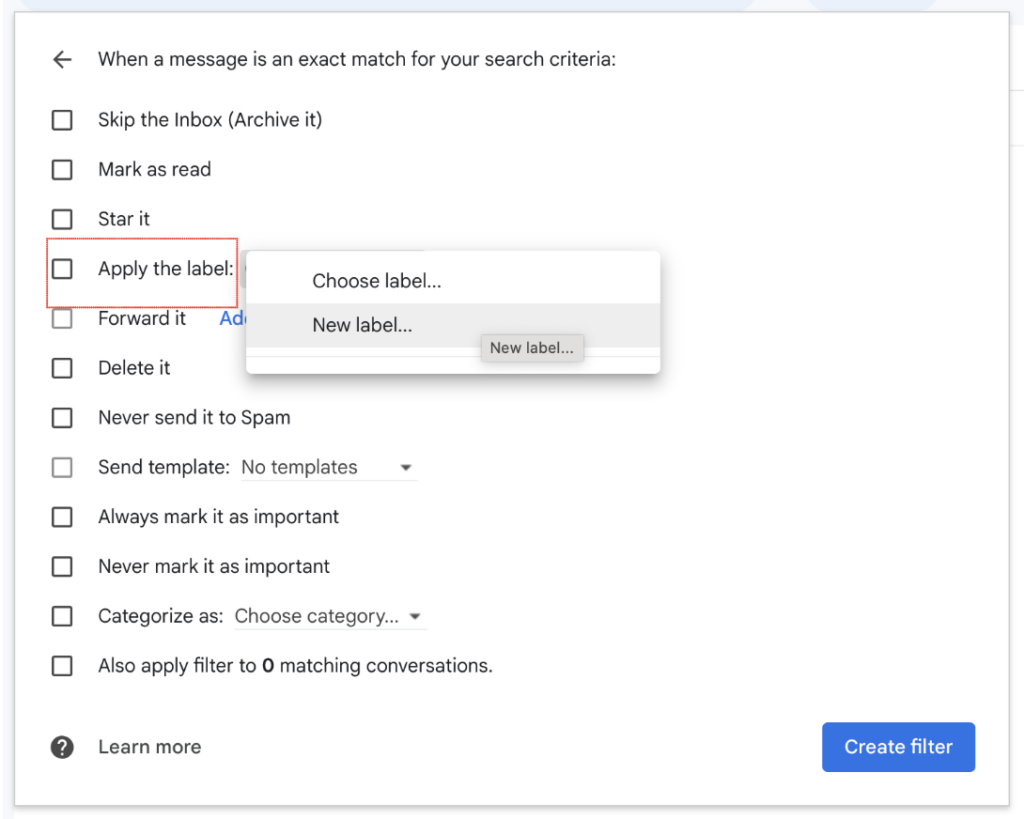
3. Set filter actions
Step 6: Choose what you want Gmail to do with the emails that match your criteria.
You will be given the following choices on what to do with those emails. You can choose to:
- Skip the Inbox (Archive it)
- Mark as read
- Star it
- Apply a label
- Forward it to someone else
- Delete it
- Never send it to Spam
- Send template
- Always mark it as important
- Categorize as
- Also, apply filter to X-matching conversations.
Then, click on “Create filter” to save your new filter.

Tip: If you want to apply the filter to existing emails, check the box next to “Also apply filter to X matching conversations.”

Also read: Gmail Filters 101: Your Definitive Guide To Gmail Filters
Common Use Cases for Gmail Rules
Gmail rules, also known as filters, automatically sort incoming emails based on criteria you define. This is the key to a clutter-free inbox.
In fact, here’s what a user has to say about Gmail filters on GetApp:
“The spam filtering is highly effective, and the customizable labels and filters help keep the inbox organized.”
– User review on GetApp
Let’s explore some common use cases for Gmail rules that can help you keep your Gmail inbox organized:
1. Sort emails by sender
Automatically moving emails from specific senders to designated folders is a great way to organize your inbox. This is perfect for managing emails from colleagues, clients, or newsletters that you want to keep separate from your main inbox.
Here’s how to sort emails by sender:
Step 1: Follow the instructions mentioned in the previous section until step 5.
Step 2: To sort by sender, select “Apply the label” and choose an existing label or create a new one. And then click on “Create.”
Tip: You can also choose to “Skip the Inbox (Archive it)” if you don’t want these emails in your primary inbox.
Step 3: Click “Create filter” to save your new filter. And you’re all set to move emails from specific senders into designated folders.
2. Organize newsletters and promotions
You can filter promotional emails and newsletters into separate labels or folders.This ensures that your primary inbox only has important emails, while you get to access all newsletters in a separate view.
To set this rule, you have to:
Step 1: Follow the instructions mentioned in the previous section until step 4.
Step 2: Fill in the criteria for your filter. In the “From” field, enter the email addresses or domains that send you newsletters or promotional emails. For example, you might enter “newsletter@example.com” or “@promo.com” to catch all emails from those sources.

Step 3: Choose what you want Gmail to do with the emails that match your criteria. Select “Apply the label” and choose an existing label such as “Marketing Updates” or “Newsletters,” or create a new one.
Step 4: Then, click on “Create filter” to save your new filter.

3. Manage important emails
You can use Gmail rules to highlight emails from important contacts. This ensures you never miss an important message.
To set this rule in Gmail,
- Follow the steps mentioned in the above use cases.
- Remember to select “Star it” and/or “ Always mark it as important” from the list of search criteria. Finally, click on “Create filter.”

4. Automate email responses
You can create email rules in Gmail to send automated responses. This becomes especially handy when you are out of the office, want to respond to FAQs, or share SOPs with prospects or clients.
For instance, you might want to set up automated response for your incoming emails based on a couple of specific keywords in your incoming emails.
Follow these steps to set up automated email responses:
Step 1: Open Gmail and click the gear icon in the upper right corner to open the settings menu.
Step 2: Click on “See all settings” to access the full settings menu.
Step 3: Navigate to the “Filters and Blocked Addresses” tab.
Step 4: Click on “Create a new filter.”
Step 5: Set the criteria for the emails you want to automate responses for. In this example, you want to send an auto-reply for all incoming emails based on some keywords. So add the specific criteria like keywords or senders.

Step 6: Click on “Create filter” with this search.
Step 7: Choose the action “Send Template.”

Step 8 (Optional): In case the “Sent Template” option is disabled, you need to enable it. You can do this from the “Advanced” tab, as shown below.

Step 9: Select the Template from the dropdown menu you want to send. If you haven’t created one yet, here’s a guide on how to do it in Gmail.

Step 10: Click “Create filter” to save your new filter.

Note: This gmail rule can only be applied to new incoming emails.
Also read: How to Use Gmail Automation For Your Business.
Advanced Tips on How to Set Rules in Gmail
We’ve explored the fundamentals of Gmail rules and how they can transform your inbox into a well-organized one.
But there’s even more to discover! Let me show you how you can create multiple filters and labels:
1. Combine multiple criteria
If you need to create more specific rules, you can use multiple criteria to fine-tune your rules. Here’s how:
Step 1: Click on the gear icon in the upper right corner and select “See all settings.”

Step 2: Navigate to the “Filters and Blocked Addresses” tab.
Step 3: Click on “Create a new filter.”
Step 4: In the filter criteria fields, enter the conditions. For example, you can filter emails from a specific sender that also contain certain keywords in the subject line or body. And then click “Create filter”.

Step 5: Choose the actions you want to apply, such as labeling, archiving, or marking emails as important. Finally click “Create Filter”.

2. Use color-coded labels
In Gmail, you can assign different colors to your labels to visually distinguish between different categories of emails.
For example, you might use red for urgent emails, blue for work-related emails, and green for personal emails.
Here’s how to do it:
Step 1: Go to the left sidebar, scroll down, and click on “+” beside “Labels”

You can also hover over an existing label and go directly to Step 3
Step 2: Add the name of the label and click “Create.”

Step 3: Click on the three-dot menu next to the label, select “Label color,” and choose your preferred color.

And you’re done!

3. Create nested labels
You can create nested labels to organize your emails in a hierarchy. For example, under the main label “Urgent,” you can have sub-labels like “Clients,” “Prospects,” and “Vendors.”
Here’s how to do it:
Step 1: Create a parent label by clicking on “+” on the left sidebar
Step 2: Add the name of the parent label and click “Create.”
Step 3: Now create the sub-labels by following the same method. Remember to specify a parent label by clicking the “Nest label under” checkbox and selecting the parent label.

And voila! You can see all your sub-labels under the parent label. You can now move emails to the labels you’ve created. In this case, I have labels “Client”, “Prospects”, “Vendor” under the parent label “Urgent”.

Create Rules in Gmail To Keep Your Inbox Organized
By now, you’ve hopefully understood how to use Gmail rules. It automates much of the sorting and prioritizing of your incoming emails so that you can find what you need without much hassle.
With these sorting tips, you can create a well-organized inbox quickly! Remember, the key is to customize your Gmail rules to fit your specific needs.
Frequently Asked Questions (FAQs)
- What are Gmail rules?
Gmail rules are a set of features by Gmail that help you automatically sort your incoming emails based on criteria you set. They act like personal assistants, automatically filing emails into folders, marking them as read, etc.
- How do I avoid creating overlapping filters that might misdirect emails?
Structure your rules with a clear hierarchy. Create nested labels to group similar emails under one parent label. Regularly review and test your filters to ensure they work as intended without conflicts.
- Can I set rules for emails I’ve already received?
Absolutely. When creating a filter, simply check the box next to “Also apply filter to matching conversations” to apply the filter to existing emails in your inbox. - How can I update or delete existing Gmail rules?
Click the gear icon in your Gmail inbox. Then select “See all settings” and navigate to the “Filters and Blocked Addresses” tab. Find the filter you want to update or delete, then click “edit” to modify it or “delete” to remove it.
*- https://hbr.org/2019/01/how-to-spend-way-less-time-on-email-every-day