Skip to content
")

")
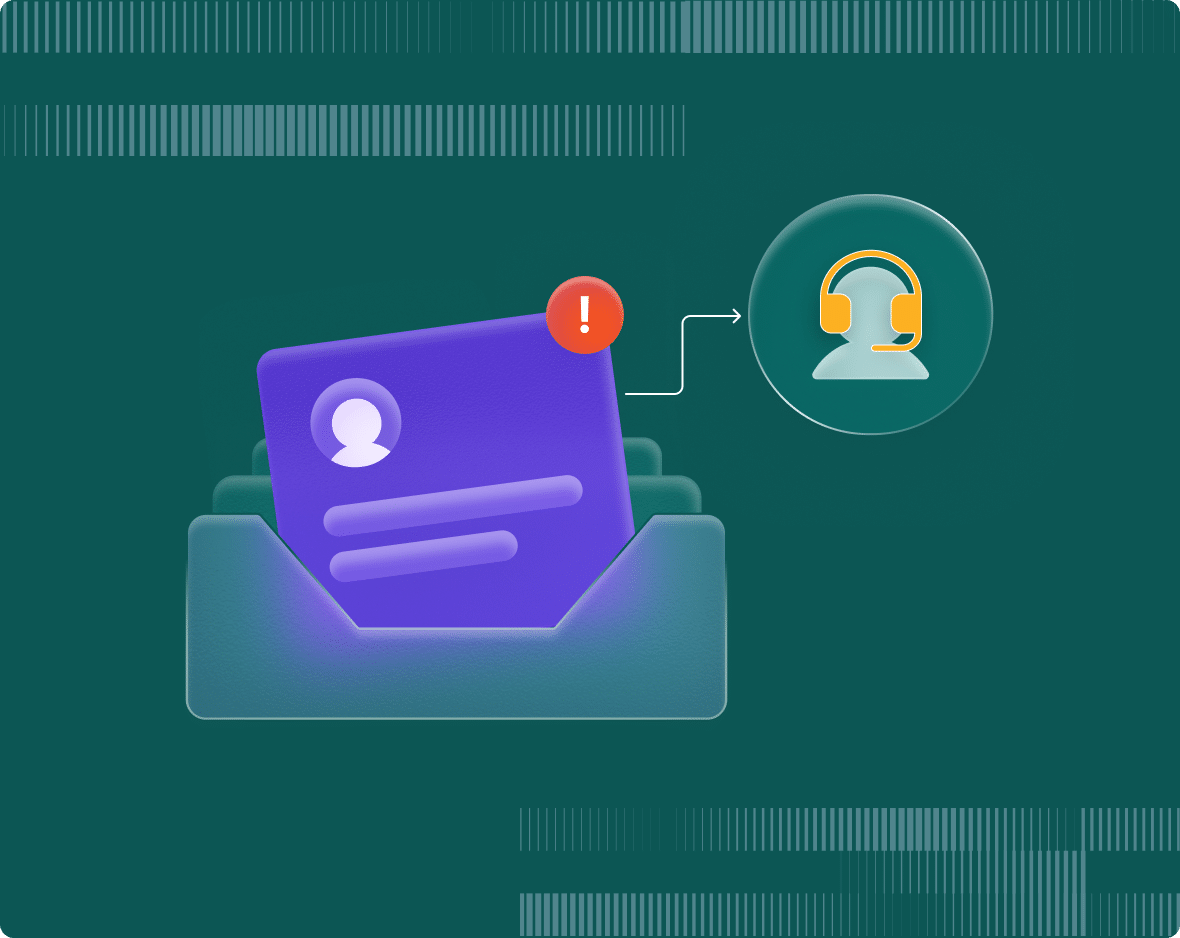
Google doesn’t offer a built-in ticketing system. There’s no native “Google help desk” product inside Workspace.
What teams actually do is stitch together tools they already pay for, Gmail, Google Forms, Google Sheets, Google Groups, and sometimes Apps Script, into a working ticket workflow. It’s a legitimate, low-cost way to start, and for a small team handling a handful of requests a day, it can be enough.
This guide covers four ways to build one, what each method costs in setup time and money, where each one breaks down, and the signals that tell you you’ve outgrown the DIY route.
If you just want the short answer: use Google Forms and Sheets or a Google Groups Collaborative Inbox to get going for free, and move to a purpose-built tool once volume, team size, or compliance needs catch up with you.
Table of Contents
- What is a Google ticketing system?
- How to build a Google ticketing system in 4 ways
- Method 1: Google Forms + Sheets + Apps Script
- Method 2: Google Groups Collaborative Inbox
- Method 3: Shared Gmail account
- Method 4: Google Ticketing system with Hiver (the most scalable way)
- Step 2: Create your shared inboxes
- Step 3: Add your team
- What features should a modern ticketing system have to be effective?
- When to switch from Google's basic ticketing to a modern system
- From DIY to scalable: why Hiver is the right next step
- FAQs:
What is a Google ticketing system?
A Google ticketing system refers to using a combination of Google Workspace tools, mainly Gmail, Google Forms, and Google Sheets, to build a low-cost help desk that tracks, assigns, and resolves support requests. Because Google has no native ticketing product, you assemble the workflow yourself.
In practice, incoming requests, an email to support@, a submitted form, a message to a Google Group, get treated as tickets. A Google Sheet or the Groups interface acts as the tracker for status, owner, and priority. Labels, filters, and optionally Apps Script handle light automation like tagging and routing.
There’s no fixed blueprint. Some teams start with a shared inbox and bolt on a Sheet later. Others begin with a Form for structured intake. The shared goal is the same: turn scattered incoming messages into something that can be tracked, assigned, and closed inside the tools you already use.
What are the limitations of building a ticketing system in Google?
The core limitation is simple: you’re forcing tools that weren’t designed for support to behave like a help desk. They’ll do it, but only up to a point, and the gaps show up fast as volume grows.
- No native ticketing layer: There’s no concept of a ticket ID, status lifecycle, or SLA built into Gmail, Sheets, or Groups. You recreate those manually, and manual systems drift.
- Basic tools lack real tracking: A spreadsheet can hold ticket rows, but it won’t tell you who’s actively working a request, flag a duplicate reply, or warn you when something has gone unanswered too long.
- No automated status updates: Moving a ticket from open to pending to resolved is a manual edit. Customers don’t get automatic acknowledgments, and agents don’t get reminders.
- No reporting or analytics: First response time, resolution time, backlog, reopen rate, none of this exists out of the box. You can’t measure what you can’t see, which makes coaching and capacity planning guesswork.
- Collaboration is thin: Google Groups Collaborative Inbox lets members claim and assign, but there’s nothing to stop two agents drafting conflicting replies to the same request. Internal discussion still happens in separate emails or another tool.
- Security and compliance risk: Shared Gmail logins are the most common DIY shortcut and the most dangerous. One lost device or phished password can expose every customer conversation. Apps Script setups often pull in third-party Workspace add-ons that may not meet your compliance bar.
None of this means the DIY route is wrong. It means it has a ceiling, and it’s worth knowing where that ceiling sits before you hit it.
Comparison chart: 4 ways to set up a Google ticketing system
Here’s how the four methods compare on the three things that matter most when you’re choosing: how long setup takes, what it costs, and where it stops scaling.
| Method | Setup time | Cost | Scalability limit |
|---|---|---|---|
| Google Forms + Sheets + Apps Script | 4 to 8 hours | $0 to ~$100/mo (Workspace + any add-ons) | Breaks down beyond ~200 tickets/week; script maintenance becomes a job |
| Google Groups Collaborative Inbox | 1 to 2 hours | Included with Workspace | Strains past a 3 to 8 person team; no SLAs, analytics, or automation |
| Shared Gmail account | Under 1 hour | Included with Workspace | Unsafe and chaotic past 2 to 3 agents; real security exposure |
| Hiver (in Gmail) | Under 1 hour | Free plan available; paid from $25/user/month | Scales across teams, channels, and ticket volume |
A quick read on this table: the free Google methods win on day-one cost and lose on everything that compounds over time, maintenance, visibility, and risk. A purpose-built tool flips that trade, you pay per user but stop paying in dropped tickets and manual overhead.
How to build a Google ticketing system in 4 ways
Below are the four practical methods, in rough order of DIY complexity, with an honest verdict on each.
Method 1: Google Forms + Sheets + Apps Script
This is the builder’s route. You create a Google Form for intake, link responses to a Google Sheet that acts as your ticket database, then use Apps Script to automate the repetitive parts.
- Build the form. Add required fields for name, email, issue type (dropdown), priority, and description. Required fields force structured data, which is the main advantage over freeform email.
- Link to a Sheet. In the Form’s Responses tab, connect it to a Google Sheet. Each submission becomes a row. Add columns for Status, Assigned Agent, and Internal Notes.
- Automate with Apps Script. Write a script that fires on form submit to generate a ticket ID, email the requester a confirmation, notify the assigned agent, and send a resolution email when status changes to closed.
Verdict: Powerful and genuinely free if you have the JavaScript skills. But it’s a 1 week project to do well, and it’s the most fragile of the four. Scripts break when Google updates APIs or auth tokens expire, and the third-party add-ons that fill feature gaps can introduce security and compliance risk. Best for technical teams that enjoy maintaining their own tooling.
Method 2: Google Groups Collaborative Inbox
A Collaborative Inbox turns a Google Group (like support@yourcompany.com) into a shared queue where members can take, assign, and mark conversations complete.
- Create a Google Group and set its posting permissions so people outside your organization can email it, otherwise customer email bounces.
- In group settings, switch the type to Collaborative Inbox.
- Add your team as members with permissions to take and assign conversations.
Verdict: A real step up from a shared label, and it costs nothing beyond your Workspace subscription. The catch: the collaborative features (take, assign, resolve) only work in the Google Groups web interface at groups.google.com, not inside Gmail, and there’s no dedicated mobile app. There’s no collision detection, no SLA tracking, no analytics, and no automation. It works for a team of roughly 3 to 8 that needs basic assignment and status, and not much further.
Method 3: Shared Gmail account
The simplest method and the one to be most careful with. Everyone on the team logs into a single Gmail account (support@) with shared credentials and works the inbox together, using read/unread and labels to signal who’s handling what.
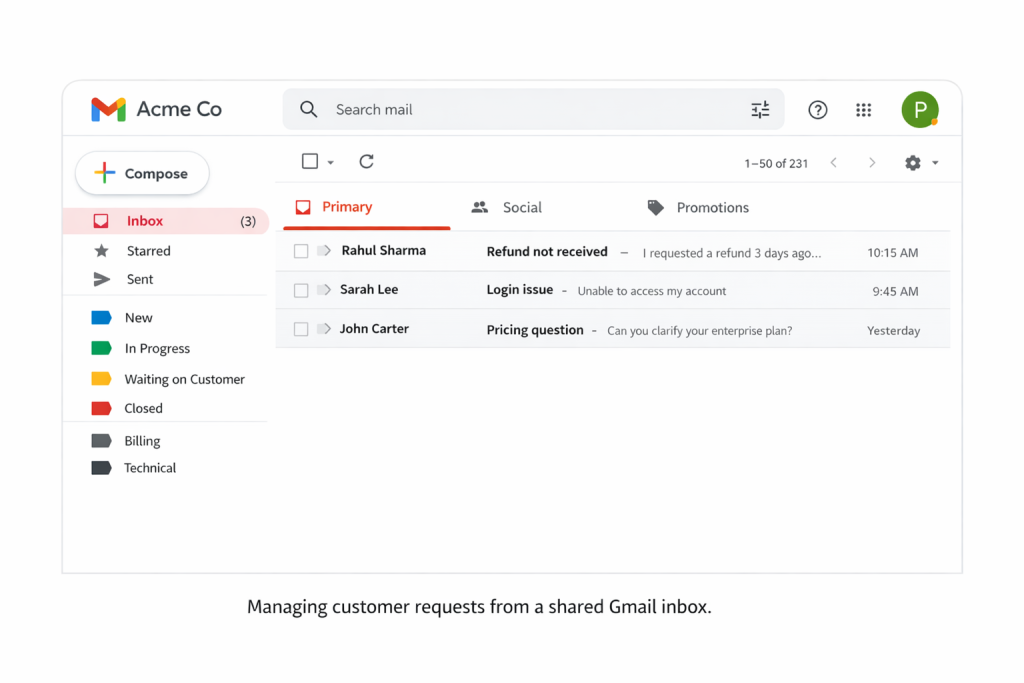
Verdict: Fast to set up and free, but it doesn’t scale past 2 to 3 people and carries real risk. There’s no way to see who’s replying to what, so duplicate and conflicting responses are common. More seriously, sharing one password across a team is a security liability, a single compromised device can expose your entire customer history. Treat this as a stopgap, not a system.
Method 4: Google Ticketing system with Hiver (the most scalable way)
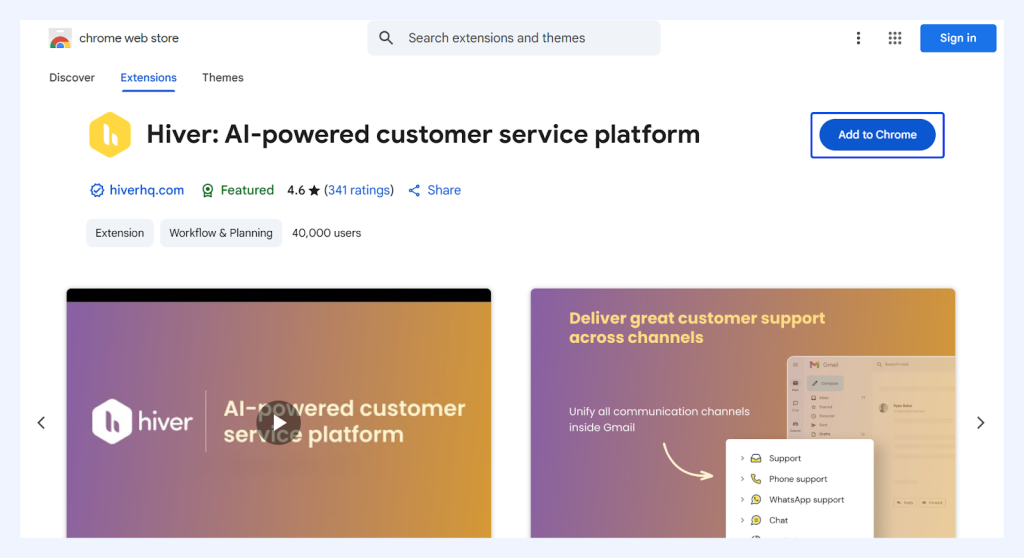
- Install the Hiver Chrome extension, and log in with your company email.
- Once installed, Hiver appears inside Gmail, so your team can start managing tickets without switching tools or learning a new system.
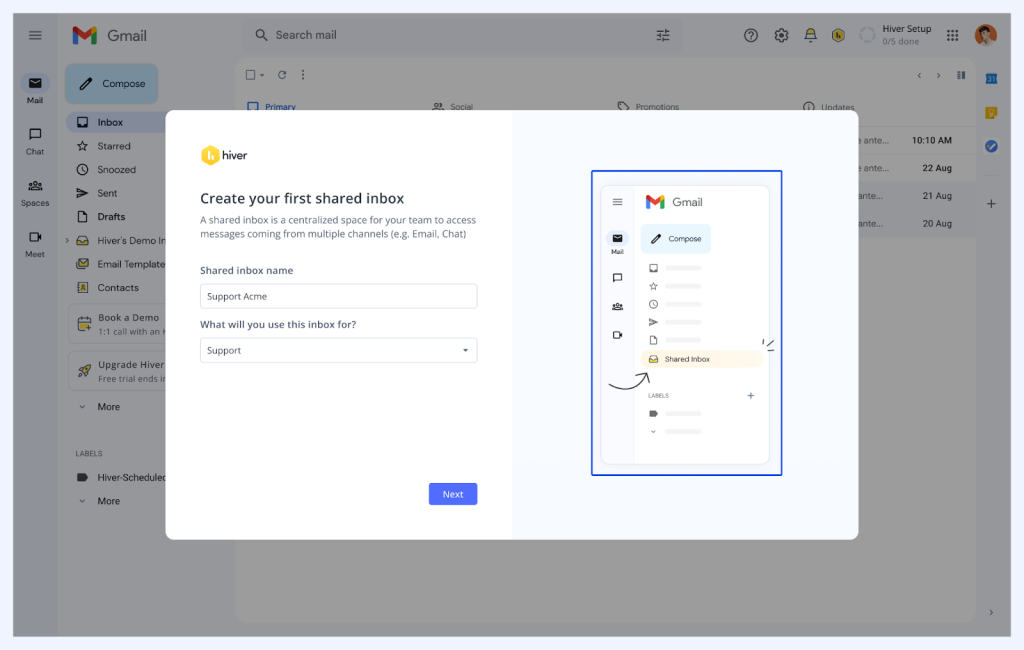
Step 2: Create your shared inboxes
Instead of having everyone log into a single support@ account, Hiver lets you manage shared email addresses (like support@ or info@) directly from your individual Gmail accounts.
Open the Hiver panel inside Gmail and click ‘Create Shared Inbox’. Enter a name for the inbox, choose its purpose, and select the email address you want to connect (for example, support@yourcompany.com). Then add the relevant team members who should have access to it.
Once created, all emails sent to that address (like support@yourcompany.com) will appear in the shared inbox, where your team can assign, track, and collaborate on them directly from Gmail.
Recommended reading
Step 3: Add your team
Add your team so they can access shared inboxes, collaborate on conversations, and manage tickets with clear roles.
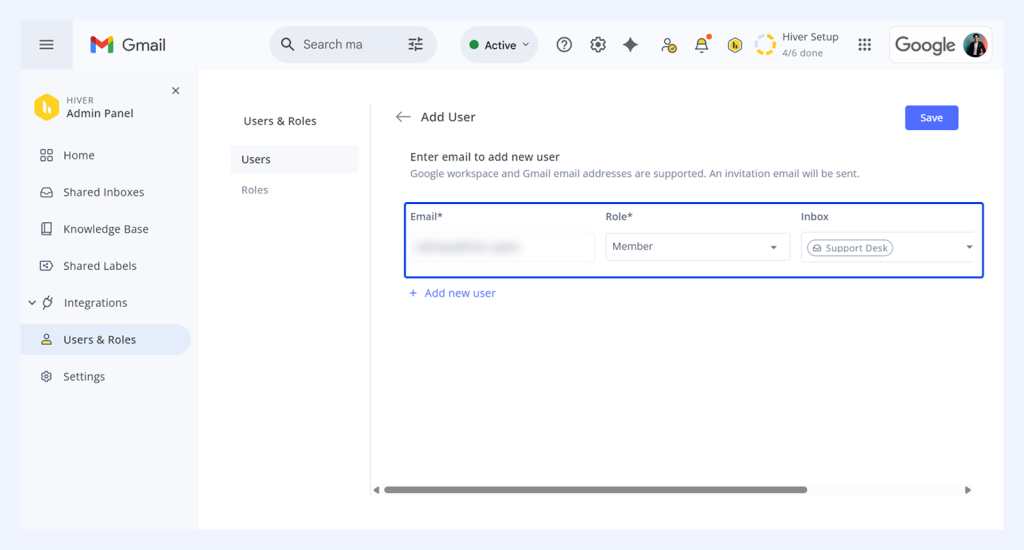
- Go to Hiver icon → Admin panel → Users & Roles → Add Users, then enter the email, assign a role, and select the shared inbox you want to add them to.
- Click Save to send the invite.
- You can manage users anytime: update roles, remove access, or view participants in each shared inbox from the Admin panel.
Verdict: The right next step specifically for Gmail-centric teams that want ticketing, collaboration, and AI without the maintenance burden of scripts or the blind spots of a shared login. Setup takes under an hour. There’s a free plan for teams just starting out, with paid tiers when you need automation, SLAs, and analytics.
What features should a modern ticketing system have to be effective?
Here’s the honest framing: a Google ticketing system has no native ticketing features at all, you’re manually approximating each one. These are the capabilities a real system needs, and a useful checklist for judging whether your current setup measures up.
- Ticket ID generation. Automatically assigns a unique reference to every request so nothing gets lost, duplicated, or overlooked as it moves between agents.
- SLA management. Tracks response and resolution targets, and flags conversations that are overdue or about to breach, so commitments don’t quietly slip.
- Reporting and analytics. Surfaces first response time, resolution time, backlog, and reopen rate by agent, queue, and tag, the data you need to coach and plan capacity.
- Automated ticket routing. Assigns incoming requests by rules, round-robin, or skill, instead of someone manually triaging every message.
- Canned responses and templates. Lets the team answer common questions consistently and fast, without rewriting the same reply each time.
- Compliance and security. Role-based access, audit trails, and certifications like SOC 2, GDPR, and HIPAA, which matter the moment you handle regulated or sensitive data.
If you’re recreating most of these by hand in a spreadsheet, that effort is the real cost of the “free” approach.
When to switch from Google’s basic ticketing to a modern system
A Google setup works until a few specific thresholds, and crossing any one of them is usually the signal to move. You rarely hit just one.
- Your team exceeds 3 to 5 members. Beyond this, shared inboxes and Collaborative Inbox start producing collisions and dropped handoffs faster than people can coordinate manually.
- Volume passes ~50 tickets/week. Once requests cross this line, tracking them across Gmail or Sheets becomes unmanageable, and response times take a direct hit from delays and dropped tickets.
- You need audit trails. When compliance, security, or a customer contract requires you to prove who did what and when, manual systems can’t give you a reliable record.
- Script maintenance becomes a tax. If an Apps Script setup needs regular fixing every time something breaks, you’re paying in engineering time what you thought you were saving in license fees.
Hitting one of these isn’t a crisis. It’s just the point where a purpose-built tool starts costing less than the workaround.
From DIY to scalable: why Hiver is the right next step
For teams whose support already runs through Gmail, the cleanest upgrade path is the one that doesn’t rip out what’s working. Hiver in Gmail layers ticketing, collaboration, automation, and AI directly onto the inbox your team knows, so there’s no migration to a separate platform and no relearning a new interface.
Craftgate, a payment orchestration platform, initially managed customer support through a shared Gmail account, but as query volumes grew, this setup became difficult to scale, leading to missed emails, uneven workloads, and limited visibility.
After moving to Hiver, they were able to bring structure into their Gmail workflow with automation, clear ownership, and better collaboration.
This resulted in 130+ hours saved monthly, 700+ conversations routed automatically, and a 35% improvement in resolution times.
Ticketing System Features that help you scale
Hiver builds on your existing Gmail setup, adding the structure needed to manage support at scale. Here’s how its key features help your team stay organized and respond more effectively.
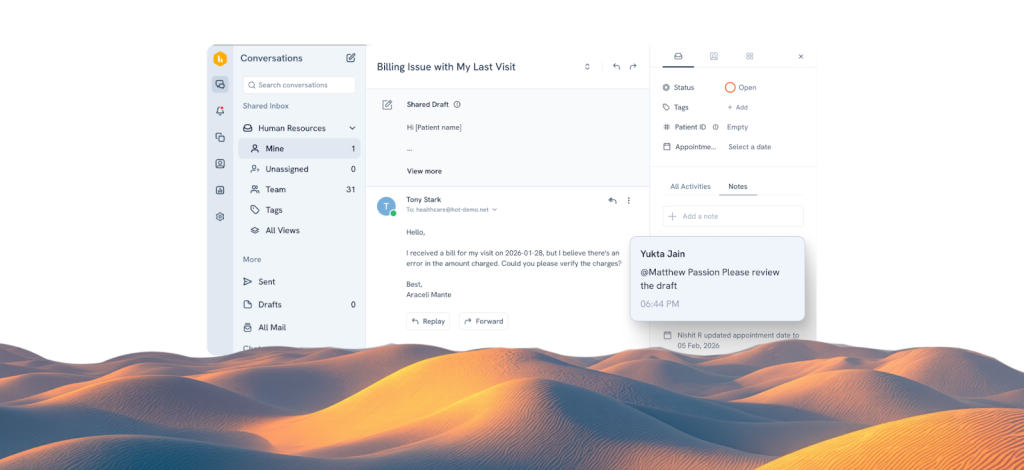
➡️ Use Internal Notes for collaboration
Bring teammates into conversations without relying on DMs, CCs, or forwards. Share context with product, engineering, and other teams, and manage internal Slack discussions, all directly linked to the customer request.
- Use the “Notes” section on the right side of any email thread. You can @mention a teammate to ask for help or provide context.
- These notes are invisible to the customer but stay attached to the ticket. This ensures that even if an agent is out of the office, the next person to step in has the full context to guide the customer.
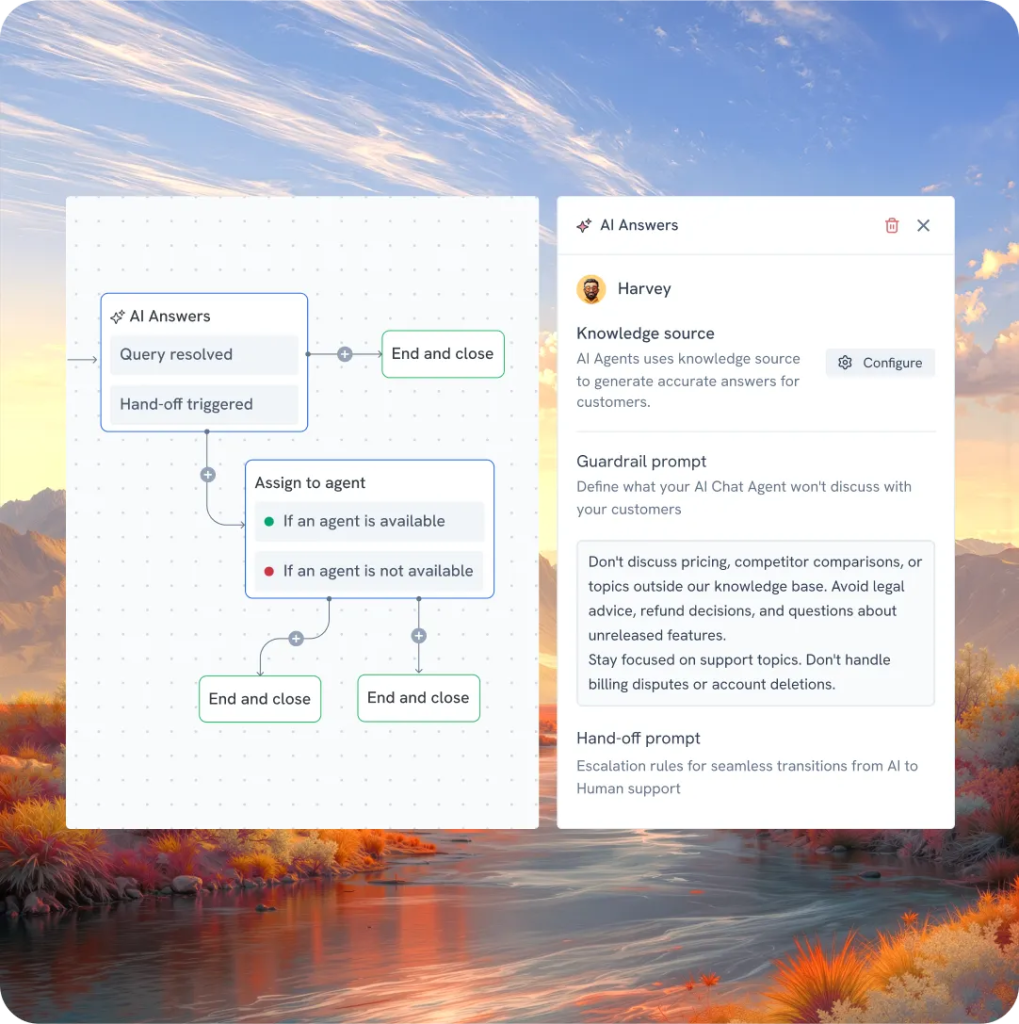
➡️ Set up automations to handle repetitive work
As ticket volume grows, manual tasks like tagging emails, assigning conversations, or closing simple threads start taking up a lot of time.
Instead of handling this manually, you can set up automations inside Hiver to manage routine work in the background. Here’s what you can automate:
- Tagging and routing: Automatically tag emails by topic (like “Refund” or “Technical Issue”) and assign them to the right team
- Round-robin assignment: Distribute tickets evenly across team members to balance workload
- Skill-based routing: Send specific queries (like billing or technical issues) to the right experts
- Auto-closing conversations: Close tickets when there’s no response after a certain time or after a “thank you” reply
- Personal inbox → shared inbox: Convert important emails from individual inboxes into trackable tickets for the team
Clutter, a moving and storage services company, initially managed employee queries through a shared Gmail inbox, relying on manual forwarding to assign emails, which made tracking and ownership difficult.
They wanted a solution that worked within Gmail, without switching to a separate help desk. After adopting Hiver, the team was able to assign conversations, use templates, and manage communication more efficiently.
This led to a 25% improvement in response times, with clearer ownership and faster handling of recurring queries.
➡️Add AI capabilities with Hiver to improve response quality and speed
As support volume grows, a lot of time is spent doing two things: finding the right answer and writing the response. Hiver AI assists with both, directly inside Gmail, so agents don’t have to switch tabs or search across tools.
Ask AI (finding answers instantly): Instead of searching through help docs or past tickets, agents can ask AI and get instant answers pulled from connected knowledge sources like SOPs, previous conversations, and customer data.
This is especially useful when handling unfamiliar queries, onboarding new agents, or responding quickly without digging through multiple tools.
AI Suggested Responses (drafting replies faster): Agents don’t have to start from a blank screen. AI generates ready-to-use reply drafts based on conversation context, past tickets, and help documentation.
This helps teams respond faster while keeping replies consistent. Combined with templates for common queries, agents can reuse proven responses and refine them with AI, reducing typing effort without losing context or personalization.
Hiver’s AI doesn’t just help agents draft replies, it also handles repetitive work and gives teams visibility into performance.
With AI Agents, teams can automate repetitive and even multi-step workflows, handling common queries, follow-ups, and routine resolutions without manual intervention.
It also brings visibility and quality control into the process. AI QA helps review conversations and highlight gaps in responses, while AI Insights surfaces patterns across tickets, like recurring issues or sentiment trends.
Together, this creates a system where agents are supported with AI Copilot, routine work is handled by AI Agents, and performance is continuously monitored and improved.
➡️Track progress with real-time reporting
To move from a reactive team to a proactive one, you need data.
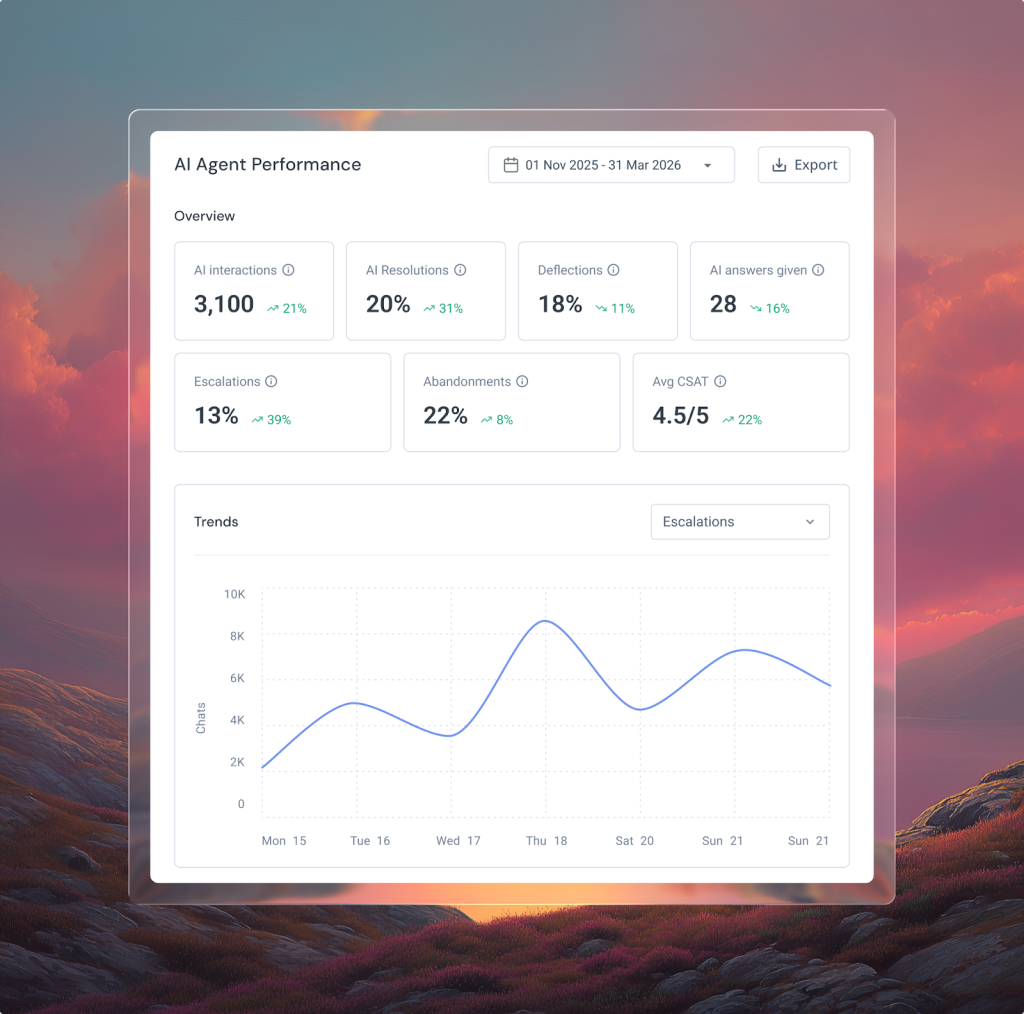
- Access Hiver AI-powered analytics to get a clear view of how your team is performing, and track key metrics: response times, workload, and SLA adherence. You can also use AI to spot patterns like customer sentiment, common issues, and areas where agents may need support.
- You can create customized dashboards to track key metrics in one place and schedule reports for a consistent view of performance and workload.
- With AI Sentiment Analysis, you can see how customer sentiment changes over time, spot early signs of dissatisfaction, and understand where support experiences may be slipping.
- With AI Chat Analytics, you can track real-time metrics like response time and chat volume, helping you spot trends as they happen.
- AI Agent Analytics gives visibility into how AI is contributing: how many conversations it’s handling, how often it resolves issues, and where it’s actually making an impact.
FAQs:
1. Does Google have a built-in ticketing system?
No. Google Workspace has no native ticketing product. Teams build one by combining Gmail, Google Forms, Google Sheets, and Google Groups, or add a third-party tool.
2. How does a Google-based ticketing system work?
Incoming requests become tickets tracked in a Google Sheet or Groups Collaborative Inbox. Status, owner, and priority are managed manually, with labels, filters, or Apps Script adding basic automation.
3. Is there a free way to build a Google ticketing system?
Yes. You can build a free google apps ticketing system using a Google Collaborative Inbox. This allows you to assign topics to team members and mark them as resolved. However, it lacks advanced features like automation or detailed analytics.
4. What is the best way to turn Gmail into a ticketing system?
For small teams, a Google Groups Collaborative Inbox works. For assignment, SLAs, automation, and analytics inside Gmail, a tool like Hiver in Gmail is the most scalable option.
5. What are the advantages of a ticketing tool over a DIY Google system?
Purpose-built tools add ticket IDs, SLA tracking, collision detection, automated routing, reporting, and security, capabilities you’d otherwise recreate manually and maintain yourself.
6. Can I integrate a Google ticketing system with other tools?
Yes, most ticketing system options integrate seamlessly with the wider ecosystem, including Google Calendar, Drive, and Slack. Advanced tools also offer API access to connect with your CRM or proprietary databases.
7. What are the alternatives to Google-only ticketing tools?
Common alternatives include Hiver, Help Scout, Freshdesk, and Zendesk. The right choice depends on team size, channel mix, and whether you want to stay inside Gmail.
8. Is a Google-based ticketing system suitable for external customer support?
For low volume, yes. At scale it struggles, no SLAs, weak collaboration, and security risk from shared logins make it unreliable for high-volume external support.
9. Do you need a Google Workspace seat for every user to support the ticketing system?
For DIY methods, yes, each agent needs a Workspace account. A Google Group address doesn’t consume a separate license, but agents still need their own seats.