An interesting article I read argued that everyone should have at least four email accounts and honestly, the reasoning made sense.
What didn’t make sense was the reality of managing them.
Most people juggling two or three inboxes daily know the struggle. You miss a client follow-up because you were in the wrong inbox. You spend 10 minutes looking for an email that turned out to be in a different inbox the whole time.
Half your morning is gone before you’ve actually responded to anything, because you’re still catching up across accounts. We’ve seen this exact pattern across hundreds of teams we’ve worked with, and it almost always comes down to the same root cause: no system.
Thankfully, there are three ways to deal with it. You can go the manual route with forwarding and aliases, use the built-in features of your existing email client (Gmail, Outlook, Yahoo, or Apple Mail), or switch to a dedicated app designed to manage multiple accounts from one workspace.
Read on to find out how each one works and which one is right for you.
How to manage multiple email accounts manually
The manual approach is usually where people start for managing multiple accounts, and for good reason. It does not require any new tools and doesn’t come with a learning curve.
You redirect emails from your secondary accounts to one primary inbox using forwarding or aliases, and manage everything from there. We’ve seen this work well for individuals. For teams, it tends to break down quickly.
Email forwarding
Forwarding automatically sends incoming emails from one account to another. Set your secondary accounts to point at your primary inbox, and everything arrives in one place without logging in elsewhere.
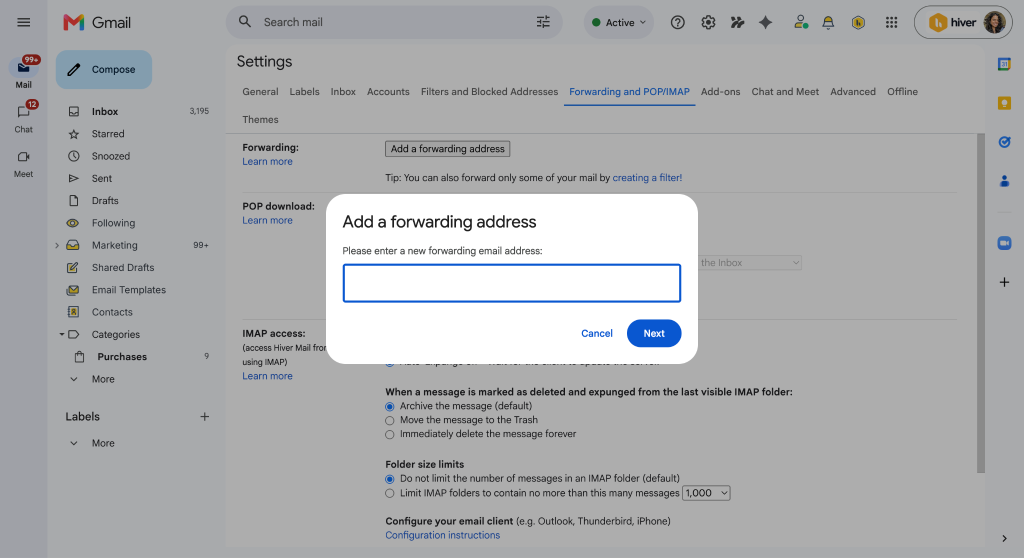
Setting up forwarding in Gmail:
- Open Gmail and click the Settings gear icon in the top right
- Select “See all settings”
- Go to the “Forwarding and POP/IMAP” tab
- Click “Add a forwarding address” and enter your primary email
- Confirm the verification email Gmail sends to that address
- Select “Forward a copy of incoming mail” and click Save
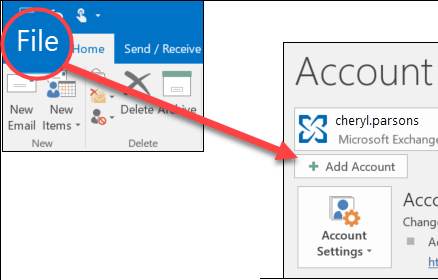
Setting up forwarding in Outlook:
- Open Outlook and go to Settings
- Select Mail, then Forwarding
- Toggle “Enable forwarding” on
- Enter the email address you want to forward to
- Choose whether to keep a copy in Outlook and click Save

Where it falls short: Forwarding gets emails to one place, but replies go out from your primary address by default. If you need to respond as a specific account, you will need to configure the ‘Send As’ option separately.
Email aliases
An email alias is an alternative email address (like a nickname) that routes messages directly to your primary inbox without requiring a separate account. So instead of logging into three different inboxes, you manage everything from one place while still being able to send and receive from each address separately.
Gmail, Outlook, and Apple Mail all support aliases. Here is how to set alias up in Gmail:
- Go to Settings
- Click “Accounts and Import”
- Find “Send mail as”
- Click “Add another email address”
- Enter the alias address
- Complete the verification Gmail sends
- Save
Where it falls short: Aliases work well for one person managing multiple identities. If you’re part of a team and everyone needs access to the same set of emails, an alias will not cut it.
How to manage multiple email accounts with email clients
Most email clients let you add multiple accounts and switch between them without logging in and out. For individuals, this is usually enough. Here’s how you can set it up in the four most common email clients.
How to manage multiple email accounts with Gmail
Gmail lets you add up to five email accounts and view them all through a single interface. You can switch between accounts from the profile icon in the top right, or view all inboxes at once under “All inboxes.”
- Click your profile icon in the top right
- Select “Add another account”
- Sign in to the account you want to add
- Switch between accounts by clicking your profile icon and selecting the account
Read the full instructions on Google’s support page.
Where it falls short: Although Gmail has an All Inboxes view on mobile that combines everything into one feed, the desktop version has no equivalent. On Gmail web, accounts stay separate and you switch between them rather than seeing everything in one place.
In our experience, most people outgrow Gmail’s native switcher around the time they hit three or more accounts and start missing things.
Pro tip: If Gmail keeps grouping separate emails into the same conversation, change the subject line when starting a new topic.
You can also go to Settings > See all settings > General > Conversation View and turn it off to see every email as a separate message.
How to manage multiple email accounts with Outlook
Outlook handles multiple accounts well across desktop and mobile. Each account gets its own folder set in the left panel, and you can set a primary account for composing new emails.
- Go to View tab
- Select View settings
- Go to Accounts > Your accounts
- Select Add Account
- Enter your email address and follow the prompts
Read the full instructions on Microsoft’s support page.
Where it falls short: Outlook.com (the web version) no longer supports adding third-party accounts like Gmail directly. You will need the desktop or mobile app instead.
How to manage multiple email accounts with Apple Mail (iPhone)
Apple Mail supports multiple accounts natively and lets you view all of them together in a single “All Inboxes” view or separately by account.
- Go to Settings > Apps > Mail
- Tap Mail Accounts
- Tap Add Account
- Select your email provider
- Enter your email address and follow the prompts
Read the full instructions on Apple’s support page.
Where it falls short: When composing a new email, Apple Mail defaults to your primary account. It’s easy to send from the wrong address without noticing, especially when you’re moving quickly across accounts.
How to manage multiple email accounts with Yahoo Mail
Yahoo Mail lets you add up to 50 third-party mailboxes, including Gmail, Outlook, and AOL, and manage them all from one place.
- Click the More options icon
- Select Settings
- Click Mailboxes
- Under “Mailbox list” click Add mailbox
- Select your email provider
- Enter your email address and follow the prompts
- Save
Read the full instructions on Yahoo’s support page.
Where it falls short: Yahoo Mail works fine for personal use but lacks the team features that matter once more than one person is managing the same set of emails. No task assignment, no internal notes, no visibility into who has responded to what.
A good rule of thumb: If you’re managing accounts on your own and the native switcher works, you don’t need a dedicated tool yet. But when emails start to go unanswered, the wrong person replies, or nobody knows who owns what, it’s your sign to switch to a dedicated email management tool.
Best apps to manage multiple email accounts
Native email clients get you so far. Once you’re juggling multiple accounts across a team, you start missing important emails. Emails go unanswered because nobody knows who picked them up. The same message gets replied to twice.
We’ve helped thousands of teams get past this point. The tools below are the ones we’ve seen work best, depending on where you are and what you need.
- Mailbird
If you’re an individual managing two or three personal and work accounts and just want them in one place without complexity, Mailbird is a solid starting point.
It pulls Gmail, Outlook, iCloud, and other IMAP accounts into a single desktop inbox, with integrations for tools like Slack, Google Calendar, and Dropbox. Clean interface, fast to set up, and does the job well for solo use.
- G2 rating: 3.6/5
- Key features: Unified inbox, multi-account support, email tracking, message snoozing, app integrations, customizable workspaces, AI-powered email writing
- Spike
Spike takes a different approach. Rather than just consolidating accounts, it converts email into a chat-style interface so threads read like conversations instead of long quoted chains.
It works with Gmail, Outlook, iCloud, and most IMAP accounts. Teams that find traditional email too slow or cluttered tend to gravitate toward it. Worth trying if the interface itself is part of the problem.
- G2 rating: 4.6/5
- Key features: Conversational email, unified inbox, shared inbox, priority inbox, team channels, collaborative docs, video calls, AI-powered replies
- Hiver
Managing multiple accounts across a team takes more than a consolidated inbox. Hiver’s shared inbox adds ownership, tracking, and collaboration on top of your existing email account.
You can assign every email to the right person, track statuses and leave internal notes to collaborate on responses. Hiver’s AI handles routing, triage, and quality checks automatically, which means your team spends less time on repetitive tasks and more time doing work that actually matters.
Since Hiver works with Gmail, Outlook, and every other email provider, you don’t need to worry about a learning curve or migrating your operations to a new email client.
- G2 rating: 4.6/5
- Key features: Omnichannel inbox, AI agents, AI Copilot, AI QA, shared inboxes, Jira integration, cross-team collaboration, customer portal, analytics
Group Miki’s Manila operations team is a good example. They were managing 18,000 to 20,000 weekly conversations across multiple inboxes, with agents manually toggling between accounts and triaging emails by hand.
As Nelson Jay Dela Cruz, their Deputy General Manager, put it: “We were stuck switching between multiple inboxes. It slowed us down and added extra steps to our workflow.”
After switching to Hiver, average case handling time dropped from 12 to 4 minutes, and the team saved 168 hours every month.
- Missive
Missive combines email and team chat into one workspace. Teams can manage multiple accounts from one place, assign conversations to specific people, collaborate on drafts before sending, and see exactly who is handling what.
It also supports SMS, WhatsApp, and social channels alongside email, so everything comes into one inbox regardless of where it started.
- G2 rating: 4.7/5
- Key features: Shared inboxes, internal threads, collaborative drafting, assignment workflows, rules and automations, multi-account support, AI drafts, SMS and WhatsApp support
Stay on top of multiple email accounts
Having the right tool is half the battle. How you use it matters just as much. Here are a few practices we’ve seen make the biggest difference.
Set a primary account for sending. Decide which address goes out for which type of email and stick to it. Replying from the wrong account is one of the most common mistakes teams make when managing multiple accounts.
Use folders and labels consistently. Whether you’re on Gmail, Outlook, or a dedicated tool, a consistent labelling system across accounts saves more time than most people expect. If you’re searching for something three weeks later, you’ll be glad you set it up.
Check all accounts on a schedule, not constantly. Constant tab switching is what makes multiple accounts exhausting. Block specific times for each inbox rather than reacting to every notification as it arrives.
Automate what repeats. If certain emails always need the same action (forwarding to a teammate, adding a label, sending a standard reply), set up a rule. Every email you handle manually that could be automated is time you’re not getting back.
Give every account a clear purpose. The root cause of inbox chaos is usually accounts that overlap in function. If two addresses receive the same types of emails, consolidate them. Clarity of purpose makes everything else easier.
Find the best way to manage multiple email accounts
There is no single right way to manage multiple email accounts. A freelancer managing two Gmail accounts has different needs from a team handling five regional inboxes.
If you’re an individual, start with your email client’s native features. Gmail, Outlook, and Apple Mail all give you enough to consolidate accounts without adding new tools.
But if you’re managing email as a team and things are slipping through, a dedicated tool is worth the investment. Hiver is where we’d point you for teams that need automation, AI, and full visibility across every account.
Start for free or book a demo to see how it works.