Skip to content


Not using email isn’t an option. So the only other option is to manage your email account better. Decluttering and organizing your inbox is a great idea, but it still requires a considerable amount of time and effort. However, if you use Gmail, a simpler alternative is to set up labels and filters to manage your Gmail inbox better.
We’ve written about Gmail labels earlier, so in this blog post, we’ll focus on how to use Gmail filters to sort your emails automatically.
Table of Contents
- So, what are Gmail filters?
- Actions that can be performed using Gmail filters
- How do you create a filter in Gmail?
- Precise Gmail Filters with Operators
- 11 Effective Gmail Filters To Help You Organize Your Inbox
- Editing or deleting filters
- Import/Export Gmail filters
- More ways to organize your inbox
So, what are Gmail filters?
Filters in Gmail are automation rules that allow you to redirect emails as they hit your inbox, thereby saving you the trouble of having to sort and manage emails manually.
For instance, you can redirect certain newsletters from certain senders into a separate inbox or directly send emails from certain sources to the trash. In Gmail, you can even use filters to add importance markers and labels of different types and colors. By weeding out emails this way, you can free up space, reduce stress levels, and focus on the conversations that really matter.
If you prefer that your email won’t be linked to your own IP address, making it harder for the recipient to identify you with VPN for PC. For that reason, it’s best to use the right tool if security is one of your main keys
Actions that can be performed using Gmail filters
Here’s a quick run-down of all of the actions that you can perform with Gmail filters:

- Skip the inbox: Archive an email so that it doesn’t appear in your inbox.
- Mark as read: As the name suggests, have an incoming email already marked as ‘read.’
- Star it: Have Gmail mark the email as starred.
- Apply a label: Add a specific Gmail label to an email.
- Forward it: Automatically forward an email to another email address.
- Delete it: Send an email to the trash.
- Never send it to Spam: Tell Gmail to never send a specific set of emails to Spam.
- Mark important: Automatically mark a specific set of emails as important.
- Never mark it as important: Tell Gmail to never mark filtered emails as important.
- Categorize as: If you use multiple categories of inboxes such as Primary, Social, Updates, etc., tell Gmail to automatically add a specific set of incoming messages under a category.
How do you create a filter in Gmail?
There are two ways to create filters in Gmail.
Method 1: Using the search bar

- Create a filter with the search bar
- Go to the Gmail search bar, type in a keyword or specific email address you’d like to filter out, and click on the filter symbol.

- Create a filter with the search bar
- Clicking on the filter symbol opens up a dropdown. This dropdown allows you to further refine your filter conditions. Once you’ve done that, click on the “Create filter” option.

- Create a filter with the search bar
You can now choose what you want this filter to do. For instance, in this case, I’d like to have all emails that contain the keyword “News” and are from Google Newsletter’s email address, <thekeyword-noreply@google.com>, go into my Updates folder instead of my primary inbox. So I click the dropdown next to the “Categorize As” option and select “Updates”.

- Create a filter with the search bar
Clicking on the “Create filter” button will now create the said filter, and all emails which contain the keyword “News” and are from the email address <thekeyword-noreply@google.com> will now appear in my “Updates” folder instead of my primary inbox.
Pro tip: Remember to click on the “Also apply a filter to matching conversations” checkbox. This way, all your pre-existing emails that match the filter conditions will also be included within the filter conditions.
With this, you have created your first Gmail filter and are on your way to achieving email nirvana.
Method 2: Create a filter from the settings menu in Gmail
Click on the ‘gear icon’ on the top right of your Gmail screen.

- Create a filter from the settings menu on the top right corner
Pick “See all settings” at the top.

- Go to “See all settings”
- And then click on ‘filters and blocked addresses.’ This section shows you the existing Gmail filters which are applied to your Google account.

- Go to “Filters and Blocked Addresses”
- To create a new filter, click on the “Create a new filter” option.

- Select “Create a new filter”

- Repeat the last two steps from Method 1
This opens up a dropdown menu, which, if you’ve read through the previous section, looks familiar.
The rest of the steps to create the filter remain the same as in the previous section.
Method 3: Directly from an Email
Open the email that you wish to filter and click on the three vertical dots in the top right corner.

- Select the menu in the top right corner of the email

- Select the menu in the top right corner of the email

- Repeat the steps mentioned in Method 1
Precise Gmail Filters with Operators
Gmail supports several operators which allow you to perform precise search operations. These searches can then be saved as powerful and precise filters. Here’s a quick run-down of the operators that are supported by Gmail and their functions.
| Operator | Meaning | Use Case |
|---|---|---|
| or | Combines two or more filters with an OR operator. | is:from <your boss’s email address> or is:from <your colleague’s email address> |
| and | Combines two or more filters with an AND operator. Requires that all criteria be met. | is:from your boss’s email address and is:in the subject “invoice” |
| ( ) | Groups multiple criteria together | Subject: (meeting OR appointment) AND Body: (report OR summary) |
| + | Includes the specified word or phrase. | has:the words “invoice” “payment” +unsubscribe |
| – | Excludes the specified word or phrase. | has:the words “invoice” “payment” -unsubscribe |
| “” | Matches an exact phrase | Subject: “Meeting with John Doe” |
11 Effective Gmail Filters To Help You Organize Your Inbox
These 11 efficient Gmail filters offer a tailored approach to organizing your inbox, ensuring that important messages are prioritized and distractions are minimized.
Gmail Filter 1: Auto-delete unwanted emails
Preventing emails from reaching your inbox is a hundred times better than having to deal with them once they enter your inbox. You can always use Gmail’s block button or even a smart tool like unroll.me
But sometimes you come across spam email senders that don’t honor your unsubscribe requests or senders you can’t block even if you’d like to. Or maybe you find pesky emails that get past your gmail spam filters and end up in your inbox.
One way to get around those is by using a filter. You can:
- Go to your search bar and select the filters symbol
- Add the email in the From field. This is the email you don’t want to receive communications from.
- Set the date i.e. the duration, which may have past emails that you’d want to delete.
- Click “Create filter”.

- Check the option “Delete It” and “Also apply filter to ‘x’ matching conversations”.

- Click “Create filter” again
Gmail Filter 2: Mark emails as read
All emails are equal, but some are more equal than others. This is why it is important to mark these less important emails as ‘read’ so that you can focus on the ones that really matter.
Once again, you can:

- Create a filter based on the sender’s email address or keywords, and then
- Instruct Gmail to ‘mark as read.’
Gmail Filter 3: Move emails to specific categories
If you aren’t using Gmail’s tabbed inboxes, you probably should. Tabbed inboxes allow you to segregate your inbox into tabs such as Primary, Social, Updates, etc., allowing you to focus on emails that matter.
To enable tabbed inboxes, click on the ‘gear icon’ on the top right corner of your Gmail window and click on ‘Configure inbox’ from the dropdown.
- Click the gear icon on the top right corner.

- Click “See all settings”.

- Select the “Inbox tab.
- Under “Inbox Type”, click the drop-down menu and select “Default”.
- You can check the tabs you want to see in your inbox and uncheck those that you don’t.
Note: You can’t add, edit, or delete categories in this list.
Now, go to the search bar as usual and apply the filter to the categories you checked.

- Check the “Categorize as: ” filter.
- Select the dropdown and select the category you want emails from the specific email ID to be stored in.
- Click “Create filter”.
Gmail Filter 4: Automatically add labels to emails
We’ve already spoken about how Gmail labels are a powerful tool to organize your inbox. You can read more about it here. You can use filters to automate label creation to mark certain emails as important or for follow-ups to clients and more.
To automate label creation:
- Create a filter based on the sender’s email address or keywords, and then,

- Use the ‘Apply a label’ and pick a label from the dropdown menu.
Note: You can also select the “Skip the inbox” option to get rid of these emails from your primary inbox.
Gmail Filter 5: Automatically empty your Spam inbox
Are you tired of manually deleting emails from your Spam inbox on a periodic basis? You can create a filter to automatically delete every email that Gmail sends to your Spam inbox.
To do this,

- Go to the Gmail search bar and click on the filter icon.
- In the dropdown, navigate to the “Includes the words” field and type in is:spam
- Click on the “Create filter” button.

- Use the “Delete it” filter action and confirm filter creation.
Gmail Filter 6: Automatically reply to emails with a canned response
Canned responses are a great way to save time and effort when responding to emails. They allow you to pre-write responses to common questions or requests so that you can quickly and easily send them out when needed. This can be especially helpful when you receive a lot of emails that require the same or similar responses.
Suppose you receive a lot of emails asking for your company’s pricing information. You could create a canned response that includes this information and then create a filter that automatically sends this canned response to any email that contains the word “pricing.”
Here’s how you create templates or canned responses in Gmail:
- Go to the gearbox icon in the top right corner of your inbox. Click “See all settings” and move to the “Advanced” tab, as shown in the image below.

- Enable the setting for “Templates” and click on “Save Changes”.
- Go back to your inbox and compose an email. Type the canned response you wish to send. I’ve typed one for pricing intimating the customer that I’ll get back to them with the information within 12 hours.

- Click on the More button (three vertical dots) on the Send toolbar.
- Select Templates > Save draft as template > Save as new template.

- Give your template a name. I’ve named it “For pricing” for easy reference.

- Now it’s time to set up the filter. Go to the Gmail search bar and type “pricing” in the “Includes the words” field. Click on “Create filter”.

- Check on the boxes “Send template:” and select the template name from the drop-down. Click “Create filter”.

Congratulations! You can now easily send canned responses based on set filters.
Recommended reading
Gmail Filter 7: Filter emails that contain comments on Google Workspace files
If you receive a lot of comments on Google Workspace files, it can be helpful to filter them so that they are not all mixed in with your regular email. Also, you’re going to view them in the file anyway, so they’re pretty much useless as email notifications and can clutter your inbox unnecessarily.
Let’s say you’re receiving notifications about the comments on Google Docs.
- Select the last part of the Google notification email ID. In the example given in the image below, I’ve selected “@docs.google.com”.

Here’s how you filter notifications from Google docs.
- Enter “@docs.google.com” in the “From” field. Type “sheets” in the “Has the words” field. Click on “Create filter”.

- Check on “Skip the inbox”, “Apply the label:” and select the appropriate folder name from the drop-down. In my case, I’ve selected the folder “Google Docs Comments”. Click on “Create filter”.

And that’s it! All your comments on Google files will now appear in a separate folder. Repeat the process for Google Sheets and Google Slides.
Gmail Filter 8: Filter calendar notifications
Just like the comment notifications email from Google files, the messages you receive when someone accepts a Calendar invite are also pretty useless and unnecessarily clutter your inbox.

Here’s how to get rid of them.
- Go to the Gmail search bar, click on the filter icon. Type filename:invite.ics AND accepted in the “Subject” field. Click on “Create filter”.

- Next check the options – “Skip the inbox”, “Mark as read”, “Apply the label:” and select the appropriate folder from the drop-down. In my case, I’m selecting the label named “Calendar”.
- Finally, check the “Also apply filter to matching conversations” option and click “Create Filter”.

Gmail Filter 9: Search for old emails by date + move to folder
As your inbox fills up, important emails can easily get lost among the clutter. Gmail’s built-in search filters can help you find the emails you need quickly and easily.
For example, I want to shift all the invoices I’ve received in the last 6 months to a new folder. Here’s how to go about it:
- Go to the Gmail search bar. Click on the filter icon.
- Type “invoice” OR “billing” in “Includes the words” field. I’ve chosen the range as 6 months and picked July 21st, 2023 by clicking the field next to the Calendar icon.
- Click on “Create filter”.
This means that I’ll get all emails related to billing and invoicing within 6 months prior to July 21st.

- Next check the options – “Skip the inbox”, “Apply the label:” and select the appropriate folder from the drop-down.
- In my case, I’m selecting the label named “Invoice”.
- Finally, check the “Also apply filter to matching conversations” option and click “Create Filter”.

Note: if you just want to filter emails by date without moving anything to a folder, just type before: your date in YYYY/MM/DD format and after:your date in YYYY/MM/DD format in the Gmail search bar. Use both to find emails between the before and after duration.
Gmail Filter 10: Automatically star emails and move to folder
Starring emails is a great way to prioritize your inbox and make sure that you don’t miss anything important. When you star an email, it will appear in your Starred mailbox, which is a separate folder that you can easily access. This makes it easy to find important emails quickly and easily, even if you have a lot of emails in your inbox.
For example, you could create a filter to automatically star all emails from your boss, or all emails that contain the word “urgent.”

To set up a filter to automatically star emails, follow these steps:
- Go to your Gmail search bar and select the filter icon.
- Add the sender’s email in the “From:” field.
- Click “Create filter”.
- In the filter action option, check “Star it” and “Apply the label: <your label>”.
- Click “Create filter”.
Gmail Filter 11: Apply filter to snooze emails
Snoozing emails is a great way to manage your inbox and make sure that you don’t forget about important emails. When you snooze an email, it will be automatically moved to your Snoozed mailbox, where it will stay until the date and time that you specify.
This means that you can defer dealing with an email until you have time to focus on it, without having to worry about forgetting about it.
Unfortunately, there’s no filter to snooze emails. Currently, you can only snooze one email at a time by hovering over the email on the list, and they will appear in the Snoozed folder.

Click on the Snooze button and select the relevant date and time.

But what you can do is apply filters to the snoozed emails. For example, I want to see all the emails that were snoozed before July 31st, 2023.

- Type the filter in:snoozed before:2023/7/31 in the search bar and press enter.

- Select all the emails and transfer them to the folder of your choice. In my case, I created a folder “Before July 31st” to store all Snoozed emails that appeared in the filter.
Editing or deleting filters
- To edit or delete a filter, click on the gear icon→settings→filters and blocked addresses tab.

This now shows you a list of all your existing Gmail filters. In addition to this, next to the filter, you see an option to either edit the filter or delete it.
- Clicking on ‘edit’ opens up a dropdown menu that allows you to refine your filter conditions.
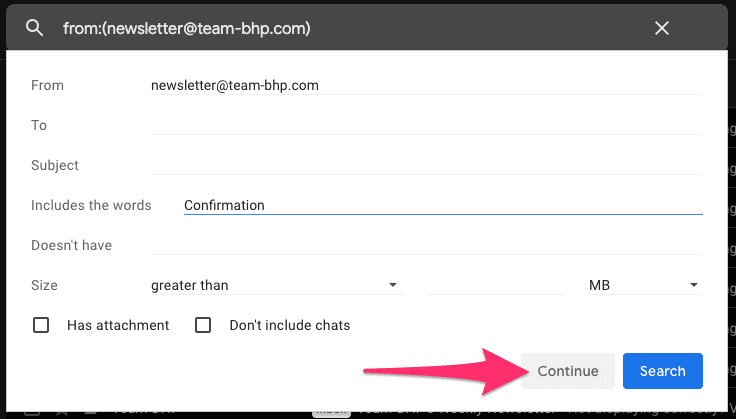
For instance, I’ve now modified the filter and added a condition to filter emails containing the keyword ‘Confirmation.’
- Clicking on ‘Continue’ takes you to the next dropdown which then allows you to modify the actions you want the filter to take.
For instance, in this case, the filter was used to add a label to an email. I’m now using it to also send emails that contain a particular keyword to the trash.
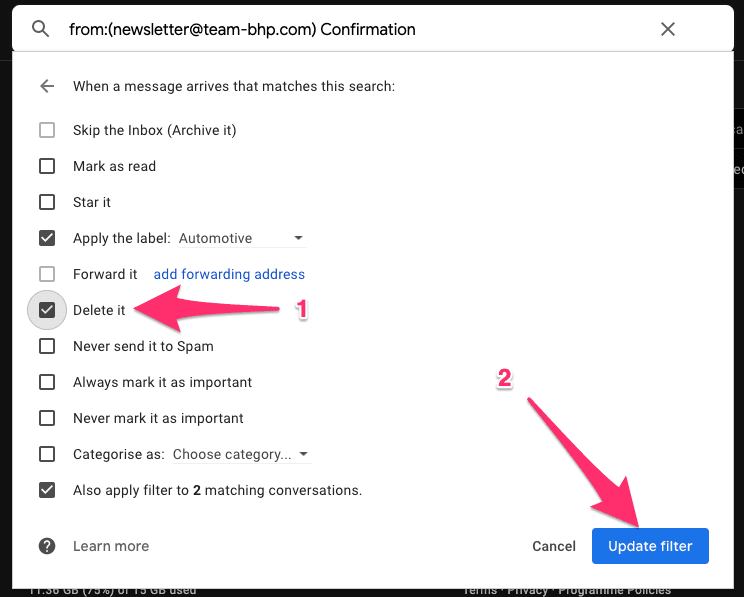
- Clicking on ‘Update filter’ edits the filter conditions.
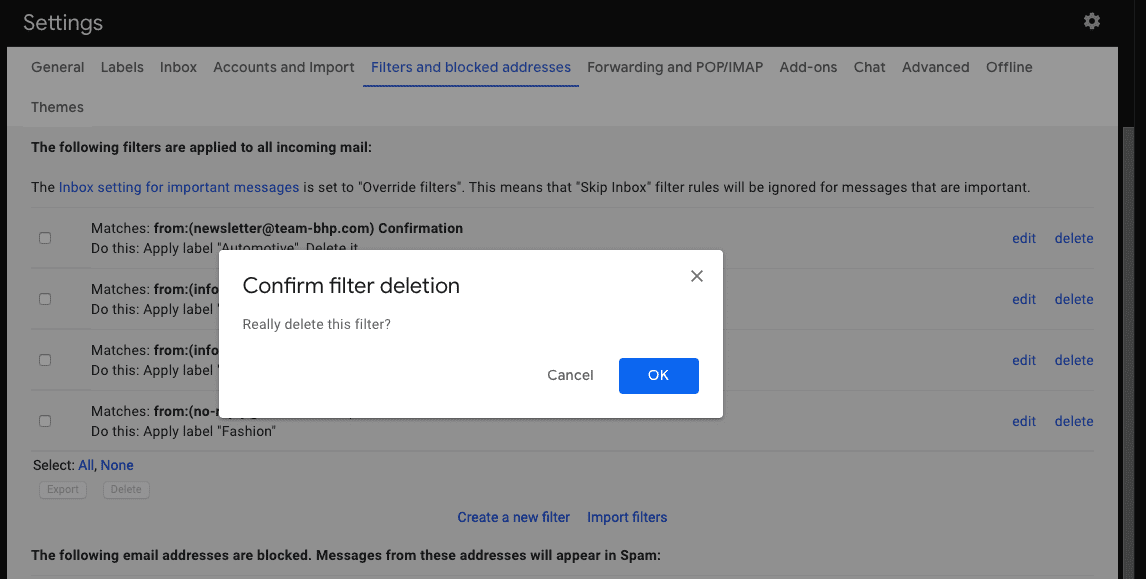
Deleting a filter is simple.
- Simply click on the ‘delete’ option next to the filter you wish to delete, confirm that you wish to delete the filter you have selected and you’re all done.
Pro-tip: Gmail allows you to take bulk actions on filters. Use the checkboxes on the left-hand side columns of the filters and choose one, many, or all of the filters.
Import/Export Gmail filters
By now, you’re probably an expert on creating and editing Gmail filters, and you’re now ready to take things to the next level.
If you’ve set up a number of email filters on one Gmail account and you want to use the same set of filters on another Gmail account, you can accomplish this by using the import/export filter options.
- To export a filter, let’s revisit some of the steps we’ve followed in the previous section — gear icon→settings→filters and blocked addresses.
- Now use the checkboxes to select filter(s) and click on the ‘export’ option.
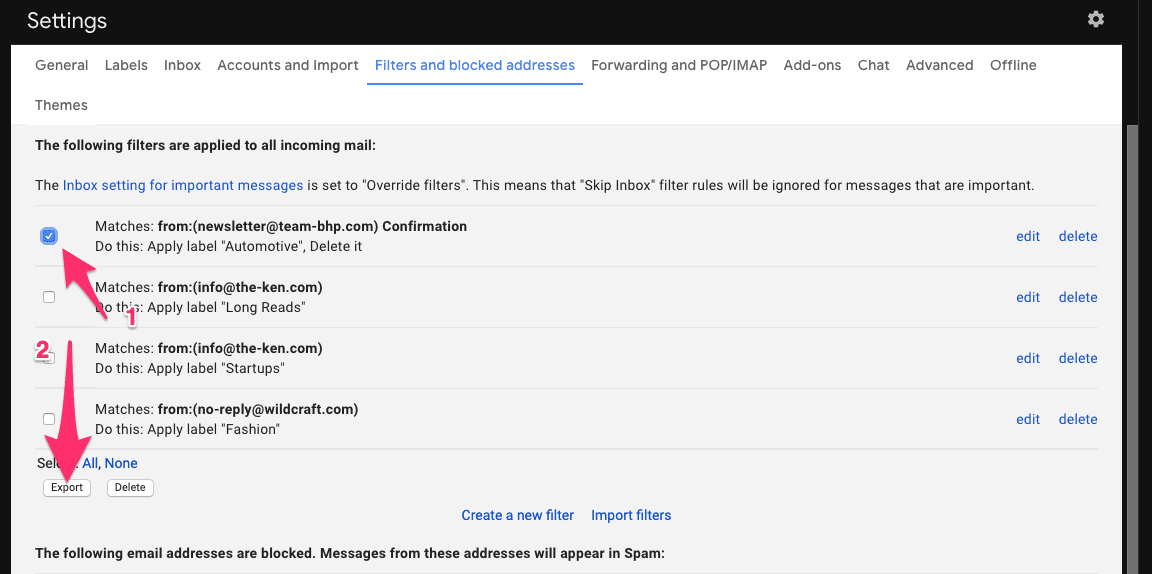
- Clicking on ‘export’ generates an XML file.
- This XML file can then be edited via a text editor or saved and imported into another Gmail account in order to replicate the filter setup.
- To import a filter, once again use the gear icon→settings→filters and blocked addresses path to get to the list of all your existing Gmail filters.
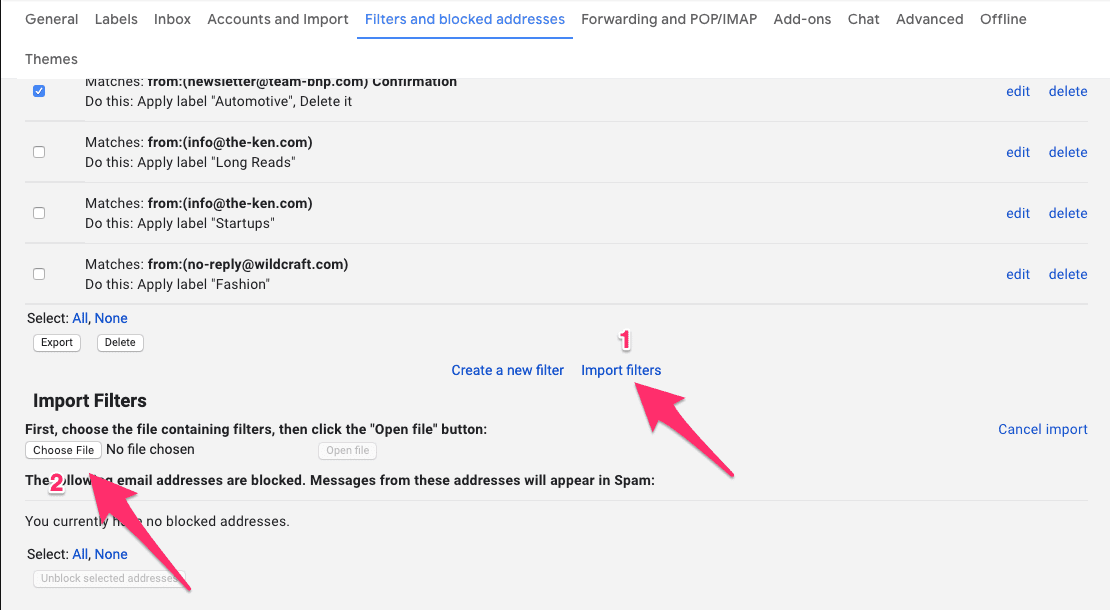
- Click on the ‘import filter’ option, then upload your XML file.
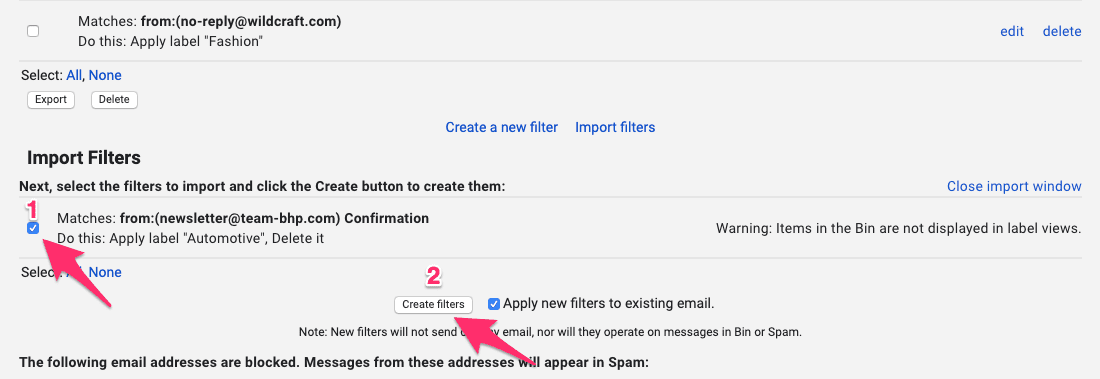
- Now click on the checkbox next to the imported filter and use the create filter option to start using the newly imported filters.
Congratulations! You’ve graduated from the Gmail filter school. Now on to some must-have Gmail filters to achieve inbox nirvana.
More ways to organize your inbox
Filters in Gmail have one primary goal: reducing inbox clutter and helping you focus on the emails that truly matter. This is great for your work inbox, but what if you’re also part of a shared inbox — say info@ or support@ — where you manage emails as a team?
In such cases, you’d need more than filters. You need a collaborative inbox that can help you gain visibility into all incoming emails, and also set automations for these emails to assign, tag and prioritize them.
And that’s Hiver. Over 10,000+ teams use Hiver because it works as an extension to their Gmail and helps manage multiple inboxes from Gmail’s familiar interface. There’s no need to switch between tabs.
Find the right plan and see Hiver tailored to your use case.