If you run support on Microsoft 365, a shared mailbox in Outlook is usually your first move. You create support@ or billing@, grant access, and expect the team to work from one inbox.
Most shared mailbox issues start during setup. Permissions get misconfigured, automapping fails, sent items land in the wrong folder, or the mailbox appears in OWA but not on the desktop. Mobile and Windows clients may also behave differently. These small configuration gaps quietly turn into daily operational friction.
Getting it right requires understanding how shared mailboxes actually behave across desktop, web, and mobile. In this guide, I’ll show you how to configure them correctly, clarify how permissions work in practice, and help you avoid the configuration mistakes that create issues later.
Table of Contents
- What is Outlook Shared Mailbox?
- How to Add a Shared Mailbox in Outlook (Desktop, Web, Mobile)
- Using a shared mailbox: sending, signatures, rules, and calendars
- Insights from Real Users on Outlook Shared Mailboxes
- Troubleshooting: Shared mailbox not showing, syncing, or sending
- Best Practices for Managing an Outlook Shared Mailbox
- Limitations of Outlook Shared Mailbox
- Hiver: An Alternative to Outlook Shared Mailbox
- Frequently Asked Questions (FAQs)
What is Outlook Shared Mailbox?
An Outlook shared mailbox is a Microsoft 365 email account that allows multiple licensed users to access and manage it together. It’s typically used for team addresses like support@, billing@, or info@.
It does not have its own username or password. Instead, admins grant users access via Microsoft 365 permissions. With a shared mailbox, your team can:
- Read incoming emails from one central address
- Reply using that shared address
- Keep all conversations in one place
- Access a shared calendar linked to that account
It centralizes team emails inside Outlook without creating separate logins for every function.
What are the different permission levels on Outlook Shared Mailbox?
Microsoft 365 uses three separate permission types for shared mailboxes: Full Access, Send As, and Send on Behalf. Each one serves a different purpose and must be assigned individually in the Exchange Admin Center. Here’s what each level allows.

Full Access
Full Access lets a user open and work inside the shared mailbox. They can read incoming emails, organize messages, create drafts, and manage folders or the shared calendar.
However, this permission does not allow sending emails from the shared address unless Send As or Send on Behalf is also granted. It also does not allow changes to mailbox policies like retention, archiving, or storage limits, which require Microsoft 365 admin permissions.
Send As
Send As allows a user to send emails that appear to come directly from the shared mailbox address, such as support@company.com. The recipient only sees the shared address in the From field, and replies return to the shared mailbox.
However, this permission does not provide access to open or manage the mailbox itself. Users must also have Full Access if they need to read or handle incoming emails, and permission updates may take time to reflect across devices.
Send on Behalf
Send on Behalf allows a user to send emails from the shared mailbox while showing their own name in the sender field, such as Jane Smith on behalf of support@company.com.
This is often used in assistant or administrative workflows where the sender’s identity should remain visible. However, it does not grant access to the mailbox itself unless Full Access is also assigned, and the sender’s identity will always appear to recipients.
Recommended reading
How to Create an Outlook Ticketing System: A Step-by-Step Guide
How to Add a Shared Mailbox in Outlook (Desktop, Web, Mobile)
The steps to add a shared mailbox depend on whether you are using Classic Outlook, New Outlook for Windows, macOS, or Outlook on the web. The interface and available configuration paths differ across versions.
Before adding the mailbox, confirm:
- The mailbox has already been created in Microsoft 365 or the Exchange Admin Center.
- The correct permissions have been assigned, typically Full Access, and Send As if required.
If permissions are missing, the mailbox will not appear, even if you try to add it manually.
How to Add a Shared Mailbox in Outlook on Windows and Mac
In most environments, shared mailboxes are automapped. Once Full Access is granted, the mailbox appears automatically in the left folder pane after Outlook is restarted.
If it does not appear, add it manually using the steps below.
Add a Shared Mailbox in Classic Outlook (Windows)
Classic Outlook exposes full account configuration controls, including advanced mailbox settings.
To manually add a shared mailbox:
- Open Outlook
- Click File
- Select Account Settings → Click Account Settings again
- Select your Microsoft 365 account → Click Change
- Click More Settings
- Open the Advanced tab
- Click Add
- Enter the shared mailbox email address
- Click OK, then restart Outlook
After the restart, the mailbox should appear in the left folder pane.
If it does not, verify permissions in Exchange Admin Center before troubleshooting further.
Add a Shared Mailbox in New Outlook for Windows
New Outlook removes several advanced configuration paths available in Classic Outlook. Most mailbox configurations must be handled in Microsoft 365 admin tools rather than inside the app.
If automapping is enabled and permissions are correct, the mailbox appears automatically under your primary account. To add it manually:
- Open New Outlook
- Click your profile icon in the top-right corner
- Select Add another mailbox
- Enter the shared mailbox email address
- Click Add
If the mailbox does not appear after adding it, verify that Full Access permission is assigned in Exchange Admin Center. Unlike Classic Outlook, New Outlook does not expose advanced account settings for troubleshooting inside the client, so most issues must be resolved on the admin side.
Add a Shared Mailbox in Outlook for Mac
Outlook for Mac uses a more simplified configuration model and relies heavily on cached account data.
If automapping does not work:
- Open Outlook
- Click Tools in the top menu
- Select Accounts
- Choose your Microsoft 365 account
- Click Delegation and Sharing
- Under “Open these additional mailboxes,” click +
- Enter the shared mailbox address
- Restart Outlook
If the mailbox does not sync immediately, restart the app or re-sync the account. Mac clients often require refresh cycles to reflect permission updates.
Classic Outlook vs New Outlook: What’s Different for Shared Mailboxes?
Classic Outlook and New Outlook do not offer the same shared mailbox configuration options. Classic Outlook exposes advanced account and mailbox settings. New Outlook limits most configuration to Microsoft 365 admin tools.

- Account configuration: Classic Outlook allows access to Advanced settings, profile controls, and manual mailbox additions. New Outlook limits these options.
- Troubleshooting visibility: Classic Outlook provides clearer insight into account and mailbox configuration. New Outlook relies more on server-side configuration.
- Rules and advanced controls: Some mailbox rules and settings are easier to manage in Classic Outlook.
- Admin dependency: In New Outlook, permission and mailbox configuration issues must typically be resolved in Exchange Admin Center rather than inside the desktop client.
Recommended reading
Add a Shared Mailbox in Outlook on the Web (OWA)
Outlook on the web reflects permission changes faster than desktop clients and is useful for validating access.
To add a shared mailbox:
- Go to outlook.office.com and sign in
- In the left folder pane, right-click Folders
- Select Add shared folder or mailbox
- Enter the shared mailbox email address
- Click Add
The mailbox will appear in the left navigation pane.
If the mailbox does not appear:
- Confirm Full Access permission in Exchange Admin Center.
- If permissions were recently assigned, allow time for propagation.
- If the mailbox appears in OWA but not in desktop Outlook, the issue is with the desktop client configuration or local cache.
Use OWA to confirm whether the problem is permission-related or client-side.
Add a Shared Mailbox in Outlook Mobile (iOS and Android)
The Outlook mobile app supports shared mailboxes but provides limited configuration control.
To add a shared mailbox:
- Open the Outlook app
- Tap your profile icon in the top-left corner
- Tap the + icon to add an account
- Select Add shared mailbox
- Enter the shared mailbox email address
- Tap Add
The shared mailbox will appear as a separate account in the app.
Mobile limitations to be aware of:
- Rules cannot be created or edited.
- Shared mailbox settings cannot be configured.
- Sent Items behavior depends on server-side configuration.
- Shared calendar permissions may not reflect immediately.
- Troubleshooting options are minimal compared to desktop.
Mobile access is suitable for reading and replying. Advanced configuration and troubleshooting should be handled on desktop or in Exchange Admin Center.
Recommended reading
Using a shared mailbox: sending, signatures, rules, and calendars
Once access is configured, daily usage is where most issues surface. The tasks below are the ones that typically create confusion in shared mailbox environments.
1. Setting the From Address
When working from a shared mailbox, sending from the wrong address is a common operational error. Send As permission allows you to send from the shared address, but it does not make it the default sending account.
Outlook chooses the sending account based on where you open the email. If you open and reply from the shared mailbox folder, the email is sent from the shared address. If you reply from your personal inbox or a unified view, Outlook sends it from your personal account.
To prevent this, make the From field visible and check it before sending. In Classic Outlook → Options → From. In New Outlook and OWA, use the From dropdown in the compose window to confirm the sender.
2. Ensuring Sent Items Stay in the Shared Mailbox
Another common issue in shared mailboxes is sent emails saving in the wrong place. Even when you send from the shared address, Outlook can store the message in your personal Sent Items folder. This happens because sent-item storage is controlled at the server level, not just by the sending permission.
To ensure sent emails are stored in the shared mailbox, enable the setting in Exchange Admin Center → Recipients → Shared mailboxes → Select the mailbox → Enable “Save copies of messages sent as this mailbox” and, if applicable, “Save copies of messages sent on behalf of this mailbox.”
After configuring this, send a test email and confirm it appears in the shared mailbox’s Sent Items folder. If it does not appear there, review the server-side settings before troubleshooting the client.
3. Ownership and Duplicate Replies
Outlook shared mailboxes do not include assignment tracking or collision detection. There is no built-in field showing who owns a conversation, and Outlook does not indicate when another user is drafting a reply.
Multiple agents can open and respond to the same email without warning. Teams typically use categories, subfolders, or external coordination to signal ownership. These methods provide visibility but do not prevent duplicate replies.
4. Signature Control
When sending from a shared mailbox, Outlook applies the user’s personal signature by default. It does not automatically switch to a signature tied to the shared address.
This means emails sent from support@ or billing@ can include an individual agent’s name, title, and contact details unless configured otherwise.
To control this, create a separate signature for the shared address and select it when composing messages. In Classic Outlook → File → Options → Mail → Signatures. In New Outlook and OWA → Settings → Mail → Compose and reply.
For consistent branding across users, configure centralized signature rules in Microsoft 365 based on the sender address. Without this, signature consistency depends on manual selection.
5. Rules and Automatic Replies
In an Outlook shared mailbox, rules created in Outlook desktop can be either client-side or server-side. Client-side rules run only when Outlook is open on the machine where the rule was created. If that instance of Outlook is closed, the rule does not execute.
To avoid this dependency, create rules directly in the shared mailbox using Outlook on the web → Settings → Mail → Rules. Rules created there are server-side and continue running even when no user is logged into Outlook.
Automatic replies must be set on the shared mailbox, not on your personal account. To do this, open the shared mailbox in Outlook on the web → Settings → Mail → Automatic replies and configure the message there. If you turn on automatic replies in your personal mailbox, it will not send responses from the shared address.
6. Search Behavior
Search in Outlook does not automatically include shared mailboxes. By default, search runs against the mailbox that is currently selected. If you search while your personal inbox is selected, results will not include emails from the shared mailbox.
To search inside a shared mailbox, first click into that mailbox in the folder pane. Then use the search bar and confirm the scope shows Current mailbox. In New Outlook and Outlook on the web, the scope appears directly below the search bar and can be adjusted from the dropdown.
Most “missing email” issues in shared mailboxes are caused by incorrect search scope rather than deletion or sync errors.
7. Shared Calendar Behavior
A shared mailbox includes its own calendar. Anyone with Full Access can add, edit, or delete events in that calendar. Meeting invites sent to the shared address land in the shared inbox. When you accept the invite from there, the event is added to the shared mailbox calendar.
Problems usually happen when responses are sent from the wrong account. If a meeting response goes out from a personal address instead of the shared one, it means Send As permission is not assigned or the From field was not selected correctly.
Outlook shared mailbox calendars also do not include approval workflows or booking controls. Anyone with Full Access can change or delete events, and Outlook does not require approval before those changes are made.
8. Mailbox Size Limits
Shared mailboxes are limited to 50 GB unless a Microsoft 365 license is assigned. When the mailbox reaches this limit, new emails stop delivering and senders may receive a mailbox full error. Users can still open the mailbox in Outlook, but incoming messages will be rejected until storage is increased.
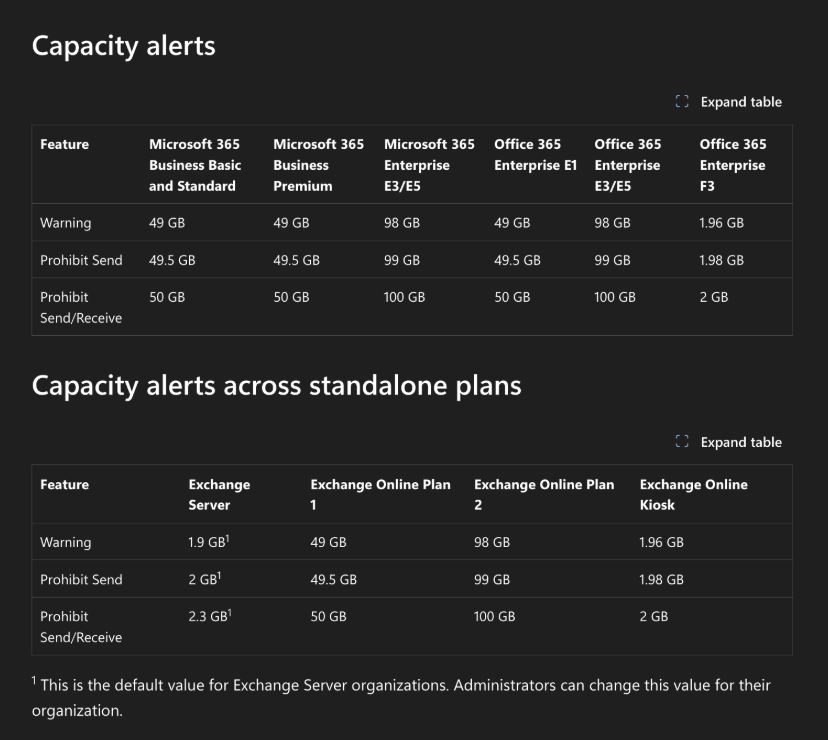
Monitor usage in Microsoft 365 Admin Center → Teams & groups → Shared mailboxes → Mailbox usage. If the mailbox is nearing capacity, assign a license to expand storage or enable archiving before delivery failures occur.
Recommended reading
What to Do When Outlook Won’t Send Emails: Troubleshooting Guide
Insights from Real Users on Outlook Shared Mailboxes
Shared mailboxes are often adopted to centralize team email without implementing a full help desk system. As usage grows, recurring limitations surface in user forums and community discussions.
Below are common issues surfaced in user discussions, along with what causes them and how to address them.
1. Sending Permissions Confusion
“Outlook has auto-populated all the shared mailboxes I have access to under Shared With Me. I’m not seeing a way to add one of these Shared Mailboxes as an option to send from, let alone make it the default to send from.”
This happens because access and sending rights are separate permissions. Full Access allows you to read and manage emails. It does not allow you to send from the shared address.
If emails are going out from personal accounts, confirm that Send As (or Send on Behalf) has been assigned in Exchange Admin Center → Recipients → Shared mailboxes → Select mailbox → Mailbox delegation.
After assigning the permission, restart Outlook and verify that the shared address appears in the From dropdown when composing a message.
2. Lack of Assignment and Ownership Tracking
“I am looking for a solution within shared mailboxes. Outside of simple communication between end users utilizing shared mailboxes, is there any way to ‘assign’ emails that come into a shared mailbox to one of the delegates?”
Outlook shared mailboxes do not include native assignment. There is no ownership field, no status indicator, and no mechanism that prevents two people from working on the same email.
If you need basic delegation, you can use categories or move emails into user-specific folders to signal ownership. These methods provide visibility but do not prevent overlap. If you require structured assignment, workload tracking, or status control, you need to add a workflow layer on top of Outlook.
3. Workflow Breakdown at Scale
“I am having trouble understanding the purpose of a shared mailboxin office 365. We are using them throughout our organization, but they never really work as we hope they would.”
This usually happens when an Outlook shared mailbox is expected to behave like a helpdesk and manage workflows. It centralizes email, but it does not track ownership, prevent duplicate replies, or measure response time.
As more people gain access, emails sit unclaimed or get answered twice. To reduce this, establish a clear process. For example, assign ownership by category, move emails into agent-specific folders after claiming them, and set internal response time targets outside Outlook.
4. Migration Challenges in Microsoft 365
“I have been receiving quite a number of queries regarding migration into M365. It is different – you will need to license individual users and then have a free shared mailbox license. The problem we are having would be replicating the workflow that has been established with the old mail system.”
In Microsoft 365, access is permission-based and tied to individual accounts. To replace a shared login model, assign Full Access and Send As permissions to the appropriate users → Exchange Admin Center → Recipients → Shared mailboxes → Mailbox delegation.
If your previous workflow depended on one shared login, you’ll need to redefine how the mailbox operates. Decide how ownership is assigned. Define how replies are coordinated. Review how rules are created and maintained. In Microsoft 365, identity and access are separate. Changing permissions alone won’t recreate your old workflow. You’ll need to update your process as well.
Recommended reading
Troubleshooting: Shared mailbox not showing, syncing, or sending
When a shared mailbox fails, it typically shows up in one of three ways: it doesn’t appear in Outlook, it doesn’t sync correctly, or you can’t send from it. Identify which of these is happening before making changes.
Here are some common problems with Outlook shared mailboxes and the quickest ways to fix them.
1. Shared Mailbox Not Showing in Outlook
If a shared mailbox doesn’t show up, it usually comes down to permissions or automapping. Either Full Access isn’t assigned, the permission hasn’t propagated yet, or Outlook didn’t automatically add the mailbox to your profile.
How to fix it:
Start by verifying access → Exchange Admin Center → Recipients → Shared mailboxes → Mailbox delegation → confirm Full Access is assigned.
If Full Access was just added, restart Outlook and try again after propagation.
If permissions are correct but the mailbox still doesn’t appear, add it manually:
- Classic Outlook → File → Account Settings → Change → More Settings → Advanced → Add
- New Outlook → Profile icon → Add another mailbox
Quick validation: open Outlook on the web. If the mailbox appears there but not in desktop Outlook, the issue is with the desktop client profile or cache, not permissions.
2. Shared Mailbox Not Syncing
If emails or folders look outdated, the issue is usually local to the Outlook client. The mailbox may be syncing correctly on the server but not refreshing in your desktop app.
How to fix it:
First, validate in the browser → log in to outlook.office.com and check whether the mailbox reflects the latest emails there. If it does, the issue is with the desktop client.
In Classic Outlook, confirm sync settings → File → Account Settings → Change → More Settings → Advanced → Ensure “Download shared folders” is enabled.
If syncing still fails:
- Restart Outlook
- Remove and re-add the shared mailbox
- Recreate the Outlook profile if folder inconsistencies persist
If the mailbox works correctly in Outlook on the web, focus troubleshooting on the desktop client rather than permissions.
3. Unable to Send from the Shared Mailbox
If the shared address does not appear in the From dropdown, or emails are being sent from your personal account, the required sending permission is missing. Full Access alone does not allow sending.
How to fix it:
Verify sending rights → Exchange Admin Center → Recipients → Shared mailboxes → Mailbox delegation → Confirm “Send As” or “Send on Behalf” is assigned.
After assigning permission:
- Restart Outlook
- Open a new email
- Check that the shared address appears in the From dropdown
If the permission was recently added, allow time for propagation before retesting.
4. Sent Items Saving in the Wrong Folder
When you send from a shared mailbox, Outlook may save the message in your personal Sent Items folder. Sending rights and sent-item storage are controlled separately.
How to fix it:
Enable server-side storage → Exchange Admin Center → Recipients → Shared mailboxes → Select mailbox → Enable:
- “Save copies of messages sent as this mailbox”
- “Save copies of messages sent on behalf of this mailbox”
After enabling these settings, send a test email and confirm it appears in the shared mailbox’s Sent Items folder. If it does not, restart Outlook and test again.
5. New Outlook UI Differences
After switching to New Outlook, the Advanced account settings panel is no longer available in the desktop app.
You cannot manually add a shared mailbox through the Advanced tab or perform profile-level mailbox fixes from the client. Those controls are not exposed in the New Outlook interface.
Configuration changes must be made in the Exchange Admin Center or by temporarily using Classic Outlook.
How to handle it:
- If a configuration option is not visible in New Outlook, check it in the admin center → Exchange Admin Center → Recipients → Shared mailboxes
- For manual mailbox control, Classic Outlook still exposes deeper configuration paths → File → Account Settings → Change → More Settings → Advanced
If troubleshooting becomes limited in New Outlook, switch back to Classic Outlook temporarily to complete the configuration.
Recommended reading
Distribution Groups vs. Shared Mailboxes in Outlook: When To Use What
Best Practices for Managing an Outlook Shared Mailbox
Shared mailboxes break down when multiple people use them without clear rules. Duplicate replies, missed emails, and unclear ownership are the usual results.
Here are some best practices to help you stay organized, reduce confusion, and improve response times.
- Use categories or flags to track ownership: When someone starts working on an email, they should tag it using a category such as their name or “In Progress,” or flag it for follow-up. This makes ownership visible and reduces duplicate replies.
- Set up rules or Quick Steps to triage emails faster: Use Outlook rules to automatically sort incoming emails based on sender, subject line, or keywords. Use Quick Steps to apply categories or forward emails in one click. This reduces manual sorting and speeds up triage.
- Regularly audit access permissions: Review shared mailbox permissions when roles change and as part of your quarterly access review. Remove users who no longer need access and confirm that only authorized members can send from the mailbox.
- Agree on internal response guidelines: Define expected response times, escalation criteria, and when templates should be used. Outlook does not enforce response standards, so the team must follow agreed guidelines.
- Don’t let the mailbox go unmanaged: Assign someone to monitor aging emails, storage usage, and unresolved threads. Outlook shared mailboxes do not automatically highlight neglected conversations.
- Use the shared calendar for team scheduling: Use the shared calendar to coordinate coverage, track deadlines, or plan for high-volume periods. Anyone with Full Access can update calendar events.
- Train your team on shared mailbox etiquette: Require checking the full thread before replying, avoid deleting emails unless necessary, and maintain clear subject lines. These habits reduce confusion and prevent miscommunication.
Recommended reading
Distribution List vs. Shared Mailbox: What Are the Differences?
Limitations of Outlook Shared Mailbox
While shared mailboxes work well for centralized email, there are structural limits to be aware of, especially at scale.
- No direct login without conversion: Shared mailboxes do not have their own username or password by default. Direct login requires converting the mailbox into a licensed user mailbox.
- Limited mobile functionality: Outlook mobile supports shared mailboxes, but management controls are limited compared to desktop and web. Advanced configuration and troubleshooting must be handled in the admin center or desktop client.
- No built-in reporting or analytics: There is no native way to track response times, SLA compliance, or agent activity. Analytics require a third-party help desk platform or custom reporting through Microsoft Graph.
- Storage capped at 50 GB (unlicensed): Unlicensed shared mailboxes are limited to 50 GB. To exceed this or enable archiving, an Exchange Online Plan 2 (or equivalent enterprise license) must be assigned.
- No native workflow controls: Outlook shared mailboxes lack workflow automations. That includes tagging, assignment tracking, collision detection, internal notes, and SLA management. These capabilities are standard in dedicated help desk platforms.
- Risk of missed or duplicate replies: Because there is no built-in ownership tracking or reply locking, teams must rely on manual processes to prevent overlap.
- Limited granular permission control: Permissions are limited to Full Access, Send As, and Send on Behalf. Role-based segmentation (e.g., read-only without reply rights) is not natively configurable through the standard UI.
Hiver: An Alternative to Outlook Shared Mailbox
Outlook shared mailboxes centralize email but lack workflow controls. There’s no native assignment, SLA tracking, reporting, or collision prevention.
Hiver Omni turns your Outlook shared mailbox into an AI-powered help desk. It mirrors the Outlook UI, so agents work in a familiar interface with a structured workflow built in.
Conversations are assigned to owners. SLAs are tracked. Duplicate replies are prevented. Performance and workload are visible through built-in analytics and audit logs. Automation manages routing without relying on layered Exchange rules.
Hiver Omni is a great fit if:
- You need SLA tracking as volume increases
- You want clear ownership and collision detection
- You require reporting and audit visibility
- You manage support across multiple channels
Hiver adds operational structure to Outlook without changing how your team works. Try it for free.
Frequently Asked Questions (FAQs)
1. Can I set automatic replies for an Outlook shared mailbox?
Yes. Open the shared mailbox in Outlook on the web → Settings → Mail → Automatic replies. Configure internal and external responses there. Auto-replies set on a personal account do not apply to the shared mailbox.
2. Will users get notified when new emails arrive in an Outlook shared mailbox?
Not automatically. Outlook doesn’t send desktop or mobile notifications for shared mailboxes unless users add the shared mailbox to their Outlook profile and manually enable notifications. This is why teams often miss time-sensitive emails.
3. Can I use rules to organize emails in an Outlook shared inbox?
Yes. Rules can be created, but they must be set inside the shared mailbox itself, not from a member’s personal inbox. Use Outlook on the web or desktop → open the shared mailbox → go to Settings > Mail > Rules to create and manage them.
4. What happens to an Outlook shared mailbox if all members are removed?
The mailbox and all its data stay intact. However, no one can access it until a new member is assigned. It’s best to keep at least one admin or owner mapped to avoid access issues.
5. Can I convert an Outlook shared mailbox into a regular mailbox?
Yes. Admins can convert a shared mailbox to a regular mailbox in the Microsoft 365 Admin Center. After the conversion, the mailbox will require its own license.
6. Why can’t I see sent emails from an Outlook shared mailbox?
By default, Outlook stores sent messages in the user’s personal Sent Items folder. Check that “Copy items sent as this mailbox” is enabled in the shared mailbox’s settings so all shared replies stay in one place.
7. Can two people work on the same email in an Outlook shared inbox?
Not natively. Outlook doesn’t show real-time ownership (like “assigned to,” “in progress,” or “waiting”). This often leads to duplicate replies unless teams use a help desk tool built on top of Outlook.
8. Who can access a shared Outlook mailbox?
Only users who are granted permissions in Exchange Admin Center. Access requires Full Access permission and a licensed Microsoft 365 account.
9. Why is my shared mailbox not showing or not syncing in Outlook?
This usually happens due to missing Full Access permissions, delayed propagation, or client-side sync issues. Verify permissions first in Exchange Admin Center, then check the desktop client.
10. Do shared mailboxes require a Microsoft 365 license?
No. Shared mailboxes up to 50 GB do not require a separate license. A license is required if you need archiving or storage beyond 50 GB.
11. How large can a shared mailbox be before performance issues occur?
Shared mailboxes are capped at 50 GB without a license. Performance issues are more likely caused by large folder counts, heavy rule usage, or local Outlook profile size rather than raw mailbox size alone.
12. Are shared mailboxes automatically added to Outlook?
Yes, if automapping is enabled and Full Access is assigned. If automapping fails, the mailbox must be added manually.